It looks like you're using an Ad Blocker.
Please white-list or disable AboveTopSecret.com in your ad-blocking tool.
Thank you.
Some features of ATS will be disabled while you continue to use an ad-blocker.

The Collaborative Gimp tutorial for ATS members. [updated]
page: 5share:
reply to post by Druid42
I can get started on a few "special FX" for text tutorials for you. Some of them are long and drawn out without the plug in. If you have the plug in it is as easy as clicking a single button lol. As for the text along a path. That is actually not as easy as it should be but I will work on a tutorial for you for sure. The main problem is that if you draw your path wrong and apply your text it may not sit right and it is a back and forth trial and error scenario, but I will try to make it as easy as I can.
I can get started on a few "special FX" for text tutorials for you. Some of them are long and drawn out without the plug in. If you have the plug in it is as easy as clicking a single button lol. As for the text along a path. That is actually not as easy as it should be but I will work on a tutorial for you for sure. The main problem is that if you draw your path wrong and apply your text it may not sit right and it is a back and forth trial and error scenario, but I will try to make it as easy as I can.
reply to post by Agarta
What's the name of the plug-in? Can't I just download it for the version I am running (2.6), or is it specific to the newest version?
Anyway, the tutorial(s) will be beneficial to both me and the rest of ATS who are reading. Thanks.
What's the name of the plug-in? Can't I just download it for the version I am running (2.6), or is it specific to the newest version?
Anyway, the tutorial(s) will be beneficial to both me and the rest of ATS who are reading. Thanks.
reply to post by Druid42
Just look up gimp text plug ins and you should get a good list. It will be either script-fu or python-fu. I like script-fu a lot more and python-fu tends to not work on my version, just a heads up. You can get a glass text, fire text, 3D text, etc etc etc plug ins just do a quick search.
Just look up gimp text plug ins and you should get a good list. It will be either script-fu or python-fu. I like script-fu a lot more and python-fu tends to not work on my version, just a heads up. You can get a glass text, fire text, 3D text, etc etc etc plug ins just do a quick search.
reply to post by Agarta
Uhm, might as well post the tech details for installing them as well. People may be clueless for installing plug-ins, so that'd be a major help!
I know it's easy, *cough cough*, but a simple "do this" would take the mystery out of it.
Thanks.
Uhm, might as well post the tech details for installing them as well. People may be clueless for installing plug-ins, so that'd be a major help!
I know it's easy, *cough cough*, but a simple "do this" would take the mystery out of it.
Thanks.
reply to post by Druid42
No problem I can do that. Also I did that "quick" search I mentioned and it is not quite so easy lol. The results are all over the place. I found most of mine on deviant art. You can use their search to look up gimp plug ins and gimp scripts and go through them. I am making dinner for the younglings but when I am done I will look it up and post a link in here to save the trouble for others and a tutorial on installing them.
No problem I can do that. Also I did that "quick" search I mentioned and it is not quite so easy lol. The results are all over the place. I found most of mine on deviant art. You can use their search to look up gimp plug ins and gimp scripts and go through them. I am making dinner for the younglings but when I am done I will look it up and post a link in here to save the trouble for others and a tutorial on installing them.
reply to post by Agarta
I also was searching google for plugins, and was overwhelmed by the choices. They have "packs" of plugins to download, but which packs do I want? Script-fu? Python-fu?
Clarification on what each is would be appreciated.
I am approaching this from a perspective of a person able to follow directions, and relying on your ability to make a tutorial that explains how the "plugin" things work. Run me through a single site that offers a plugin, how to install it, (text manipulation related, of course), and how to use the plugin to achieve that goal.
edit on 1/7/13 by Druid42 because: added a paragraph.
reply to post by Druid42
In my opinion script-fu is the best. With script-fu you just download and move to the right folder. With python-fu you have to install it into your gimp program the open it for every file you put in and what you are putting in is the entire text program( the entire program is written out and you have to copy and paste each one individually) and then it may not be read right depending on your Gimp version and OS. It also slows down the load time for Gimp. Script-fu can be done multiple files at a time, is read by all systems and versions, and doesn't slow the load time nearly as much.
In my opinion script-fu is the best. With script-fu you just download and move to the right folder. With python-fu you have to install it into your gimp program the open it for every file you put in and what you are putting in is the entire text program( the entire program is written out and you have to copy and paste each one individually) and then it may not be read right depending on your Gimp version and OS. It also slows down the load time for Gimp. Script-fu can be done multiple files at a time, is read by all systems and versions, and doesn't slow the load time nearly as much.
edit on 7-1-2013 by Agarta because: (no reason given)
reply to post by Agarta
Valuable insight, stick to Script-fu. Got it.
Now, which Script-fu do I want to do those text effects I was wondering about? Here's where it gets a bit foggy for the rest of us.
Valuable insight, stick to Script-fu. Got it.
Now, which Script-fu do I want to do those text effects I was wondering about? Here's where it gets a bit foggy for the rest of us.
reply to post by Druid42
For this tutorial I am going to take the script I need from here gimpscripts.com... The text script I am going to work with is called "Glass Effect Text" (it is currently the 5th choice on the list). You can download the zip file by clicking its name. Choose "save file". When it is finished downloading double click it and your unzipping program will open. Unzip the file and you will have a file named "glass-text.scm" and a read me file. You don't need the read me file. ALL .scm files go into the "script" folder. ALL .scm files go into the "script" folder. (sorry I had to repeat that. Nothing else goes in that file I just had to be clear).
Click your start button and go to your main drive(in my case it is the "C" drive) and click program files, then "Gimp 2", next "Share", then "gimp", then "2.0", and finally "scripts". Once it is opened bring up your extracted file page and you can either, drag and drop it into the "scripts" file, or copy and paste it in. Either way you will be asked permission as an administrator of the computer or that an admin must accept. Once it is in you are done and can now open your Gimp program.
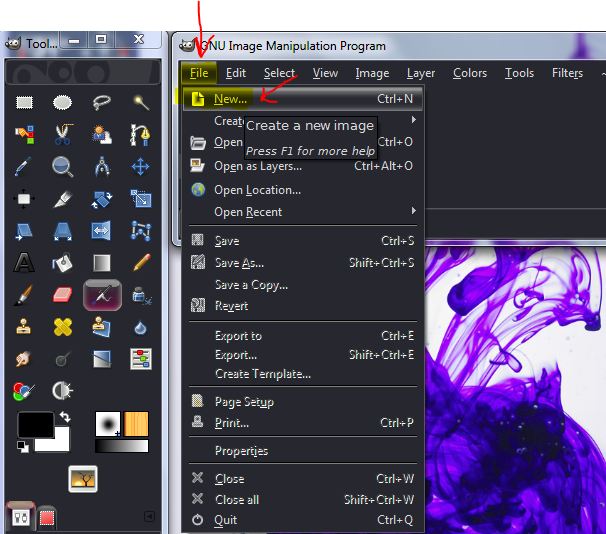
For the purposes of this tutorial I am going to make it as basic and simple as possible. Once your Gimp program is open, click file and then new.
I am going to set the size of the new image to 400X400 and set to the foreground which is by default black.
If you choose to use a different color feel free.Simply click the foreground color and a color picker will pop up and you can select your color.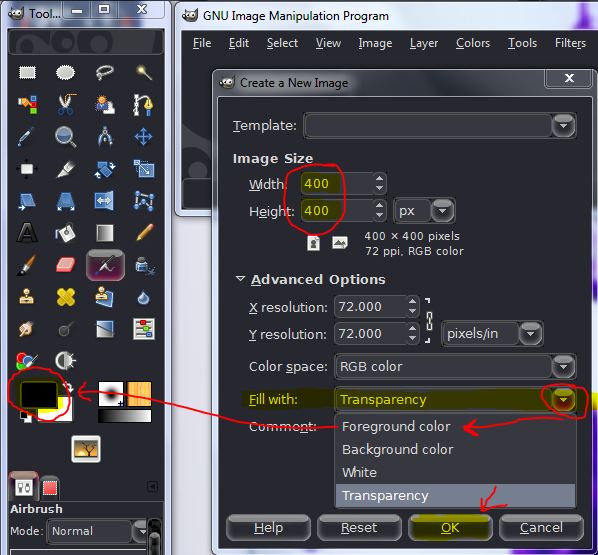
A new script-fu tab will appear in the top row. Select it then find "Create New" and hover to open the next panel and select "GlassEffect Text".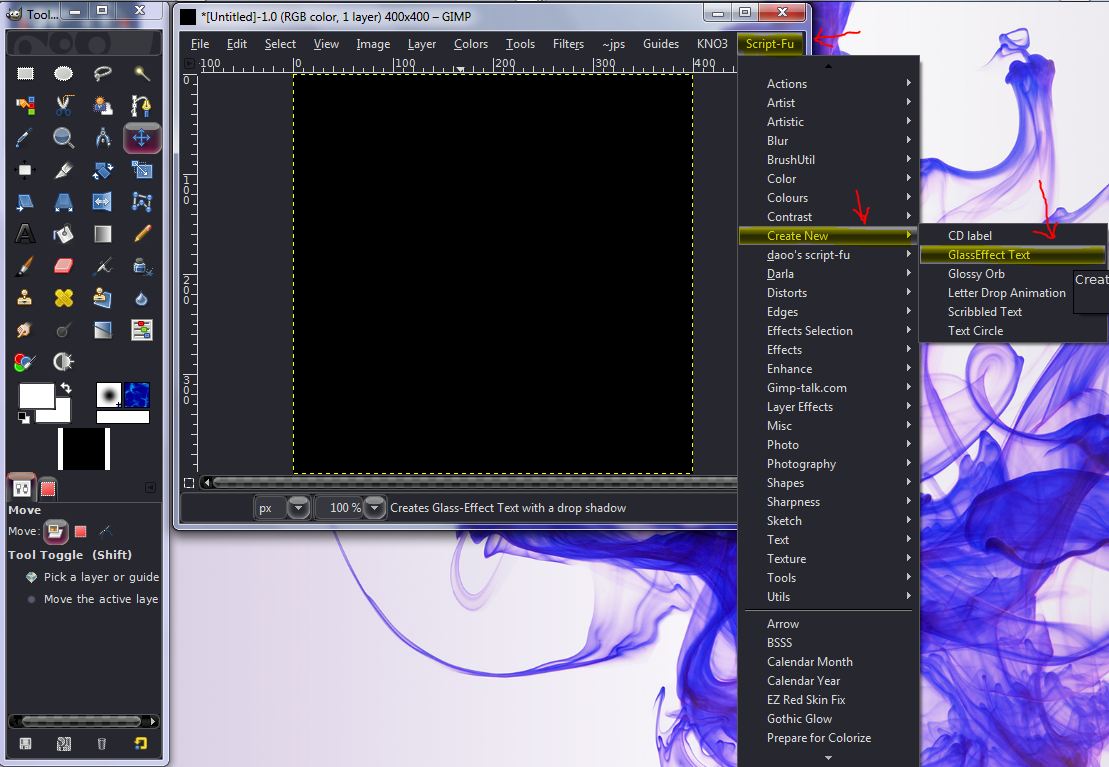
A new box will open with several settings. Set them as you like but remember at the bottom is a click box that says "Include Background" toggle that off.If you have made a new image as this tutorial shows set the text size high. I have it set at 160.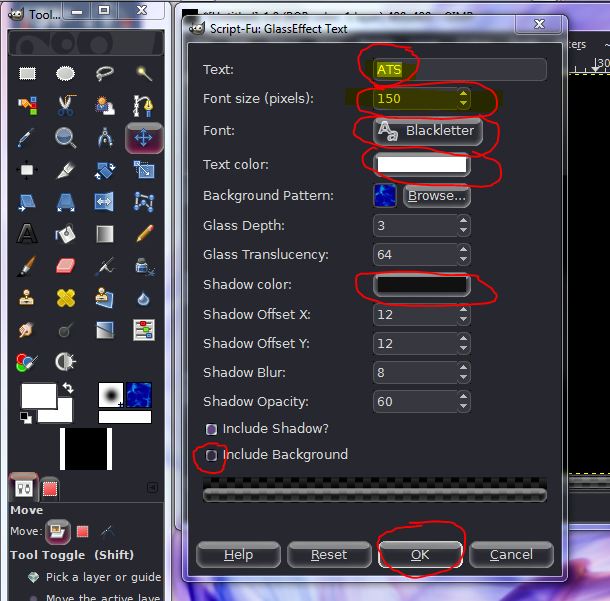
Once you click okay a new image is formed with a transparent background. on the right side bar you will see 2 layers listed one for the letters and one for the drop shadow. Right click on the top one and select merge down. Right click on the image(be sure to click on the color not the transparency), hover over edit, slide down to copy visible and select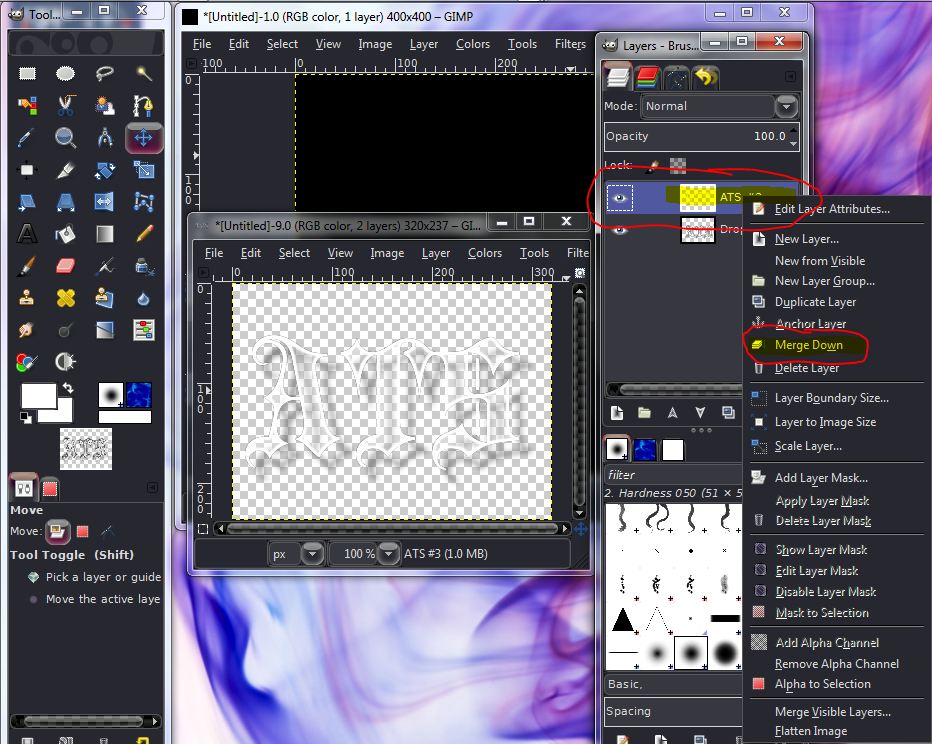
Right click on the new background you made, hover over "edit', scroll down to "paste as" and select "New Layer" and your glass text will be set on it in the upper left corner.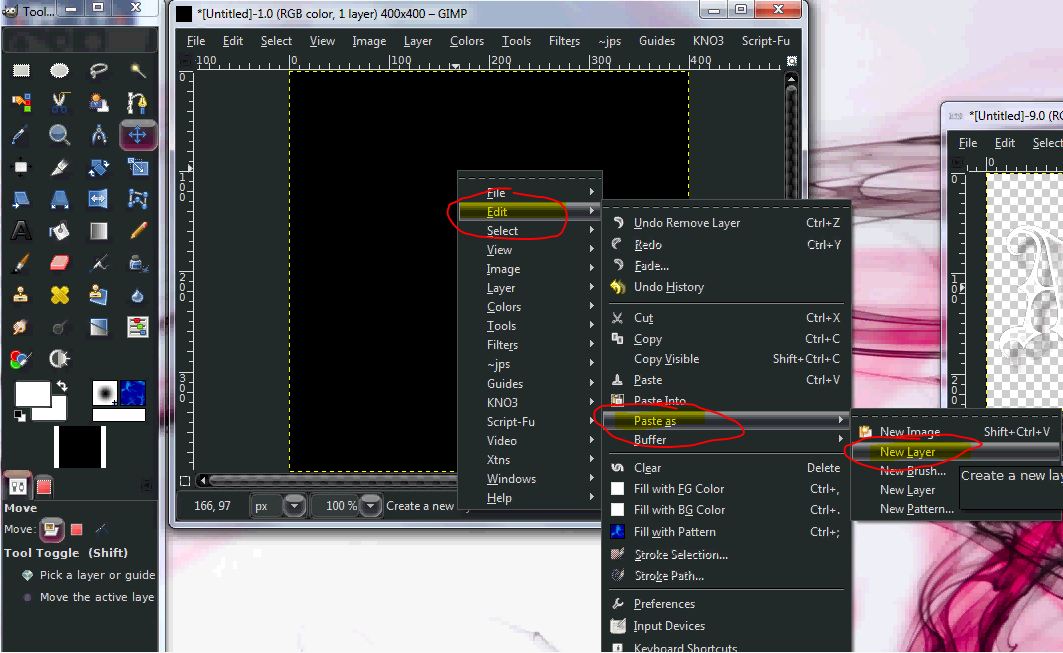
Simply use your move tool and center it. All done.

Not all the text scripts are like this but you will find that the 3D, fire, and many others are. I will attempt to find one that is not this way and do a tutorial on how to do it that way.
Enjoy
Edit to add: Here is another version with white Background, green letters and shadow and a different font.

multicolored layers

For this tutorial I am going to take the script I need from here gimpscripts.com... The text script I am going to work with is called "Glass Effect Text" (it is currently the 5th choice on the list). You can download the zip file by clicking its name. Choose "save file". When it is finished downloading double click it and your unzipping program will open. Unzip the file and you will have a file named "glass-text.scm" and a read me file. You don't need the read me file. ALL .scm files go into the "script" folder. ALL .scm files go into the "script" folder. (sorry I had to repeat that. Nothing else goes in that file I just had to be clear).
Click your start button and go to your main drive(in my case it is the "C" drive) and click program files, then "Gimp 2", next "Share", then "gimp", then "2.0", and finally "scripts". Once it is opened bring up your extracted file page and you can either, drag and drop it into the "scripts" file, or copy and paste it in. Either way you will be asked permission as an administrator of the computer or that an admin must accept. Once it is in you are done and can now open your Gimp program.
For the purposes of this tutorial I am going to make it as basic and simple as possible. Once your Gimp program is open, click file and then new.
I am going to set the size of the new image to 400X400 and set to the foreground which is by default black.
If you choose to use a different color feel free.Simply click the foreground color and a color picker will pop up and you can select your color.
A new script-fu tab will appear in the top row. Select it then find "Create New" and hover to open the next panel and select "GlassEffect Text".
A new box will open with several settings. Set them as you like but remember at the bottom is a click box that says "Include Background" toggle that off.If you have made a new image as this tutorial shows set the text size high. I have it set at 160.
Once you click okay a new image is formed with a transparent background. on the right side bar you will see 2 layers listed one for the letters and one for the drop shadow. Right click on the top one and select merge down. Right click on the image(be sure to click on the color not the transparency), hover over edit, slide down to copy visible and select
Right click on the new background you made, hover over "edit', scroll down to "paste as" and select "New Layer" and your glass text will be set on it in the upper left corner.
Simply use your move tool and center it. All done.
Not all the text scripts are like this but you will find that the 3D, fire, and many others are. I will attempt to find one that is not this way and do a tutorial on how to do it that way.
Enjoy
Edit to add: Here is another version with white Background, green letters and shadow and a different font.
multicolored layers
edit on 8-1-2013 by Agarta because: (no reason given)
reply to post by Agarta
Thanks! One more "gimpstery" solved for me. I'll try tinkering with this after work today.
Thanks! One more "gimpstery" solved for me. I'll try tinkering with this after work today.
[atsimg]http://files.abovetopsecret.com/files/img/pq50ec7d20.jpg[/atsimg]
Placing text along a path is fairly easy but it can be one of the most frustrating processes on Gimp. I will begin with showing how to do it and it turns out wrong then I will describe the fixes and then complete the process.
I am putting this on a new image for the tutorial but you can obviously put it on an image of your choice but if you do I suggest you add a new layer to your image. It is not required, but it does make things a little easier especially if you need to move it around a little.
Once you have your image ready, select the "Path" tool and draw your path. Each dot you see in the image below is a click of the mouse. You do not actually "Draw it out", but set points for the path to follow.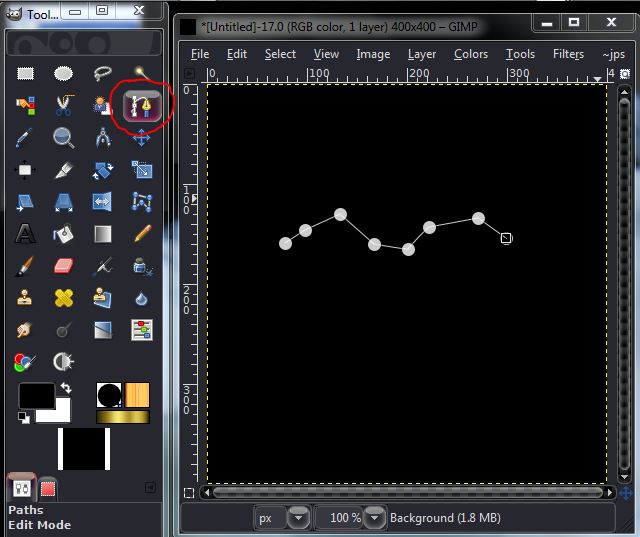
When your path is done click on the "Add Text" tool. Your path will disappear(don't worry it is still there). Add your text as you choose it to be, but make sure it is nowhere near your path(text and font, the color does not matter as long as it is visible to you for adjustments). (also, if you are not using Gimp 2.8 your text area will not look like this but it will still be the same process) Once you have your text ready, right click on the text area and select "Text along Path".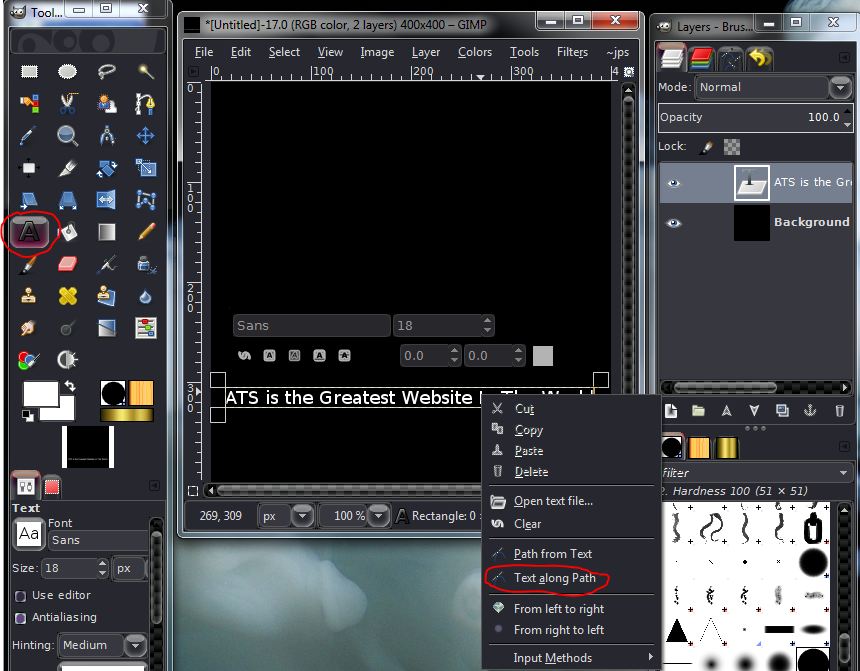
A red outlined version of your text will then appear along your path. This is where it can get frustrating. As you can see in the image below the text did not fit and was distorted.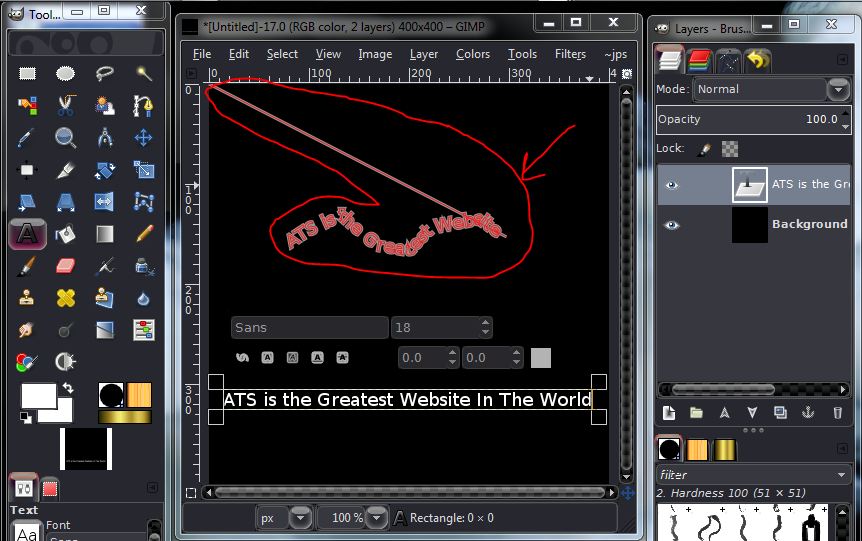 The fix to this can be done in a few ways. Start by undoing the last action then
adjust
The fix to this can be done in a few ways. Start by undoing the last action then
adjust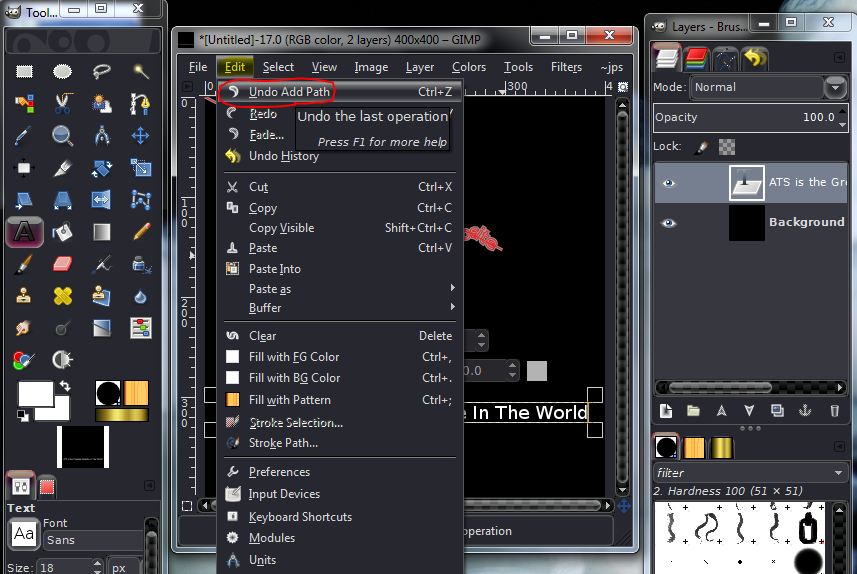 First, you can adjust the text size, but sometimes if you have a long set of text the letters will be too small to be
read. Second, you can back up and redraw your path to be larger/longer. Third, a compromise between the first and second option. Either way it can be
a back and forth process.
First, you can adjust the text size, but sometimes if you have a long set of text the letters will be too small to be
read. Second, you can back up and redraw your path to be larger/longer. Third, a compromise between the first and second option. Either way it can be
a back and forth process.
Once you have what you want, delete your text layer by right clicking the layer and selecting "delete layer". The text along the path is not really there, you have to finish the process or you will loose it.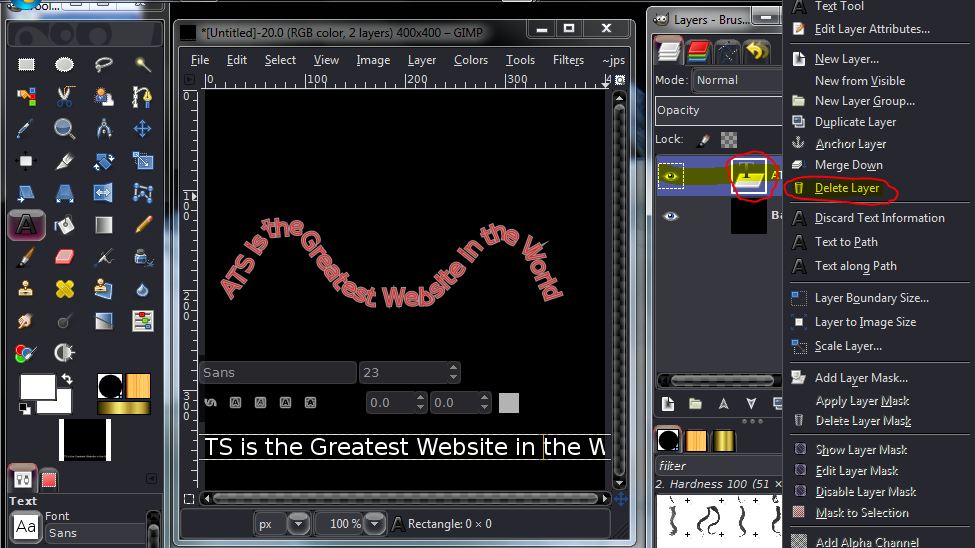
At the very top of the layers window you will see some tabs. You may only have 3, I have mine set to 4, select the "paths" tab. In the layers section you will see the original path you drew with no eye(showing it is invisible) and a visible(the eye is showing) layer of your text path. Right click the text layer and select "Path to Selection"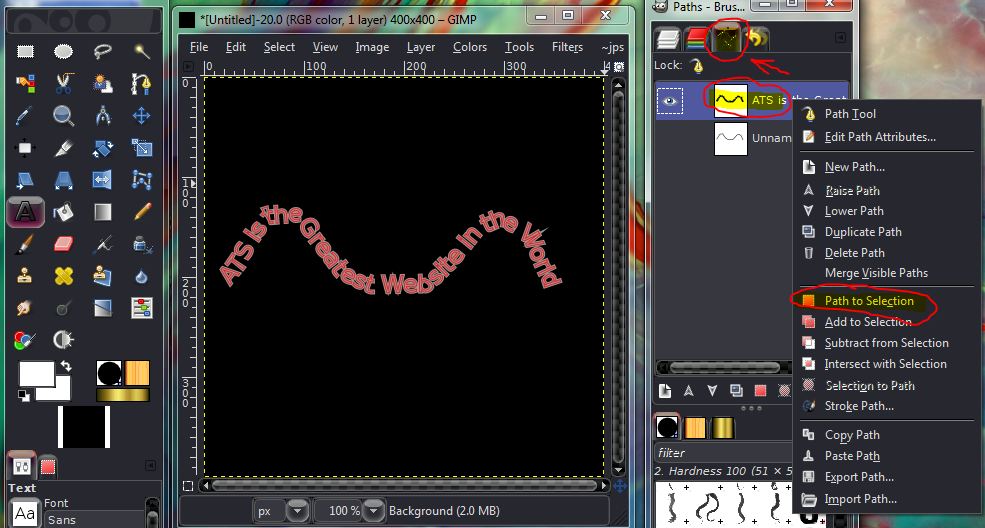
This next part is important. If you forget this step it will not work and frustration can occur. Turn off the visibility of the created text along the path. This will leave you with the "ants" running the shape of the text.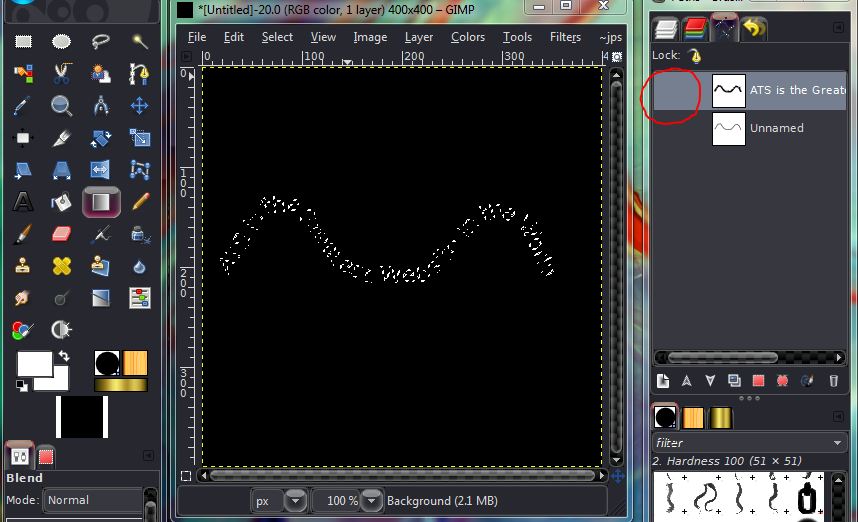
Once you have the "ants' and the red outline is gone it is time to fill in the "ants" you can do this however you wish. You can click the "brush" tool and paint it in the color of your choice, you can use the "bucket fill" tool and fill them up in the color of your choice, or you can use the "blend tool" like I have in the image below(I used the "Gold" option). Then just click "Select" and choose "None"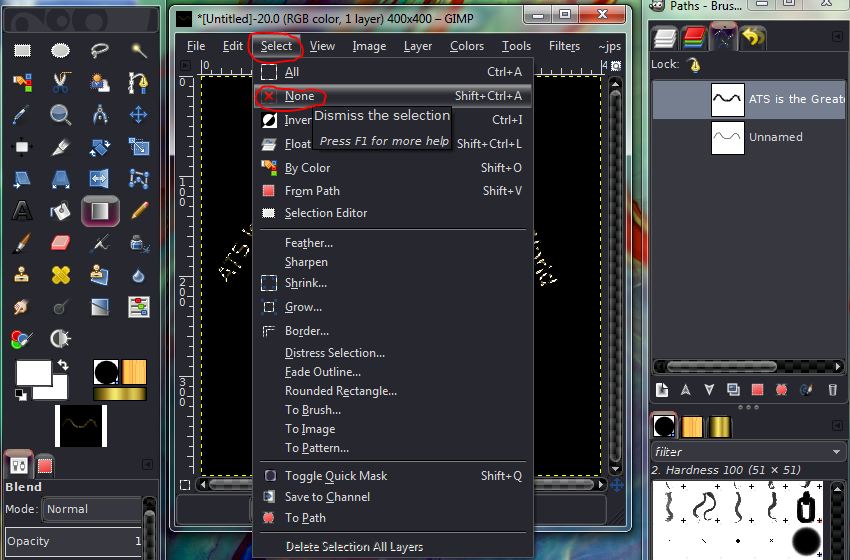
And you are done.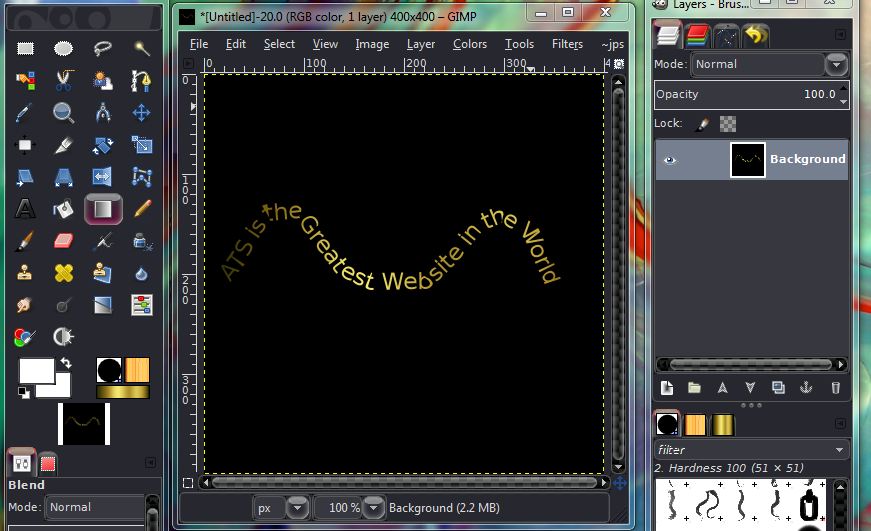
You can then repeat as necessary, but if you do I suggest going to your "Paths" tab and deleting all layers so you have a clean slate for the next path.
Placing text along a path is fairly easy but it can be one of the most frustrating processes on Gimp. I will begin with showing how to do it and it turns out wrong then I will describe the fixes and then complete the process.
I am putting this on a new image for the tutorial but you can obviously put it on an image of your choice but if you do I suggest you add a new layer to your image. It is not required, but it does make things a little easier especially if you need to move it around a little.
Once you have your image ready, select the "Path" tool and draw your path. Each dot you see in the image below is a click of the mouse. You do not actually "Draw it out", but set points for the path to follow.
When your path is done click on the "Add Text" tool. Your path will disappear(don't worry it is still there). Add your text as you choose it to be, but make sure it is nowhere near your path(text and font, the color does not matter as long as it is visible to you for adjustments). (also, if you are not using Gimp 2.8 your text area will not look like this but it will still be the same process) Once you have your text ready, right click on the text area and select "Text along Path".
A red outlined version of your text will then appear along your path. This is where it can get frustrating. As you can see in the image below the text did not fit and was distorted.
Once you have what you want, delete your text layer by right clicking the layer and selecting "delete layer". The text along the path is not really there, you have to finish the process or you will loose it.
At the very top of the layers window you will see some tabs. You may only have 3, I have mine set to 4, select the "paths" tab. In the layers section you will see the original path you drew with no eye(showing it is invisible) and a visible(the eye is showing) layer of your text path. Right click the text layer and select "Path to Selection"
This next part is important. If you forget this step it will not work and frustration can occur. Turn off the visibility of the created text along the path. This will leave you with the "ants" running the shape of the text.
Once you have the "ants' and the red outline is gone it is time to fill in the "ants" you can do this however you wish. You can click the "brush" tool and paint it in the color of your choice, you can use the "bucket fill" tool and fill them up in the color of your choice, or you can use the "blend tool" like I have in the image below(I used the "Gold" option). Then just click "Select" and choose "None"
And you are done.
You can then repeat as necessary, but if you do I suggest going to your "Paths" tab and deleting all layers so you have a clean slate for the next path.
Awesome update to the thread. Now we have links to individual tutorials. Thank you both, DTOM, and Agarta. I can't express my appreciation enough!
I have struggled with learning Gimp, following online tutorials, but they are mostly lacking for a specific technique I want to learn. Now, we have a spot to reference back to, and hopefully, updated links can be added as the tutorials grow.
For now, I am off to play with text and paths.
I'm a rookie at the graphics stuff, but by standing on the shoulders of you giants, I can see farther! Thanks once again. You really don't know how much I appreciate it.
Well, I was an utter failure tonight. I was playing with all sorts of settings, and learned a lot, but all I could produce for a grade was this ugly
spinning off-centered abomination:

I was trying to get it on a small globe, something that would fit in the avatar space, but the resizing from each setting had me baffled. I tinkered. I would like it much slower, and I think I just need to increase the number of frames, but the size and position is all off.
I will play, but whew, it's a tad frustrating.
reply to post by Agarta
I would like to say Thanks for your time and patience in putting all this together for us.!!!!.
It will take me a long time before I can get as good as you, as well as some others here, but I damn sure going to have fun trying!!
Thanks a bunch to all of you ~~
Much respect~
snarky
I would like to say Thanks for your time and patience in putting all this together for us.!!!!.
It will take me a long time before I can get as good as you, as well as some others here, but I damn sure going to have fun trying!!
Thanks a bunch to all of you ~~
Much respect~
snarky
reply to post by Agarta
Having problems navigating my menu where the "script" tab is concerned. [glass text]
I downloaded the glass type and saved it to the script folder and I believe that part is correct. But I don't see any kind of tab on my window for script.
When I look in the "Filter" tab, at the bottom is Script-fu and 3 sub-parts: Console/refresh/start server
Also, I don't have a side menu that looks like yours.
So not sure what to do next.....
Any suggestions?
Thanks,
snarky
ETA: When I click on "Console" for Script-fu and look through the items listed, it does have "glass effect text" listed. But how do I get it to my main menu to be used?
Having problems navigating my menu where the "script" tab is concerned. [glass text]
I downloaded the glass type and saved it to the script folder and I believe that part is correct. But I don't see any kind of tab on my window for script.
A new script-fu tab will appear in the top row. Select it then find "Create New" and hover to open the next panel and select "GlassEffect Text".
When I look in the "Filter" tab, at the bottom is Script-fu and 3 sub-parts: Console/refresh/start server
Also, I don't have a side menu that looks like yours.
So not sure what to do next.....
Any suggestions?
Thanks,
snarky
ETA: When I click on "Console" for Script-fu and look through the items listed, it does have "glass effect text" listed. But how do I get it to my main menu to be used?
edit on 13-1-2013 by snarky412 because: (no reason given)
reply to post by snarky412
You should have a new "Script-fu" tab on the top bar that you "filter" tab is I believe it will be right next to the "windows" tab. Expand your work area to the right and expose it. If it is not there let me know and I will see what I can do to figure it out for you.
You should have a new "Script-fu" tab on the top bar that you "filter" tab is I believe it will be right next to the "windows" tab. Expand your work area to the right and expose it. If it is not there let me know and I will see what I can do to figure it out for you.
Originally posted by Agarta
reply to post by snarky412
You should have a new "Script-fu" tab on the top bar that you "filter" tab is I believe it will be right next to the "windows" tab. Expand your work area to the right and expose it. If it is not there let me know and I will see what I can do to figure it out for you.
No... nothing new at the top.
Just the same tabs. [file/edit/select/view/image/layer/colors/tools/filters/windows/help]
I checked the "console" items and the glass effect text is listed.
I hit "refresh" and closed it and reopened it...still no new tab.
reply to post by snarky412
If you downloaded the file from the link I gave then it is a zip file. If you saved it to the script file without unzipping it it can not be read. I would suggest going to your "Script" file and moving the zip to your documents file then double click the zip file. If you have a zip program it will automatically engage and all you have to do is unzip the file. Then move the .scm page to the script file and it should work. If you do not have a zip program you can get one here download.cnet.com... If all this doesn't work or you have already done it let me know so I can continue to trouble shoot.
Edit to add: If this is the issue, remember that you must close out and restart your Gimp to activate the new script.
edit on 13-1-2013 by
Agarta because: (no reason given)
reply to post by Agarta
Okay...started over from the beginning.
I did unzip the file with no problem.
I did as it said and was asked for permission... but when I opened Gimp, there is still no tab for script.
Very frustrating to say the least....
Okay...started over from the beginning.
I did unzip the file with no problem.
Click your start button and go to your main drive(in my case it is the "C" drive) and click program files, then "Gimp 2", next "Share", then "gimp", then "2.0", and finally "scripts". Once it is opened bring up your extracted file page and you can either, drag and drop it into the "scripts" file, or copy and paste it in. Either way you will be asked permission as an administrator of the computer or that an admin must accept. Once it is in you are done and can now open your Gimp program.
I did as it said and was asked for permission... but when I opened Gimp, there is still no tab for script.
Very frustrating to say the least....
edit on 13-1-2013 by snarky412 because: (no reason given)
reply to post by snarky412
Okay maybe it decided to load into your "create" slot. Click on "File" and hover over "create" then one of the "Logos" and you should be able to select "Glass text effect"
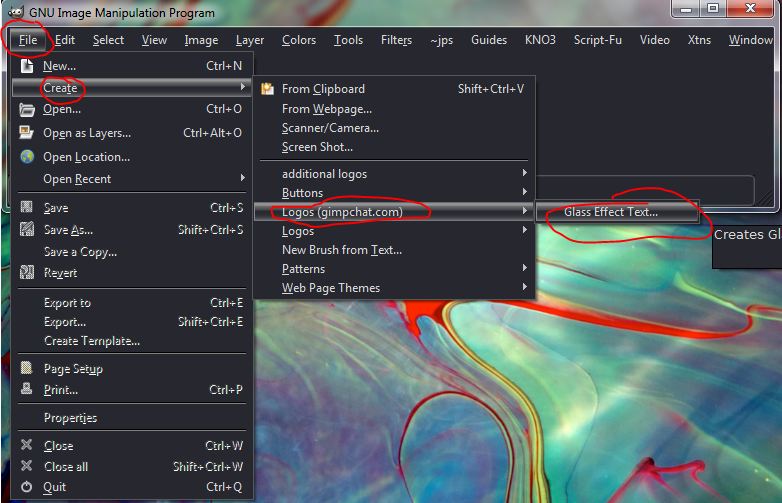
Okay maybe it decided to load into your "create" slot. Click on "File" and hover over "create" then one of the "Logos" and you should be able to select "Glass text effect"
new topics
-
BIDEN Admin Begins Planning For January 2025 Transition to a New President - Today is 4.26.2024.
2024 Elections: 14 minutes ago -
Big Storms
Fragile Earth: 1 hours ago -
Where should Trump hold his next rally
2024 Elections: 4 hours ago -
Shocking Number of Voters are Open to Committing Election Fraud
US Political Madness: 5 hours ago -
Gov Kristi Noem Shot and Killed "Less Than Worthless Dog" and a 'Smelly Goat
2024 Elections: 5 hours ago -
Falkville Robot-Man
Aliens and UFOs: 6 hours ago -
James O’Keefe: I have evidence that exposes the CIA, and it’s on camera.
Whistle Blowers and Leaked Documents: 6 hours ago -
Australian PM says the quiet part out loud - "free speech is a threat to democratic dicourse"...?!
New World Order: 7 hours ago -
Ireland VS Globalists
Social Issues and Civil Unrest: 8 hours ago -
Biden "Happy To Debate Trump"
2024 Elections: 8 hours ago
top topics
-
James O’Keefe: I have evidence that exposes the CIA, and it’s on camera.
Whistle Blowers and Leaked Documents: 6 hours ago, 13 flags -
Blast from the past: ATS Review Podcast, 2006: With All Three Amigos
Member PODcasts: 10 hours ago, 13 flags -
Australian PM says the quiet part out loud - "free speech is a threat to democratic dicourse"...?!
New World Order: 7 hours ago, 12 flags -
Biden "Happy To Debate Trump"
2024 Elections: 8 hours ago, 12 flags -
Mike Pinder The Moody Blues R.I.P.
Music: 11 hours ago, 8 flags -
What is the white pill?
Philosophy and Metaphysics: 10 hours ago, 6 flags -
Shocking Number of Voters are Open to Committing Election Fraud
US Political Madness: 5 hours ago, 6 flags -
RAAF airbase in Roswell, New Mexico is on fire
Aliens and UFOs: 8 hours ago, 5 flags -
Ireland VS Globalists
Social Issues and Civil Unrest: 8 hours ago, 5 flags -
Where should Trump hold his next rally
2024 Elections: 4 hours ago, 4 flags
active topics
-
Gov Kristi Noem Shot and Killed "Less Than Worthless Dog" and a 'Smelly Goat
2024 Elections • 39 • : Zanti Misfit -
So this is what Hamas considers 'freedom fighting' ...
War On Terrorism • 268 • : TheWoker -
BIDEN Admin Begins Planning For January 2025 Transition to a New President - Today is 4.26.2024.
2024 Elections • 2 • : NoCorruptionAllowed -
Falkville Robot-Man
Aliens and UFOs • 7 • : KKLOCO -
Big Storms
Fragile Earth • 9 • : nerbot -
"We're All Hamas" Heard at Columbia University Protests
Social Issues and Civil Unrest • 294 • : TheWoker -
Where should Trump hold his next rally
2024 Elections • 15 • : Zanti Misfit -
Gaza Terrorists Attack US Humanitarian Pier During Construction
Middle East Issues • 89 • : AlongCameaSpider -
Post A Funny (T&C Friendly) Pic Part IV: The LOL awakens!
General Chit Chat • 7138 • : baddmove -
Ireland VS Globalists
Social Issues and Civil Unrest • 8 • : nugget1