It looks like you're using an Ad Blocker.
Please white-list or disable AboveTopSecret.com in your ad-blocking tool.
Thank you.
Some features of ATS will be disabled while you continue to use an ad-blocker.

The Collaborative Gimp tutorial for ATS members. [updated]
page: 4share:
Originally posted by Agarta
reply to post by snarky412
Here is 2.8.2 stabilized version www.gimp.org...
Thanks....
The one I downloaded earlier I got off the GIMP site but not this page.
Wouldn't it be best just to completely uninstall and delete the original one altogether and just start all over with a brand new download?
This one is really annoying the way it will freeze up and then shut down on me. Ugh....
I'll save my stuff to a folder and try again.
Thank you~
snarky
P.S. I'm having to much fun with this to give up....
Still have much more to learn tho.
reply to post by snarky412
Hmm, 2.6 comes packaged with Mint 13, "Maya", the OS I'm currently using. I just checked, and and snatching the latest STABLE update.
Sorry for the confusion, I was referring to the "Latest" stable release, but if Agarta says it's so, when relating to graphics, it usually is.
(I'm getting updates through Synaptic Package Manager, not download sites.)
Updated, and the screen grab shows the version I'm running:
Not to worry, most of the functions are the same from 2.6 to 2.8, at least for learning.
Not to worry, most of the functions are the same from 2.6 to 2.8, at least for learning.
how do you add brush pack to Gimp? I just got a few and don't know where they go in the program.
Also im running Windows 7 with Gimp 2.8
Also im running Windows 7 with Gimp 2.8
reply to post by TheToastmanCometh
Like fonts, brushes go into the GIMP folder with the same name.
Just copy and paste the brush pack into the proper folder, then when in GIMP, open the brush dialog, and in the bottom right corner is a refresh icon. Voila. Access to all your brushes.
Like fonts, brushes go into the GIMP folder with the same name.
C:Documents and Settingsmyusername.gimp-2.6brushes
If you can’t find that folder, see if it’s here instead:
C:Usersmyusername.gimp-2.6brushes
Just copy and paste the brush pack into the proper folder, then when in GIMP, open the brush dialog, and in the bottom right corner is a refresh icon. Voila. Access to all your brushes.
edit on 12/15/12 by Druid42 because: ETA: Your folder would be .gimp-2.8brushes
In this tutorial I will show how to do a basic Background. Within this tutorial there are several techniques that can be used alone or in different
combinations but it was easier to go through all the steps from start to finish than to break them up into different tutorials.
Once you have a vision of what you want and you have collected the pieces needed you can begin.
First we are going to crop out the unneeded parts. In this case it is simply the white background. Click on the "crop" tool and draw out the size you need. It will not crop the image until you have right clicked the center of the image, so by going to the sides a rectangle will show. By right click and hold you can re size all sides to the exact size you wish to crop.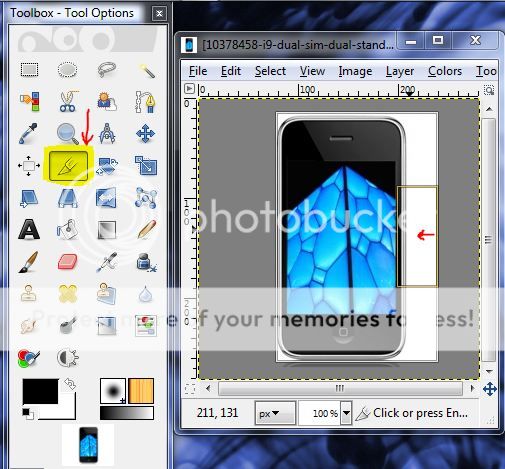
Once it is cropped to the size you want it is time to re size for the ATS background size which is 180X480. Keep in mind if the image is more square than a tall rectangle it will stretch and squish the image so make it as tall and skinny as possible to avoid this issue.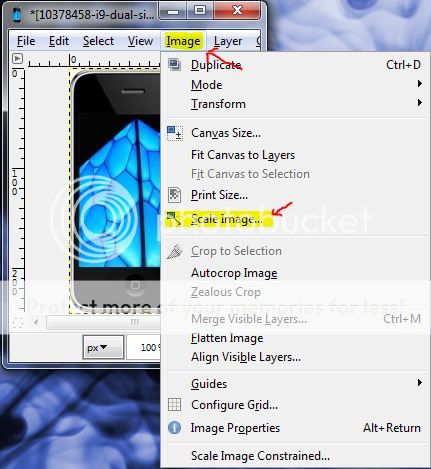 You will notice there is a link beside the width and height
size. This is to keep the scale of the original image, click the link and it will break(as pictured). This will allow you to set them
individually.
You will notice there is a link beside the width and height
size. This is to keep the scale of the original image, click the link and it will break(as pictured). This will allow you to set them
individually.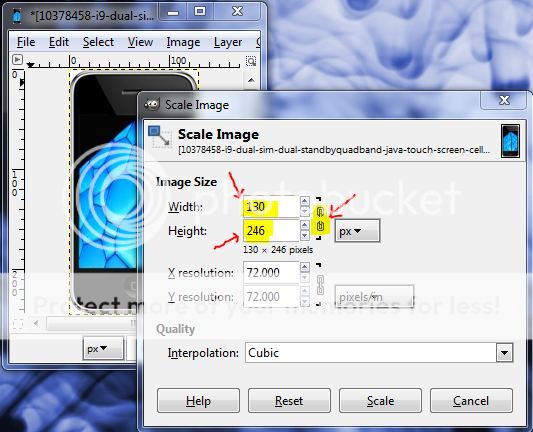
In this example the edges are curved and show the white background in the corners. This can be taken care of in 2 ways. You can make the corners transparent(which I will cover later) or you can fill them with color as shown below. Click your "fill" tool, then click the foreground color bar. This will open a color picker. You can pick a fill color or you can get it from somewhere else as I am showing below. I want the corners to be the color of the ATS background color, so click the dropper on the color picker screen then click the color you want(in this case it is an open page on ATS.(this will bring your browser page to the front. Simply minimize it and select "ok" and the color will be set) then click the corners to fill with the ATS background color.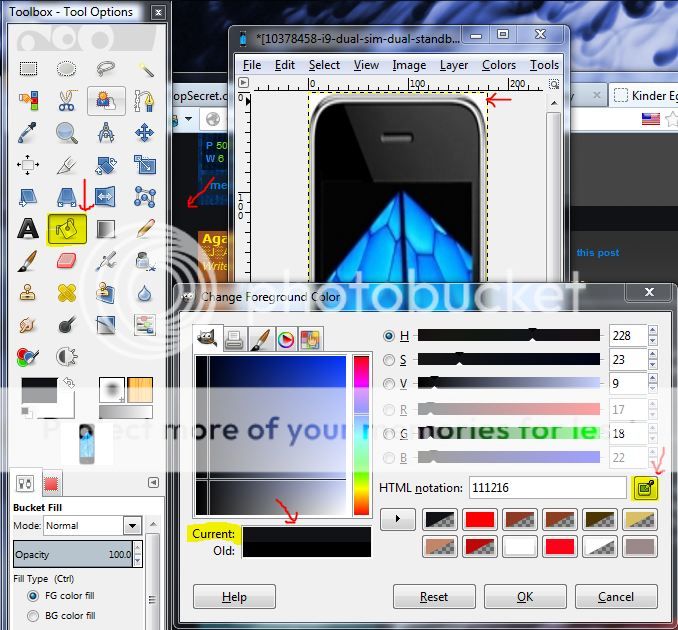
In the example I am using there is a specific sized screen for our new image. The easiest way to get this size is to create a duplicate of the image and crop it out.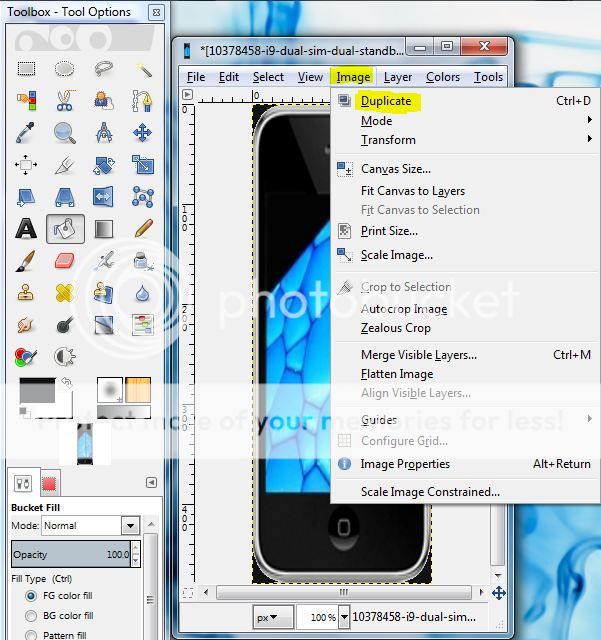 At the bottom of your little window you will see a
drop down which gives you a choice of visible scale. This will not actually scale the image but it will scale your work space. This makes it easier to
be exact on your crop.
At the bottom of your little window you will see a
drop down which gives you a choice of visible scale. This will not actually scale the image but it will scale your work space. This makes it easier to
be exact on your crop. Then just put it back to a workable size and
crop. Now you have the exact size you need to fill.
Then just put it back to a workable size and
crop. Now you have the exact size you need to fill.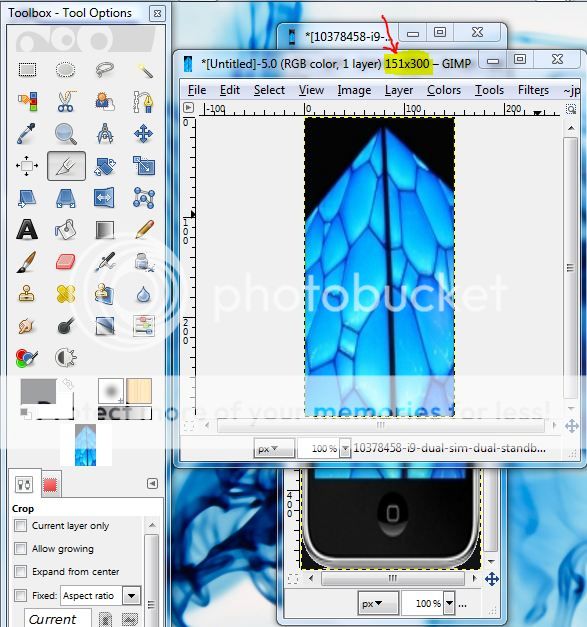
Putting those images aside(minimize) we begin the next image. We are going to remove the white background from the image. Select the "magic wand" tool and click on the white background. Moving "Ants" will then outline your image(pictured but not moving)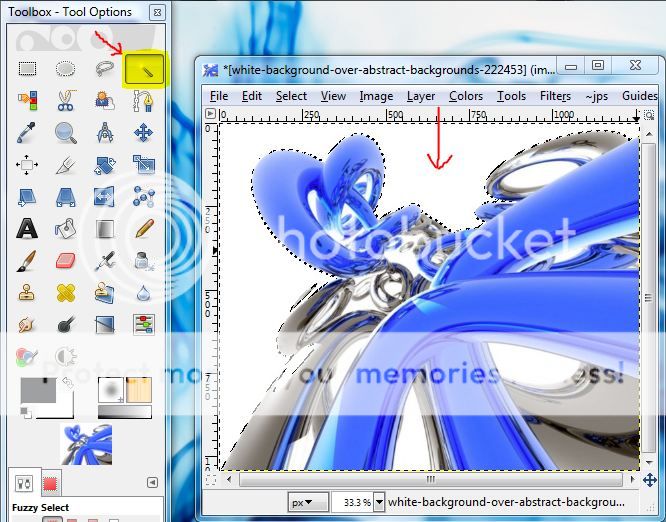 If you remove the white at this point it will leave a slight
white outline. To avoid this click on "Select" then "grow" in the drop down
menu.
If you remove the white at this point it will leave a slight
white outline. To avoid this click on "Select" then "grow" in the drop down
menu.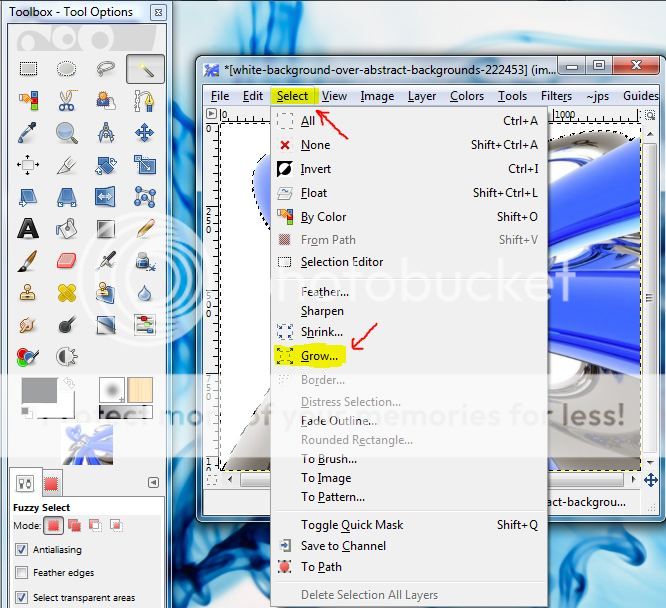 A little box will then appear asking you to set the growth
size, I will usually only grow it by 1, then click "ok"
A little box will then appear asking you to set the growth
size, I will usually only grow it by 1, then click "ok"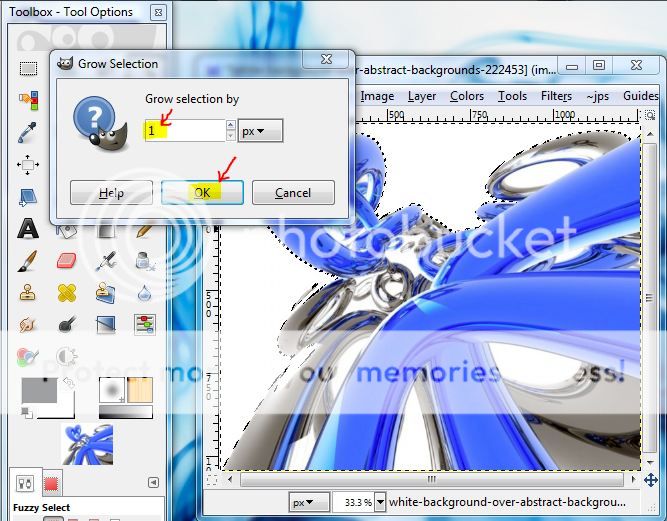 At this
point you will notice that there is a few parts of the reflection that have been included in the selection. This means you can not simply remove the
white.
At this
point you will notice that there is a few parts of the reflection that have been included in the selection. This means you can not simply remove the
white.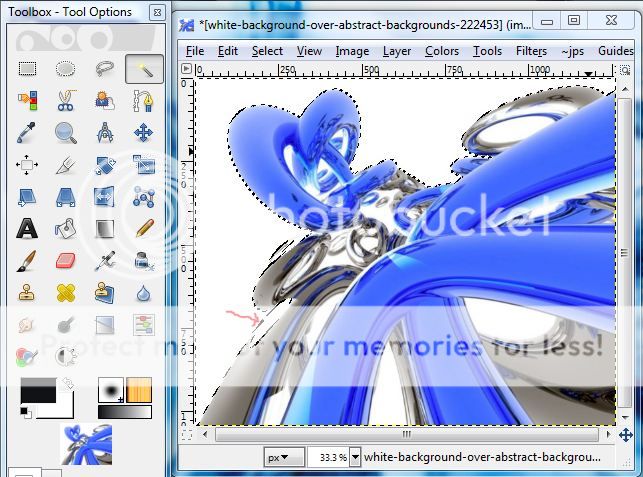 Click on your "eraser" tool then go to your right hand side
bar and right click and select "add alpha channel". Make sure the brush is set to a solid circle(it will default to a faded edge circle so it has to
be changed). Make sure your "opacity" is 100 and you can re size the brush to cover the most area. Carefully erase the background but not the
reflection.
Click on your "eraser" tool then go to your right hand side
bar and right click and select "add alpha channel". Make sure the brush is set to a solid circle(it will default to a faded edge circle so it has to
be changed). Make sure your "opacity" is 100 and you can re size the brush to cover the most area. Carefully erase the background but not the
reflection.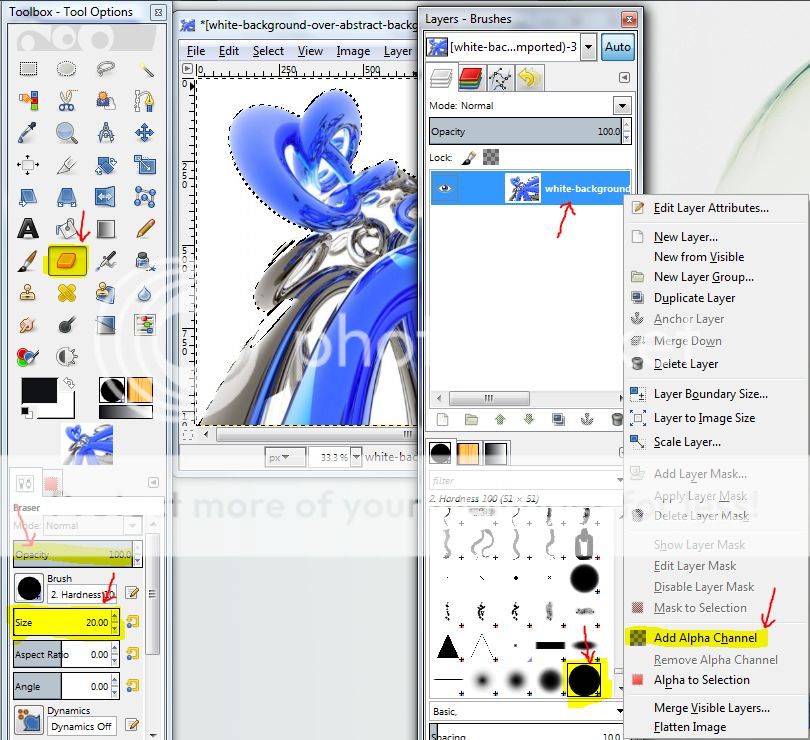 Select another section of the background, grow the
selection, and check to make sure there is no extensions like in the first example. If it is clean then select "color" and then "color to
alpha"
Select another section of the background, grow the
selection, and check to make sure there is no extensions like in the first example. If it is clean then select "color" and then "color to
alpha"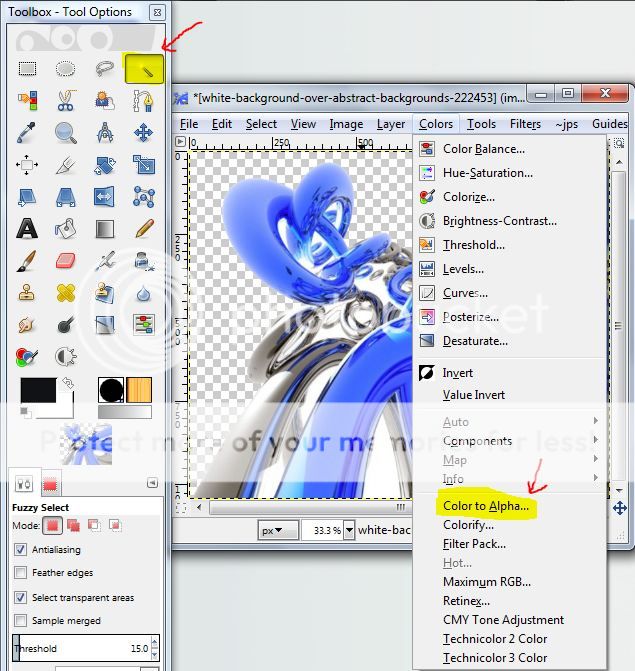 In this case it will be white(which is default) so just click
"ok"
In this case it will be white(which is default) so just click
"ok"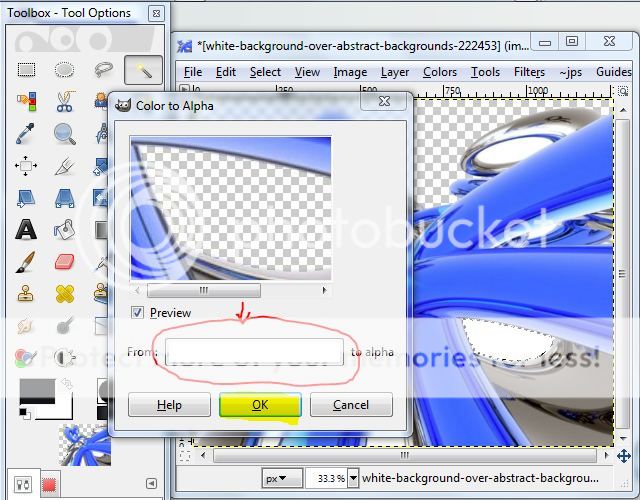 if it is not white then pick the color or click the color and
use the picker.
if it is not white then pick the color or click the color and
use the picker.
Once you have a vision of what you want and you have collected the pieces needed you can begin.
First we are going to crop out the unneeded parts. In this case it is simply the white background. Click on the "crop" tool and draw out the size you need. It will not crop the image until you have right clicked the center of the image, so by going to the sides a rectangle will show. By right click and hold you can re size all sides to the exact size you wish to crop.
Once it is cropped to the size you want it is time to re size for the ATS background size which is 180X480. Keep in mind if the image is more square than a tall rectangle it will stretch and squish the image so make it as tall and skinny as possible to avoid this issue.
In this example the edges are curved and show the white background in the corners. This can be taken care of in 2 ways. You can make the corners transparent(which I will cover later) or you can fill them with color as shown below. Click your "fill" tool, then click the foreground color bar. This will open a color picker. You can pick a fill color or you can get it from somewhere else as I am showing below. I want the corners to be the color of the ATS background color, so click the dropper on the color picker screen then click the color you want(in this case it is an open page on ATS.(this will bring your browser page to the front. Simply minimize it and select "ok" and the color will be set) then click the corners to fill with the ATS background color.
In the example I am using there is a specific sized screen for our new image. The easiest way to get this size is to create a duplicate of the image and crop it out.
Putting those images aside(minimize) we begin the next image. We are going to remove the white background from the image. Select the "magic wand" tool and click on the white background. Moving "Ants" will then outline your image(pictured but not moving)
edit on 28-12-2012 by Agarta because: (no reason given)
reply to post by Agarta
Repeat this process until all of the background is gone with which ever technique is necessary. When you are done scale the image to what you need.(refer to the duplicate you cropped)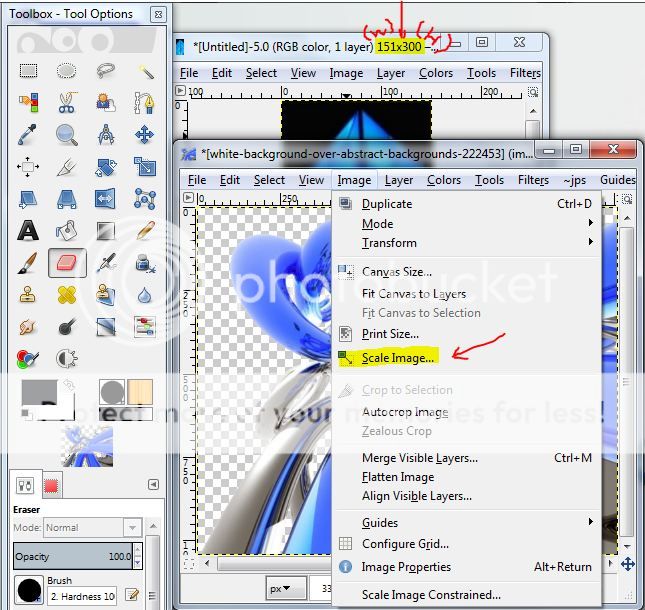
Next we are going to crop the next image needed to do the background.(again tall and skinny is preferable) and scale it to the size you need.(same size as the duplicate you cropped in this case)
We then select the "move" tool then right click on the image you want to copy then click "edit" then click "copy visible"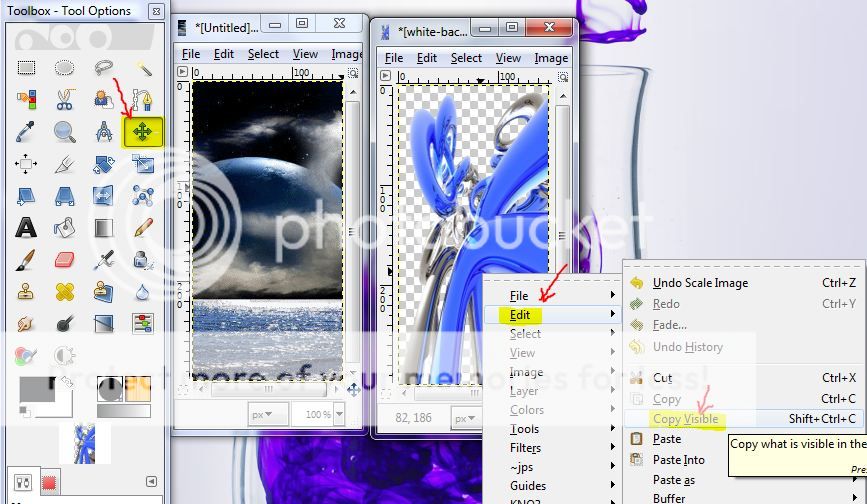 Next go to the image you want the copied image to be placed
on and right click. Then click "edit" then hover over "paste as" and select "new layer"
Next go to the image you want the copied image to be placed
on and right click. Then click "edit" then hover over "paste as" and select "new layer"

You can then move the new layer by left click hold and drag it to where you want it.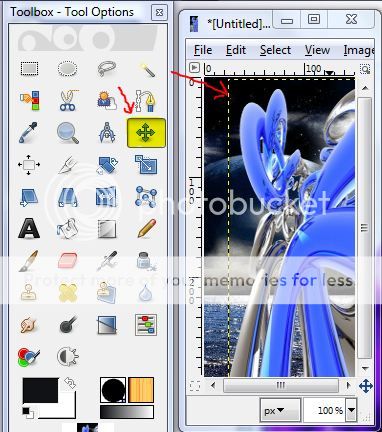
Repeat the steps to copy the new 2 layer image and paste it as a new layer on the original we started on. and move it into
place.
and move it into
place.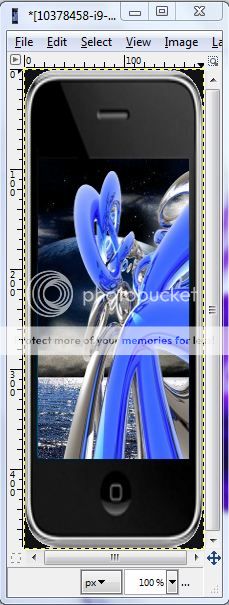
The next step is saving your new image. In Gimp if you "save" it, it will save as a "cxt" and this you do not want. Left click on "File" then go down to "Export" and left click.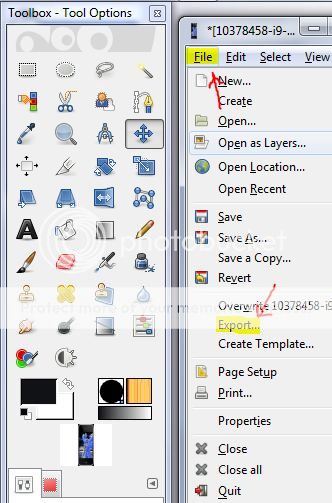 Then name your image. Select the file to
save to. Then click select file type and select .gif or .jpg(ATS only allows these 2 extensions) and click
"export".
Then name your image. Select the file to
save to. Then click select file type and select .gif or .jpg(ATS only allows these 2 extensions) and click
"export".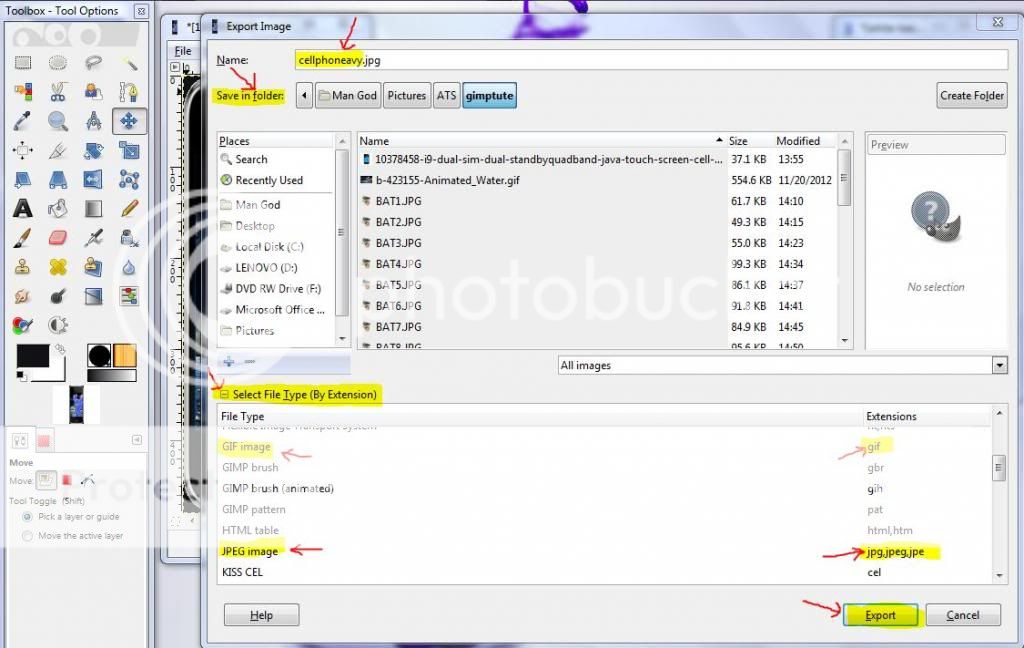 A new little box will appear asking you what quality to
save at, set this and click "export". ALL DONE
A new little box will appear asking you what quality to
save at, set this and click "export". ALL DONE
Repeat this process until all of the background is gone with which ever technique is necessary. When you are done scale the image to what you need.(refer to the duplicate you cropped)
Next we are going to crop the next image needed to do the background.(again tall and skinny is preferable) and scale it to the size you need.(same size as the duplicate you cropped in this case)
We then select the "move" tool then right click on the image you want to copy then click "edit" then click "copy visible"
You can then move the new layer by left click hold and drag it to where you want it.
Repeat the steps to copy the new 2 layer image and paste it as a new layer on the original we started on.
The next step is saving your new image. In Gimp if you "save" it, it will save as a "cxt" and this you do not want. Left click on "File" then go down to "Export" and left click.
edit on 28-12-2012 by Agarta because: (no reason given)
Wow, awesome instructions. I will have to play around a bit. Very informative!
(Without checking, I think ATS also allows .png, too.)
(Without checking, I think ATS also allows .png, too.)
reply to post by Druid42
I was going by this
But that is from the old 2002 guidelines. The new ones from 2010 do not say www.abovetopsecret.com... so you may be right but I have had issues with .png working in the avatar and background slots. It could just be me though lol.(browser that is)
I was going by this
www.abovetopsecret.com...
GIF and JPEG file formats only with a maximum dimension of 160 pixels wide, by 320 pixels tall. File sizes are not to exceed 75k, and animated GIF's are allowed. (physical size can extend up to 400 pixels tall for images under 50k in file size)
But that is from the old 2002 guidelines. The new ones from 2010 do not say www.abovetopsecret.com... so you may be right but I have had issues with .png working in the avatar and background slots. It could just be me though lol.(browser that is)
reply to post by Agarta
At the top of the new uploader tool it does say gif, jpg, and png only. I just checked. I thought I saw that somewhere.
Still, spot on tutorial! Keep up the amazing work. That took a while to create!
At the top of the new uploader tool it does say gif, jpg, and png only. I just checked. I thought I saw that somewhere.
Still, spot on tutorial! Keep up the amazing work. That took a while to create!
How do I create text in perspective.
I think it has something to do with paths but for the life of me I cannot do it
Help!!
I think it has something to do with paths but for the life of me I cannot do it
Help!!
reply to post by Sublimecraft
You don't actually create text in perspective but actually create perspective for your text or images.
After you put the new image/text on your background image and you have moved it into place(remember in order to move something you must click on a visible part of it, This is most important when moving text as you must click on the text not the space or the background image moves) and rotated it as needed, click the perspective tool.

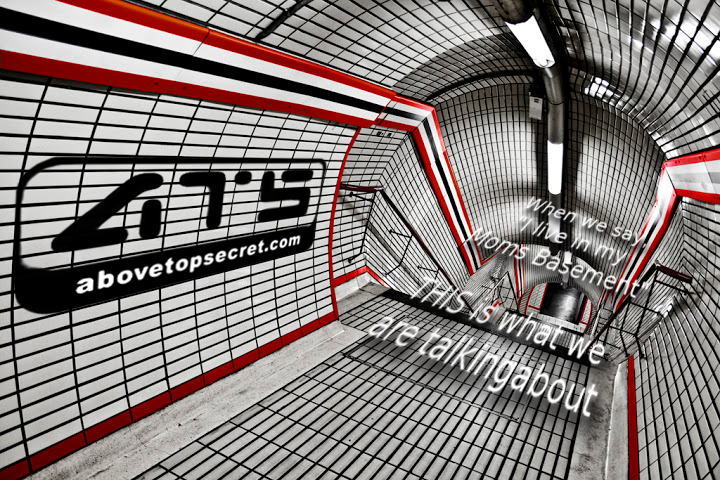
This is what it will look like. You can grab the corners and adjust as needed. In this case I am putting the ATS logo on the curved perspective wall.
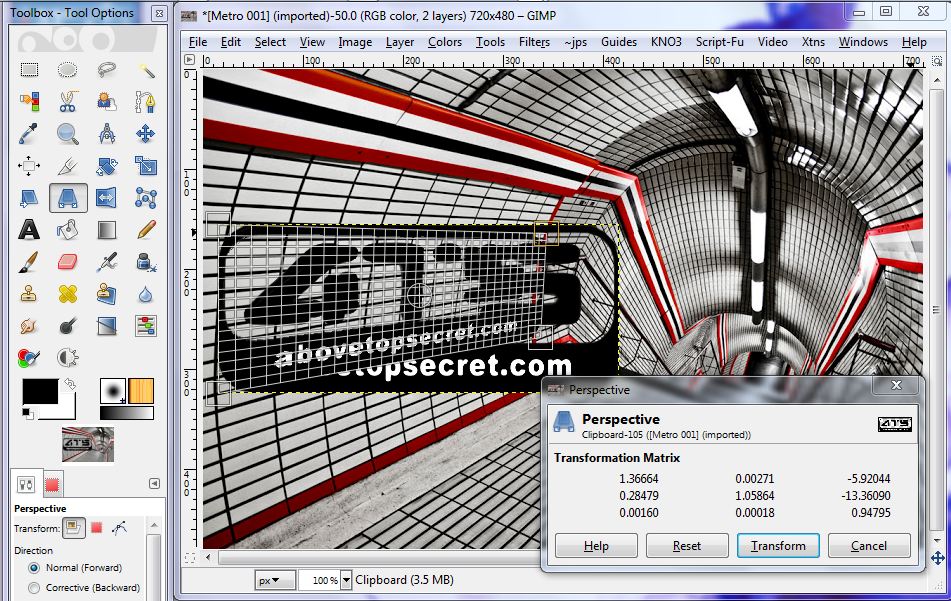
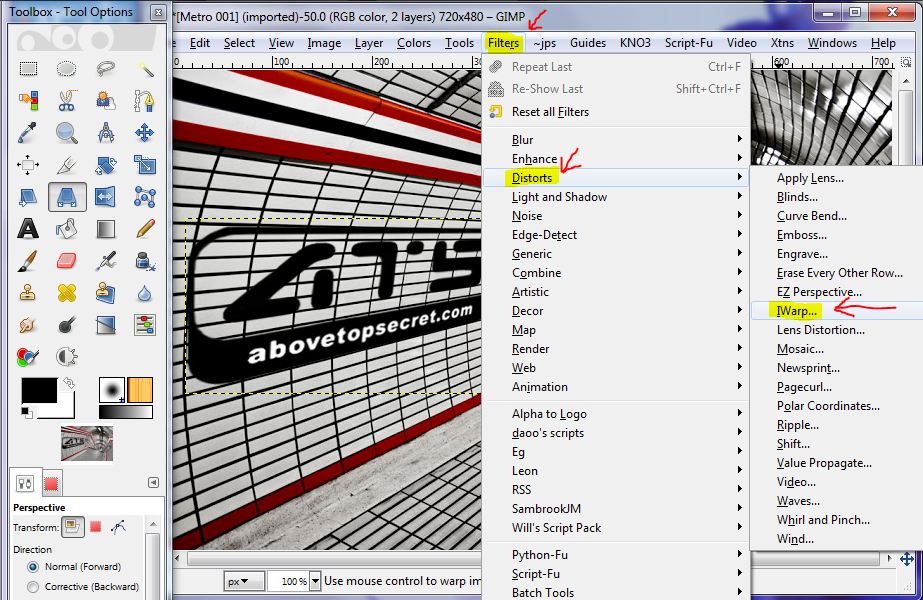
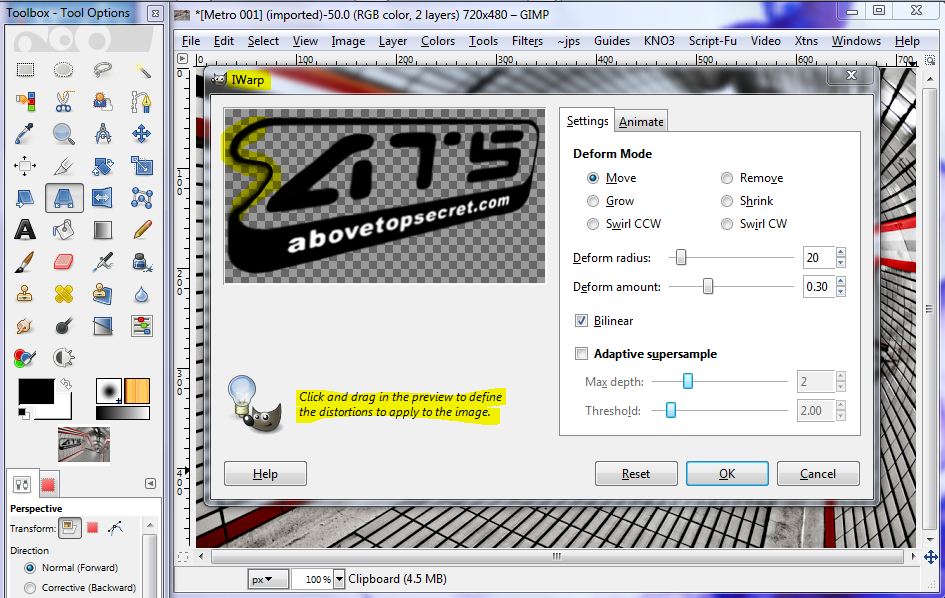
once the perspective is set, sometimes it is needed to adjust the sides like in this case where the wall is curved. The logo sitting in perspective does not look like it belongs quite yet so the edges must be manipulated to accept the curve. To do this go to the iwarp section. In the manipulation window you can drag or push parts of your picture layer. Unfortunately the background does not show in this view so it is a move a little and check, move a little and check situation until it is where you want it. (on a side note as a tester of the 3.8 version I am trying to get them to show it. It may end up as a plug in but eventually we should be able to see the background in the manipulation display). This is how to get there....
This is what the function looks like.....
That's it, You just choose your layer and alter the perspective and adjust as necessary.
You don't actually create text in perspective but actually create perspective for your text or images.
After you put the new image/text on your background image and you have moved it into place(remember in order to move something you must click on a visible part of it, This is most important when moving text as you must click on the text not the space or the background image moves) and rotated it as needed, click the perspective tool.
This is what it will look like. You can grab the corners and adjust as needed. In this case I am putting the ATS logo on the curved perspective wall.
once the perspective is set, sometimes it is needed to adjust the sides like in this case where the wall is curved. The logo sitting in perspective does not look like it belongs quite yet so the edges must be manipulated to accept the curve. To do this go to the iwarp section. In the manipulation window you can drag or push parts of your picture layer. Unfortunately the background does not show in this view so it is a move a little and check, move a little and check situation until it is where you want it. (on a side note as a tester of the 3.8 version I am trying to get them to show it. It may end up as a plug in but eventually we should be able to see the background in the manipulation display). This is how to get there....
This is what the function looks like.....
That's it, You just choose your layer and alter the perspective and adjust as necessary.
reply to post by Agarta
Thank-you!
You are a xxxxxx legend mate, hands down.
LEGEND - 100%
Want to say more but will desist!!!!!!!!!
Thank-you!
You are a xxxxxx legend mate, hands down.
LEGEND - 100%
Want to say more but will desist!!!!!!!!!
reply to post by Sublimecraft
I forgot I was going to cover this little bit as well.
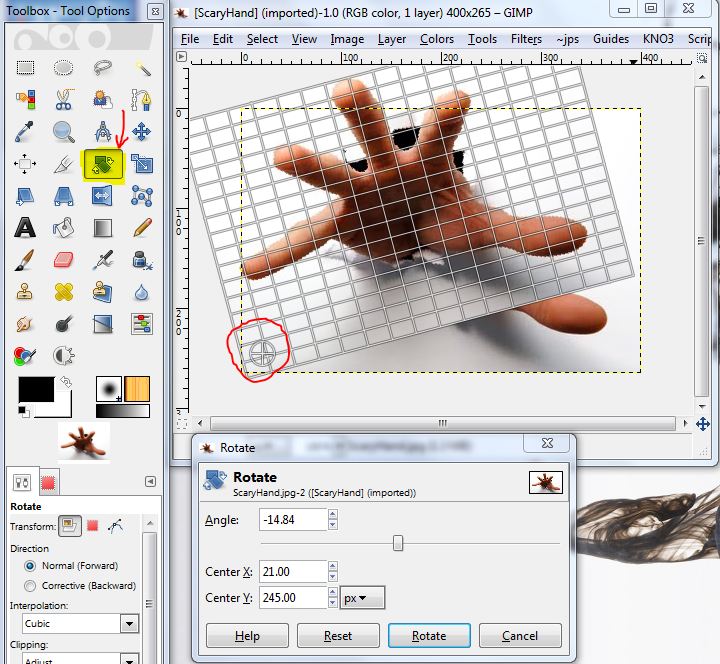
You will notice, in the middle of the grid is a small circle. This circle is your definitive center of movement. By clicking and dragging it you move the whole image within the perspective(this allows you to remain in the perspective without going to the move tool). You will notice that in your rotate state the picture rotates around this center. If you move it to one side or corner that will remain stationary and the image will rotate around that center.
Edit to add: Thank you for your kind words. Keep the questions coming. I do have ideas on what to make tutorials on but the questions help in narrowing down the specifics.
I forgot I was going to cover this little bit as well.
You will notice, in the middle of the grid is a small circle. This circle is your definitive center of movement. By clicking and dragging it you move the whole image within the perspective(this allows you to remain in the perspective without going to the move tool). You will notice that in your rotate state the picture rotates around this center. If you move it to one side or corner that will remain stationary and the image will rotate around that center.
Edit to add: Thank you for your kind words. Keep the questions coming. I do have ideas on what to make tutorials on but the questions help in narrowing down the specifics.
edit on 7-1-2013 by Agarta because: (no reason given)
As you have seen in my previous tutorials I have used the default theme for Gimp so it is more recognizable to you. I am going to give you a little
tutorial on where to get your themes and how to install them so I do not have to revert back and forth(sorry, its not that big of a deal but I
realized you guys may like a change from the default light grey). These themes are for use on Gimp 2.8 or higher(currently 2.8.2 is the newest public
version, I think). I will also show you a new addition to Gimp that was put into the Gimp 2.8 version that is not available to lower versions and that
is single window view. (I do not use it as I prefer to move everything around and see what I have open rather than to go to my bar and hover to select
what I have open but it is personal choice). This is what it looks like(keep in mind this is a different theme than you have atm(but we will fix that
shortly)...
In order to have this single window format click on the Windows tab at the top and the option should be the last in the list.
Okay on to the themes. You can access your themes by clicking "Edit" and going down to "Preferences" and selecting that. It will look like this(well different theme but similar)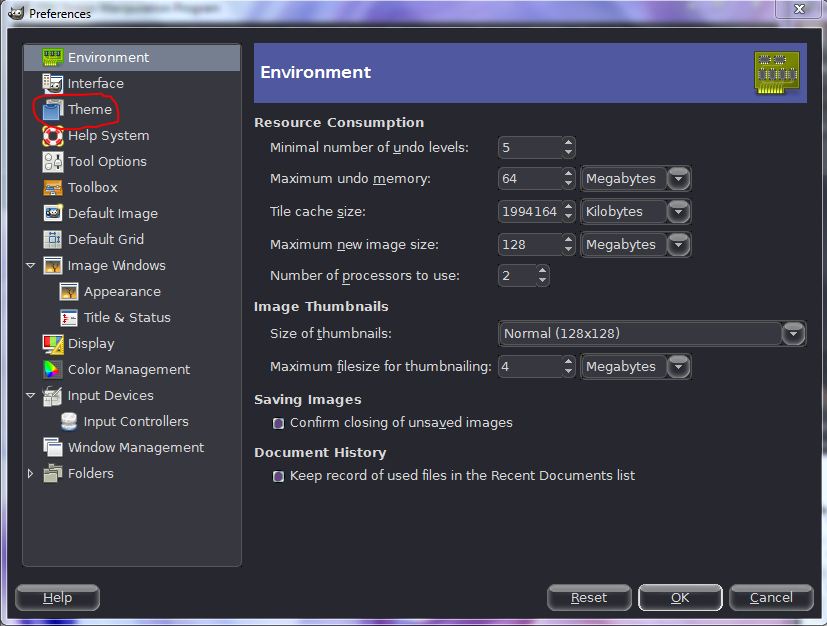
After you click the "themes" tab you will see the default and small choices. This is all you get with the basic download.
Below is a direct download link to a zip file. The download will open right here so no change of page is required. this zip file is verified virus free so no worries there. **Please note that this is for windows 7 if you have a Mac you will have to Google search for GTK Themes for Mac**. When you download the zip file extract all and keep the extracted files page open but put it off to the side for a moment. All the other pages that open during your extraction as well as you download box may be closed.
Next, click on your "Start" tab and select your hard drive that your Gimp program is on, find "Program Files" and select, then select Gimp 2, then select "Share", then "gimp"(if you select themes from that menu it will be the wrong file), next select "2.0", Then "Themes' close to the bottom of the list. Once this is open you will see the original 2 themes you had to begin with(default and small).
Go back to the new extracted file list and hold control and left click and highlight all 15 files. Once they are all highlighted release the left click and right click on the highlighted area and select "Copy". Next go over to the themes file we just opened and right click and select paste. It will ask for permission so if you are not an admin on your computer it will have to be okayed by the admin. Once it is okayed it will copy the files to the folder and you are all set.
when you open Gimp just go to your themes as shown above, select a theme and click ok and shut down and restart your Gimp to apply the theme. You can go through the different ones at your leisure. I use the "Aerolon" theme but there are some other cool ones. The Chocolate is brown(duh lol) and the "Heavy Metal" is polished metal, etc. I hope you enjoy your new looks.
Here is the download link
dl.dropbox.com...
edit on 7-1-2013 by Agarta because: (no reason given)
Agarta.
You post about how to separate foregrounds/backgrounds has saved me a ton of time since I read it (thanks!)
One problem I often run into is jagged/rough edges on images as a result of not-so-clean cuts.
Do you (or anyone) have any tricks to smooth edges?
I usually use the blur tool with a small point, but was wondering if there was something easier/better.
reply to post by Agarta
I sincerely appreciate your contributions to this thread. The text tutorial was something I was wondering about, but had no idea how to ask.
I'd call it "altering text perspectives", now that you've explained it.
I still have more Gimp questions, but I find it fascinating reading what you input. Clear, concise, and saved for future reference. For now, I have a few simpler ones about text manipulation:
How do you make plain text with special effects? Neon text, 3-d text, and beveled edges, specifically.
How do you get the text to curve on a line? It's an easy technique, I'm sure, but one that has me baffled. I think I'm making it more complicated than it needs to be.
Thanks in advance.
reply to post by Zarniwoop
That is an issue from time to time. I will do all of my removing backgrounds and such prior to scale, this tends to soften the jagged edges some. If it is really bad I will do one of 2 things or both if needed. First I will set my workable site to 400 and get into it on the pixel level and replace the missing ones or remove the extras. Second, I will use the magic wand to catch the shape and "shrink" the selection(right above grow) set to 1pixel, then use the smudge tool at between 75% and 50% and a small brush and carefully smudge the very edge.
I then bring it back gown to 100% and check it out. I will usually then put it on the background that it is going on and check it there. Sometimes even though it is a little choppy it blends into the image I put it on in most places and then I only have to deal with the ones that stand out.
Another way is to grow(1) rather than shrink and set your eraser to between 25% and 50%and go over the exposed areas outside the image or 1 pixel inside the selected area. this will soften the visability without taking away from crisp edges.
If you have an example of one you are having a hard time with post it in here and I will do a tutorial showing you haw to clean it up and give you the clean version.
reply to post by Agarta
Thanks for the info!
I don't have an example right now (when I run into really difficult ones, I usually toss them and move on), but next time I run into it, I will post one.
Thanks for the info!
If you have an example of one you are having a hard time with post it in here and I will do a tutorial showing you haw to clean it up and give you the clean version.
I don't have an example right now (when I run into really difficult ones, I usually toss them and move on), but next time I run into it, I will post one.
new topics
-
BREAKING: Astrazeneca admits for the first time its vaccine can cause deaths and serious injuries
Medical Issues & Conspiracies: 22 minutes ago -
New Bombshell Evidence Strongly Suggests Trump was Set Up in Classified Docs Saga
US Political Madness: 5 hours ago -
One More Night at the Pig and Blanket (Time 2024)
Short Stories: 8 hours ago -
Expert Says Parents Should Ask Babies Permission to Change Nappies.
General Chit Chat: 9 hours ago -
Hard evidence of a Royal plot on the US....if only i had proof.
ATS Skunk Works: 10 hours ago -
Do you name your cars ?
General Chit Chat: 11 hours ago
top topics
-
New Bombshell Evidence Strongly Suggests Trump was Set Up in Classified Docs Saga
US Political Madness: 5 hours ago, 23 flags -
5 probed after 18-year old girl dies as a result of having the COVID jab
Diseases and Pandemics: 17 hours ago, 20 flags -
Say his name
US Political Madness: 15 hours ago, 19 flags -
Jim Biden Was in Business with Qatari Officials
US Political Madness: 13 hours ago, 12 flags -
Expert Says Parents Should Ask Babies Permission to Change Nappies.
General Chit Chat: 9 hours ago, 10 flags -
Sleep paralysis and the implantation of some weird Matrix-esque demon creature...
The Gray Area: 14 hours ago, 8 flags -
There is no such thing as moonlight.
General Chit Chat: 16 hours ago, 7 flags -
I may have had a talk with Pope Francis about his plans for our nation
The Gray Area: 13 hours ago, 6 flags -
One More Night at the Pig and Blanket (Time 2024)
Short Stories: 8 hours ago, 4 flags -
Do you name your cars ?
General Chit Chat: 11 hours ago, 4 flags
active topics
-
President BIDEN Vows to Make Americans Pay More Federal Taxes in 2025 - Political Suicide.
2024 Elections • 147 • : WeMustCare -
Definitive 9.11 Pentagon EVIDENCE.
9/11 Conspiracies • 439 • : LaBTop -
Do you name your cars ?
General Chit Chat • 15 • : visitedbythem -
Official denial
Diseases and Pandemics • 21 • : PrivateAngel -
New Bombshell Evidence Strongly Suggests Trump was Set Up in Classified Docs Saga
US Political Madness • 26 • : WeMustCare -
James O’Keefe: I have evidence that exposes the CIA, and it’s on camera.
Whistle Blowers and Leaked Documents • 31 • : loveguy -
Say his name
US Political Madness • 41 • : VariedcodeSole -
BREAKING: Astrazeneca admits for the first time its vaccine can cause deaths and serious injuries
Medical Issues & Conspiracies • 0 • : Lochid -
Hamas and Other Islamist Terrorist Groups Announce Support of US Campus Anti-Israel Protests
Education and Media • 20 • : WeMustCare -
Australian PM says the quiet part out loud - "free speech is a threat to democratic dicourse"...?!
New World Order • 17 • : Myhandle