It looks like you're using an Ad Blocker.
Please white-list or disable AboveTopSecret.com in your ad-blocking tool.
Thank you.
Some features of ATS will be disabled while you continue to use an ad-blocker.

The Collaborative Gimp tutorial for ATS members. [updated]
page: 6share:
reply to post by Agarta
Hooray!!!!!!
You, my Friend, are a genius, not to mention very patient.
Thank you once again Agarta.
The menu is pretty complex when some one like me is dumb to all the different functions and their uses.
But, while I couldn't play with the glass effect, I had been tinkering with your other helpful texting tips where you use pathways.
Tomorrow, I will tackle the glass effect text since you have provided the solution to my problem.
You rock~
Many thanks....
snarky
P.S. I would give you a hundred stars and twenty applause if I could.......
reply to post by Agarta
Here's a couple I played with.
Not the greatest but it's a start......[will play with different fonts later.]


It's awkward trying to make a semi-circle without it being lopsided. Had to redo it several times. Ugh....
Question: when using the path...does it matter how close or far apart the dots [clicks] are along the pathway?
Also, when I went to "file" and then "create" to get to the glass test, I noticed underneath is "LOGOS" with all kinds of descriptions. Are they used in the same way or is that for some thing all together different?
Just curious....
Thanks,
snarky
Here's a couple I played with.
Not the greatest but it's a start......[will play with different fonts later.]
It's awkward trying to make a semi-circle without it being lopsided. Had to redo it several times. Ugh....
Question: when using the path...does it matter how close or far apart the dots [clicks] are along the pathway?
Also, when I went to "file" and then "create" to get to the glass test, I noticed underneath is "LOGOS" with all kinds of descriptions. Are they used in the same way or is that for some thing all together different?
Just curious....
Thanks,
snarky
reply to post by snarky412
When I want a true semi circle I will use the circle tool and create the circle then use the path tool and follow it for the area I need. How close they are does not matter but the closer they are the smoother the curve.
Yes those are other text options very similar. There should be options for website themes like buttons and bars and such as well
edit on
13-1-2013 by Agarta because: (no reason given)
Originally posted by Agarta
reply to post by snarky412
When I want a true semi circle I will use the circle tool and create the circle then use the path tool and follow it for the area I need. How close they are does not matter but the closer they are the smoother the curve.
Yes those are other text options very similar. There should be options for website themes like buttons and bars and such as well
Finally found the circle tool...."text circle".
My menu is not set up the same as others and is quite the challenge to find where certain tools are located.
However, I did manage this:

Now then, if I can remember how I did it, but that's another trick within itself !!
reply to post by snarky412
Sorry about that, I said circle tool when I meant the "Ellipse Tool" shown here...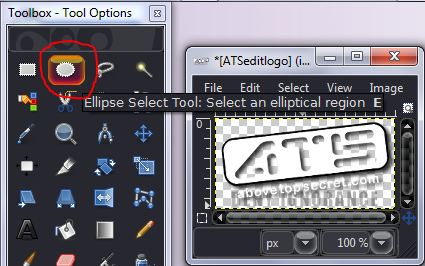
But the "Text Circle" works too lol.
Sorry about that, I said circle tool when I meant the "Ellipse Tool" shown here...
But the "Text Circle" works too lol.
reply to post by Agarta
Hey, I have another question if I may....
I've been playing around with editing images from numerous pictures at one time and grouping them in layers.
Kinda getting the hang of it except one thing.
When I select one item in the layer group and make the rest "invisible" why is it that when I re-size the one visible image it affects the whole group?
So what I've been doing is after I edit the picture, I'll export it to my folder and when I get ready to re-size it, I'll open it separately. [being as avatars are 180x480 it doesn't leave much room for multiple images...]
I'm getting by the way I'm doing it but thought I'd check with you to see if there is a better way or if it doesn't really matter.
Hope this isn't confusing......
Thanks a bunch~
snarky
ETA: Do you have any suggestions for good paintbrush plug ins? There's so many, I'm not sure which ones are worth getting and which ones aren't. I haven't gotten any new plugins for them or airbrush or anything for that matter.....just not sure.
edit on 25-1-2013 by snarky412 because: (no reason given)
reply to post by snarky412
That is actually easier than you think. In order to resize a single layer in a group of layers click the layer you want to work with, then right click on it in the right tool bar section and select "scale layer".

Edit to add: Another way is to click the "Layers" tab and find "Scale Layer". I use the way I showed above to ensure I am on the right layer because it is easier to click it then click it again rather than slide over to the image but either way works.
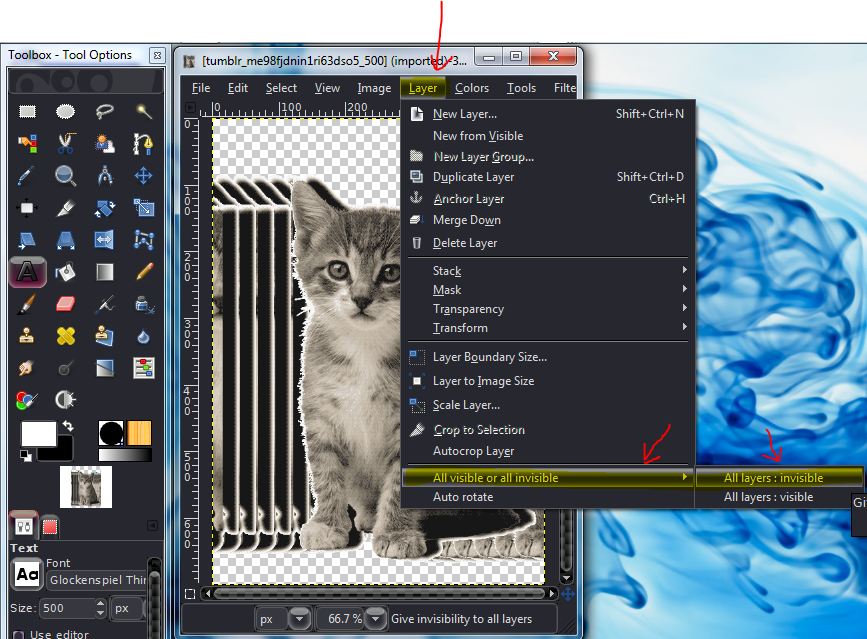
I don't know if you use the time consuming way of shutting off all the eyes in your groups or not but if you do here is an easier way. Left click on "Layers" then hover over "All Visible or Invisible" and select the one you want.
As for brushes, I have thousands. Some I have downloaded and many I have made for the job I am working on. Some I use all the time and some I have never used but there have been several times I needed one and it ended up I had what I needed. So it is up to you The ones I find I use the most are hair strands, fire, leaves, trees, star/space, the Moon, cracked glass, dripping blood, etc. I started off by making what I needed or going and looking for the ones I needed so really its up to you.
That is actually easier than you think. In order to resize a single layer in a group of layers click the layer you want to work with, then right click on it in the right tool bar section and select "scale layer".
Edit to add: Another way is to click the "Layers" tab and find "Scale Layer". I use the way I showed above to ensure I am on the right layer because it is easier to click it then click it again rather than slide over to the image but either way works.
I don't know if you use the time consuming way of shutting off all the eyes in your groups or not but if you do here is an easier way. Left click on "Layers" then hover over "All Visible or Invisible" and select the one you want.
As for brushes, I have thousands. Some I have downloaded and many I have made for the job I am working on. Some I use all the time and some I have never used but there have been several times I needed one and it ended up I had what I needed. So it is up to you The ones I find I use the most are hair strands, fire, leaves, trees, star/space, the Moon, cracked glass, dripping blood, etc. I started off by making what I needed or going and looking for the ones I needed so really its up to you.
edit on 25-1-2013 by Agarta because: (no reason given)
reply to post by Agarta
Duh.....[face palm.....]
Oops, my bad......
You're my hero once again....
Many thanks.
snarky
Duh.....[face palm.....]
Oops, my bad......
You're my hero once again....
Many thanks.
snarky
reply to post by Agarta
I downloaded the grass brushes, installed them and they worked with no problem when I opened GIMP.
The themes I downloaded worked too.
But when I downloaded/installed the edge brushes, they are not showing up after I open up GIMP.
I did the same procedure as the first one but for the life of me, can't get them to work.
So could I have a bad download?
Or is it another one of my oops moments.......
Much respect~
snarky
-----------------
ETA: Never mind, I solved my oops problem.....thx any way
As for brushes, I have thousands. Some I have downloaded and many I have made for the job I am working on. Some I use all the time and some I have never used but there have been several times I needed one and it ended up I had what I needed. So it is up to you The ones I find I use the most are hair strands, fire, leaves, trees, star/space, the Moon, cracked glass, dripping blood, etc. I started off by making what I needed or going and looking for the ones I needed so really its up to you.
I downloaded the grass brushes, installed them and they worked with no problem when I opened GIMP.
The themes I downloaded worked too.
But when I downloaded/installed the edge brushes, they are not showing up after I open up GIMP.
I did the same procedure as the first one but for the life of me, can't get them to work.
So could I have a bad download?
Or is it another one of my oops moments.......
Much respect~
snarky
-----------------
ETA: Never mind, I solved my oops problem.....thx any way
edit on 29-1-2013 by snarky412 because: (no reason given)
reply to post by Agarta
Hey, I just wanted to tell you a funny........
QUESTION:
Do you know when you've been messing with GIMP too much???????
---When you sit there watching the news and wish you could take your mouse and move all the crap off the screen.
Seriously, this morning I was sitting there watching the news and looking at all the clutter surrounding the anchor on the TV screen and thought, Damn if only I could move this here and that there and delete the rest....... and all of a sudden I broke out into a giggle fit. Naturally my husband gives me this WTH look.
Silly, I know but hey, I have a very warped sense of humor.
-------------------------------
I have been playing around a lot......played with the "curve" for text
Not the best but.....
I know this is meant for Avatars, but perhaps some GIMP people can direct me to the proper resizing dimensions for making full-length avatar
backgrounds?
As you can see, I still can't get mine to be full-length like most avies on here, so how do I fix that so I can show Saruman's badassery instead of having him creep on you like he is now?
As you can see, I still can't get mine to be full-length like most avies on here, so how do I fix that so I can show Saruman's badassery instead of having him creep on you like he is now?
Originally posted by TheToastmanCometh
I know this is meant for Avatars, but perhaps some GIMP people can direct me to the proper resizing dimensions for making full-length avatar backgrounds?
As you can see, I still can't get mine to be full-length like most avies on here, so how do I fix that so I can show Saruman's badassery instead of having him creep on you like he is now?
The visible size is 180X480 so start by making a background that size. If the instructions I wrote out on page 1 of the BTS Avatar Creations thread are not working go to your tools page and clear out everything in your avatar section and submit. Then do the same for your background section. once they are both blank follow the instructions again in order and it should work If not shoot me a U2U and I can try and help. Here is the instructions... www.abovetopsecret.com...
reply to post by Agarta
I was wondering, is it hard to 'make' brushes?
I found some brushes for hair but not quite what I was looking for...wanted longer strands, maybe flowing in 2 directions, not just the one [like for the wind blown look where the hair is up, the curve on the brush is always at the bottom]
Or maybe you can point me in the right direction to the better brushes for hair....
I also wanted to 'bump' this thread, keep it going for others that may be interested.
Thanks once again~
snarky
As for brushes, I have thousands. Some I have downloaded and many I have made for the job I am working on. Some I use all the time and some I have never used but there have been several times I needed one and it ended up I had what I needed. So it is up to you The ones I find I use the most are hair strands, fire, leaves, trees, star/space, the Moon, cracked glass, dripping blood, etc. I started off by making what I needed or going and looking for the ones I needed so really its up to you.
I was wondering, is it hard to 'make' brushes?
I found some brushes for hair but not quite what I was looking for...wanted longer strands, maybe flowing in 2 directions, not just the one [like for the wind blown look where the hair is up, the curve on the brush is always at the bottom]
Or maybe you can point me in the right direction to the better brushes for hair....
I also wanted to 'bump' this thread, keep it going for others that may be interested.
Thanks once again~
snarky
Seeing that animated background images are a "no-no", I've often wondered if there is (a simple) way to lay a transparent ani gif precisely
over a background image to work around the system and still be within the guidelines.
Anyone know how to do this in GIMP?
Anyone know how to do this in GIMP?
reply to post by snarky412
I apologize I missed this question. There are a few ways(3 that I know of) of doing it. The easiest to export as a .gbr and and export dirrectly to your gimp brushes file. This will be exactly as you saved it(Full color even). I will begin working on a tute for you later today or tomorrow.
reply to post by Zarniwoop
This to me is pretty difficult as I have not figure a rule of thumb on the exact pixels from top or side and it is always trial and error in aligning it, but it is much easier to find the alignment before making the animation. I usually put the first image in the animation on a trans avy and put the bg I am working on into my own slot and do the back and forth trial and error of putting the "Dots" where they go, then I create the gif/animation around the "dots" of alignment. If anyone can find an easier way I am all ears lol sorry I can't help more than that.
reply to post by Agarta
Darn it... I though you would have the answer.
Thanks for the response just the same.
Darn it... I though you would have the answer.
Thanks for the response just the same.
reply to post by Zarniwoop
It seems to be more of a coding problem on ATS, how it overlays the pictures, and to compensate from there.
I think you are talking about a simple animation, such as an eyeball blinking, or some similar minor animation, right?
My forte is coding, not graphic design. I'll take a look at the code to see how they load the images, and the div tags.
If we could figure it out it would set a new precedent for flashy avatars. (Not too flashy, but subtly interesting.)
The principle is this:
You have a background image, you cut a section out, animate it, then have it overlay the original properly, with the effect in place. The avatar would be on a transparent background, (or not, pending on alignment) and the background image in your profile would remain static. The effect would appear to be an animated background.
The problem:
ATS doesn't overlay images equally. Why is that? It's a coding issue, but with any coding, there is always a workaround. We just haven't discovered it yet.
My goal:
To get my wolf to blink his eye, the eye blink being an avatar, a gif, and the background image remaining static, and to figure out how to get the two images to align, without the trial and error technique.
I think that is what Zarn is after.
I'm on it.
Druid's Gimp Animation Tutorial:
Using Gimp to create animations may seem mysterious, but this tutorial will attempt to outline the basic procedure involved, and explain how Gimp is a very nifty tool for making .gif files. The possibilities are only limited by your own imagination!
The primary reason for creating this tutorial is to explain a easy way to make animated avatars with subtle effects for people who normally sport a profile background, but want to add a bit of animation to it. I'll explain a technique to make a lizard walk across your screen every five seconds. The end result is an avatar, ready to go into your avatar spot, without changing your background image. The effect is sure to make members do a double take, as the little guy is quick, and you won't really see him the first time, but your peripheral vision will.
I found this little guy somewhere on the internet, after googling a bit.
The first step is to open Gimp, and you'll see three windows appear:
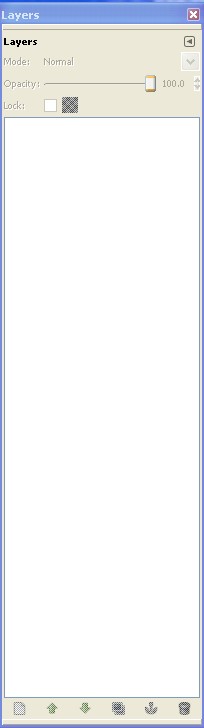
The Layer Window:
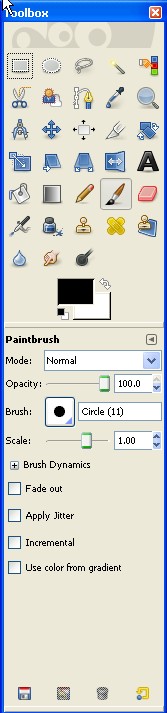
The Toolbox:
And the Main Window:
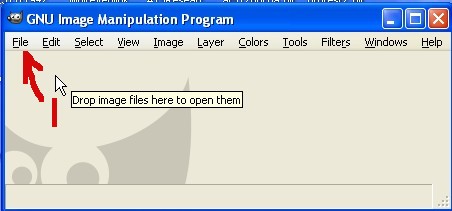
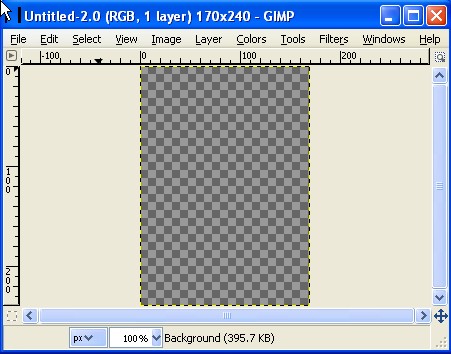
Start by clicking "File", and "New".
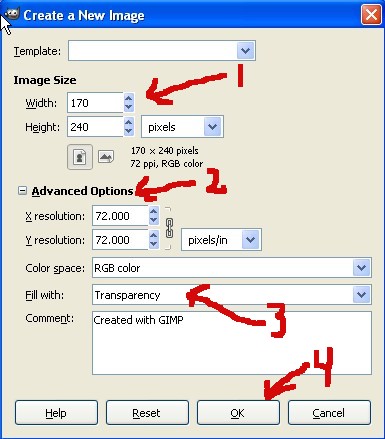
You'll want to change the image size to 170 by 240, the dimensions of an avatar. Go to Advanced Options, and where it says fill with, pick the transparency option. Then, click OK.
You'll get a blank slate to start working with.
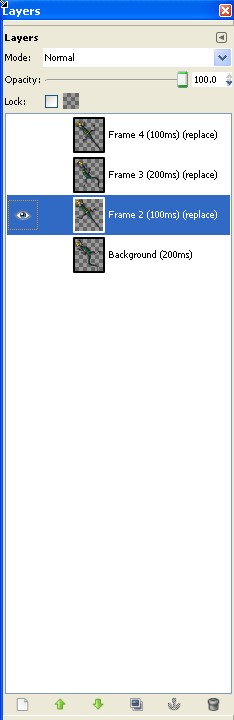
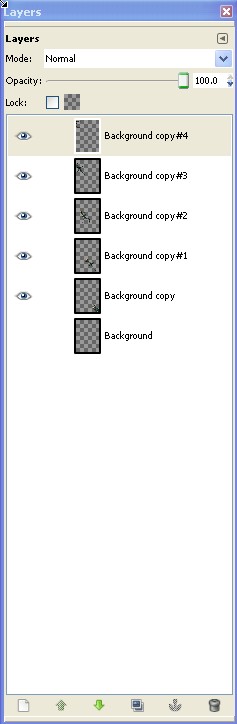
Your Layers window will look like this.
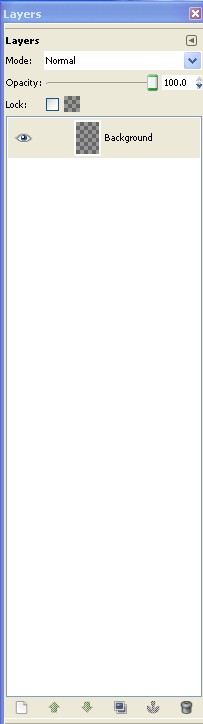
The first step is simply to duplicate that layer. Right click, and got to Duplicate Layer.
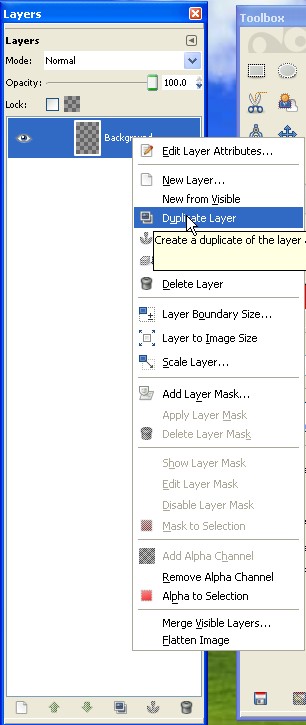
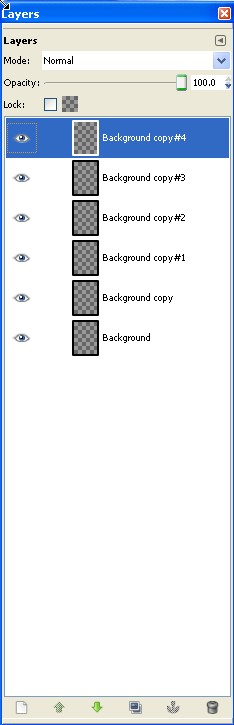
Make 5 new layers, for a total of six.
Since our little friend is four frames, it'd be a good idea to open him up in Gimp as well, as we'll be borrowing his frames to create our own animation.
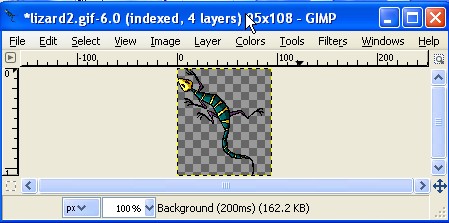
Time to start copying frames back and forth. You can use keyboard shortcuts, or right click edit copy, but the point is to take the first frame and place it in the second layer. Leave the first one blank at this point in time.

and continue,
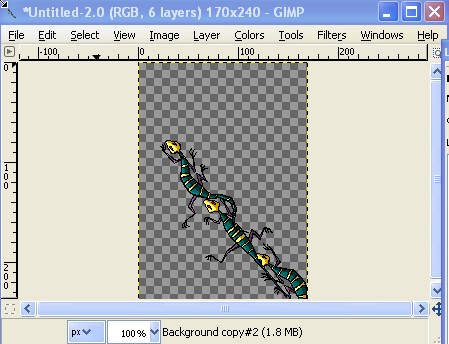
until the window is full-o-lizards.
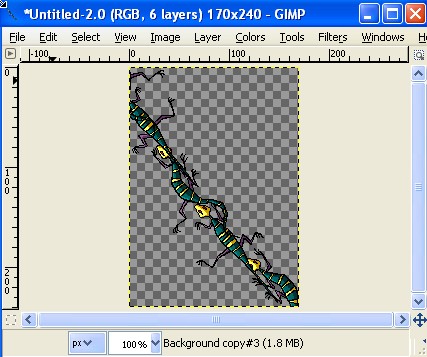
The Layer window will look something like:
We are almost done with our very first Gimp animation!
Time to check it out.
Go to Filters in the Main window, and scroll down to animation and playback,
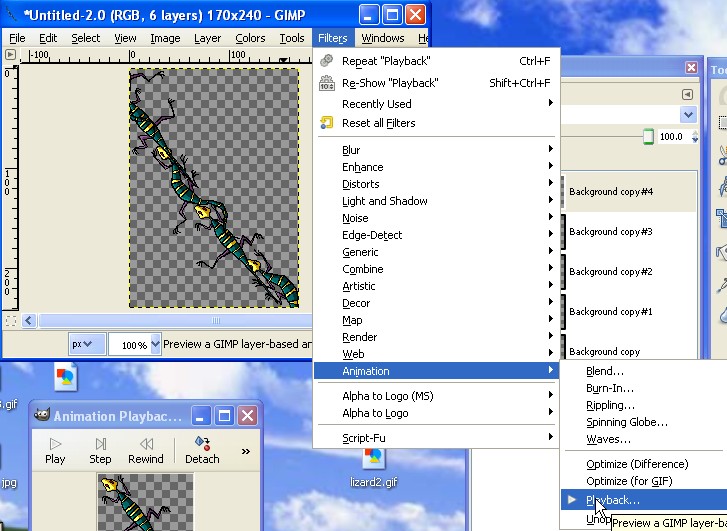
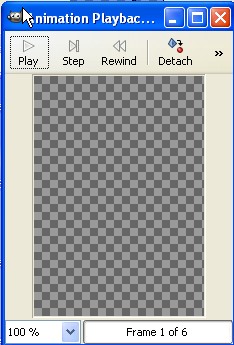
Click play:
Well, that just makes a screen full of lizards, so we need to edit the layer attributes. Right click on a layer and scroll to edit layer attributes:
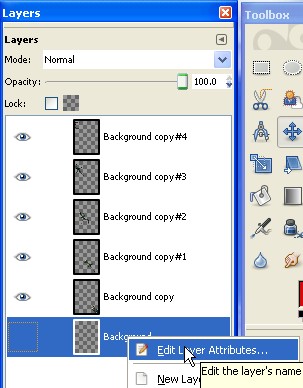
I edited the first frame already, and renamed it from Background to Frame 1, and added in an important animation attribute, (5000ms), which happens to be a 5 second pause. (10000ms) would be a 10 second pause, etc.
The second frame needs a little more work:
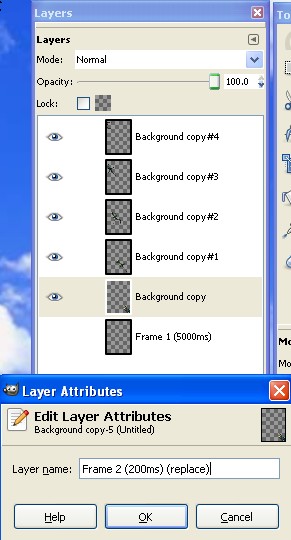
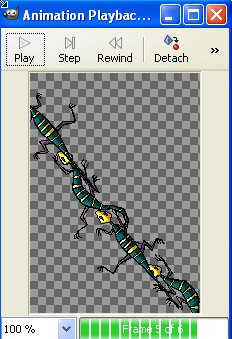
This is what it looks like with all the attributes properly edited.
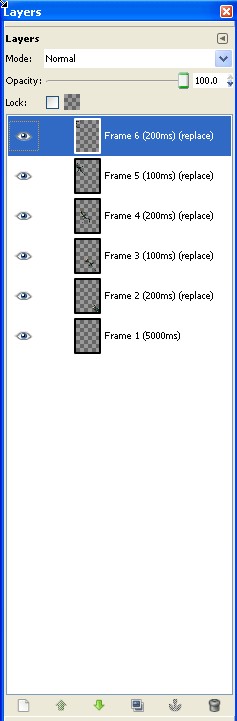
Go back to the Animation Playback window and test it out again:
Nice.
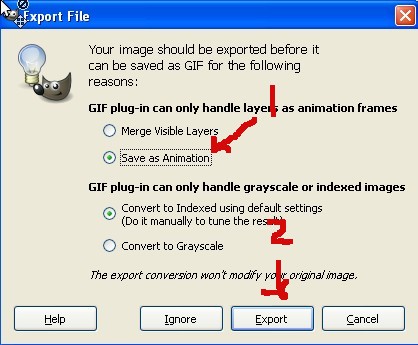
Ok, so let's save it.
Now we go to File, Save As:
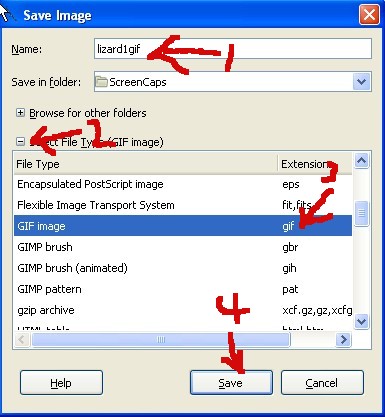
Here's the final product:

Enjoy!
edit on 2/28/13 by Druid42 because: FINAL FILE SIZE? 4.2kb!
new topics
-
How does my computer know
Education and Media: 1 hours ago -
USO 10 miles west of caladesi island, Clearwater beach Florida
Aliens and UFOs: 5 hours ago
top topics
-
Running Through Idiot Protestors Who Block The Road
Rant: 16 hours ago, 12 flags -
Tesla cutting 14,000 jobs
Global Meltdown: 15 hours ago, 6 flags -
Israel ufo shoot down drones?
Aliens and UFOs: 14 hours ago, 6 flags -
USO 10 miles west of caladesi island, Clearwater beach Florida
Aliens and UFOs: 5 hours ago, 6 flags -
Abortions in first 12 weeks should be legalised in Germany, commission says
Medical Issues & Conspiracies: 14 hours ago, 5 flags -
On this Day in History, April 15, 1865, Abraham Lincoln Passed Away.
General Chit Chat: 15 hours ago, 4 flags -
How does my computer know
Education and Media: 1 hours ago, 0 flags
active topics
-
Negotiations and Diplomacy.
History • 10 • : chr0naut -
Israel ufo shoot down drones?
Aliens and UFOs • 18 • : TheMisguidedAngel -
How does my computer know
Education and Media • 2 • : chr0naut -
Afterlife, unknown, so prepare, or just go into the unknown (bad)!!
ATS Skunk Works • 50 • : Terpene -
Abortions in first 12 weeks should be legalised in Germany, commission says
Medical Issues & Conspiracies • 10 • : Freeborn -
President BIDEN Warned IRAN Not to Attack ISRAEL - Iran Responded with a Military Attack on Israel.
World War Three • 38 • : TinfoilTophat -
Canadian Police Urge Citizens To Avoid Conflict With Armed Robbers By Leaving Keys At Front Door
Social Issues and Civil Unrest • 68 • : Astyanax -
Gold and silver prices....woo hoo
History • 71 • : SchrodingersRat -
Fossils in Greece Suggest Human Ancestors Evolved in Europe, Not Africa
Origins and Creationism • 46 • : matafuchs -
America's Infant Mortality Rate Increases for the First Time in 20 Years
Medical Issues & Conspiracies • 17 • : nugget1