It looks like you're using an Ad Blocker.
Please white-list or disable AboveTopSecret.com in your ad-blocking tool.
Thank you.
Some features of ATS will be disabled while you continue to use an ad-blocker.

Hey 3d artists, I need some help!!!
page: 1share:
I'm really wanting to do a rigged model of a Grey in Maya to show movement such as walking, running, manipulating bojects, lip synch etc, but cant
figure out how to do the head!!!
Can anyone out there toss a guy a bone and maybe teach me how to model the head?
thanks in advance
Can anyone out there toss a guy a bone and maybe teach me how to model the head?
thanks in advance
reply to post by HomerinNC
I'm fairly experienced with Maya. Can you clarify what you need help with? Are you wanting help rigging the head or just modeling it?
If you just need help modeling it, I would suggest you try Z-brush which would be perfect for a grey. You can sculpt it in high detail and then not only export it at a lower density so your poly count is reasonable, but also generate a good normal map for your model. Lots of zbrush tutorials on youtube and it's fairly intuitive to use once you get used to the interface. You can export your models in obj format which allows you to import them in maya (there is actually a goZ option in maya and in zbrush so you can just bring models back and forth between the two applications with ease).
If you don't want to try a new software package and just want to model it in maya I might be able to still help. Are you having a problem with a particular part of the head? modeling characters in maya can be a pretty in depth process. More info would allow me to help you more.
Maybe post some screenshots of where you are at in the modeling process and what sort of methods you are using? Are you using polygons, sub D's etc?
edit on 21-2-2014 by DeadSeraph because: (no reason given)
reply to post by DeadSeraph
Thanks for the very fast reply, I'm really good at doing inanimate stuff, but always had problems with organics, that was the part of my classes I flunked when I was taking 3d modeling. Right now, I'll take the easiest way to do this lol
ETA:L thought zbrush was free, i guess thats out of the question using that now
edit on 2/21/2014 by HomerinNC because: (no reason
given)
reply to post by HomerinNC
Organic modeling can be difficult with maya depending on the methods you know. I would strongly recommend familarizing yourself with zbrush. There isn't a free student license available for it unfortunately, so you will need to "acquire" it by other methods. But there are many tutorials for zbrush on youtube and elsewhere that you can find. The process also depends on what the requirements for your project are. For instance do you need to UV map your model and texture it? If so that complicates things. I will assume you need to UV and texture your model before you rig it.
Basically what I would do if I were you is this:
-"Acquire" Zbrush
-Familiarize yourself with the interface and how you pan around with the camera, move objects, select stuff, etc (tutorials are everywhere for that part)
-Find a good tutorial on "Zspheres" and familarize yourself with how they work
-Start your model using Zspheres
-Block out the basic shape of your model using zspheres (head, arms, fingers, body, legs, toes, etc). In the case of a Grey, you may wish to add an extra sphere for the eyes, depending on how much you want them to bulge out from the head
-Make sure you understand how Zbrush's symmetry feature works, and use it religiously since you will be rigging the model later
-Convert your Zspheres model to a polygonal object (this is really easy to do and zspheres tutorials should show you how)
-Start sculpting your Grey. Refine the detail of the face, nostrils, eyes, eye sockets, mouth, wrinkles, etc. Start with the head and the face and sculpt away. Don't worry about making it perfect at this point, just get the basic detail in there. You may need to turn up the number of polygons you are working with (or turn them back down depending on what you are doing).
-Sculpt the basic detail of the arms, torso, legs, etc.
-Look up how to retopologize your model in zbrush, and fix any issues you might have with your topology, or add topology where you need more detail. Keep in mind during this process that you are going to want to keep your poly count within a reasonable range in the end. You want your edges to flow where you need detail, but you don't want to go crazy. Most of your high poly detail will show up in your lower poly model through the use of the normal map, which you will generate in zbrush later
-crank up the poly count and sculpt all the really fine detail. This is the funnest part.
-Once you are happy with how your model looks, You can either UV map it in zbrush (which can sometimes have undesirable results) or export your model as an obj, open up maya, and uv map it there.
-Once your model is fully UV'd, export it back into zbrush, and generate a normal map for it which you will use to get all the high poly detail you sculpted down onto the lower poly model.
-You can also start texturing your model in zbrush at this stage if you would like by using Zbrush's poly paint feature (you'll need a tutorial on that as well). Polypaint allows you to paint directly on a UV'd model which is a more intuitive process for some. If you prefer, you can skip that step, export your uv map, diffuse map, etc, and your model, and do your texturing in photoshop or maya
-Bring your finished model back into maya and clean it up
-Start your rigging
Again, this is a really indepth process so it would help to know what your project requirements are. I would also recommend you avoid facial rigging unless it is part of your project requirements, as it will significantly complicate the rigging process. I'd also recommend you don't bother trying to have your alien capable of blinking, as you'd need to model eyelids and then rig them.
If you AREN'T comfortable with learning zbrush, you can do the whole model in maya by starting with some image planes. See if you can find some image planes of a grey alien on the internet (you would need a front, side, and top view of the same alien). Fix them up in photoshop and import them to maya. From there you could use whatever method of modeling you are comfortable with (for me it's polygonal/box modeling) and start trying to block out the basic shape of your image planes, adding more edge loops and shifting around vertices, edges, and faces as necessary. The general rule of thumb with this method is to start with as little detail as possible and just block out the basic features and shape of your character, adding more detail later on in the process.
I hope this sort of helps. It's a lot to chew on and I'm not really sure how familiar you are with the entire process. Think about which method you want to use (strictly maya, or a combination of maya and zbrush) and let me know what your project requirements are and I will do my best to help and offer further advice.
Also, if you want you can check out this thread I made for 3d artists to share their
work. It didn't get a lot of traction, but there is 2 examples of the methods I mentioned above there. The alien was done using the zspheres method,
and the female human was modeled in maya first, and then taken over to zbrush for the normal map and extra details. I believe I used zbrush's
polypaint feature as well as photoshop to texture them both. The alien is completely rigged in maya.
HomerinNC
reply to post by DeadSeraph
Thanks for the very fast reply, I'm really good at doing inanimate stuff, but always had problems with organics, that was the part of my classes I flunked when I was taking 3d modeling. Right now, I'll take the easiest way to do this lol
ETA:L thought zbrush was free, i guess thats out of the question using that nowedit on 2/21/2014 by HomerinNC because: (no reason given)
It's not free, but there are other ways to uhm... utilize it's features? That's really all i can say
If you decide to model exclusively in maya, here is a good tutorial to sort of get you started as to how the polygonal modeling method works with
characters. Sometimes it helps to just watch someone else do it so you can get comfortable with how the workflow goes:
Some good advice here:
5 mistakes made by beginners in 3d modeling
a zbrush tutorial that covers how zspheres work:
Good luck! I think you will love zbrush. It's a lot of fun and makes modeling much more intuitive.
Some good advice here:
5 mistakes made by beginners in 3d modeling
a zbrush tutorial that covers how zspheres work:
Good luck! I think you will love zbrush. It's a lot of fun and makes modeling much more intuitive.
If cost is an issue you can check out Sculptris. It's simple and fun. It's free and was acquired by the same company that makes Zbrush. Zbrush is
the way you should go though. It's just a one time cost. Unlike say Photoshop….those bastards.
In addition to what Deadseraph is recommending you can always speed up the process by creating your base model via DazStudio (free) and exporting that as OBJ into Zbrush.
I have no experience with animation. I actually take my models out of Zbrush and turn them into 2D in Photoshop composites. Even my methods would be terrible for you as I don't sculpt with performance in mind ^_^
one last thing that I forgot to mention:
If you have to have your model capable of talking (you mention lip sync) and doing facial expressions, it's crucial that when you reach the stage where you need to retopologize your model, you take this into consideration and include enough edge loops in the areas that you need to be animated.
google edge flow and how it relates to animation and you should find some relevant information. In simple terms, when areas of the face need to be animated (for instance lips for speaking, or the area around the mouth and the eyes as well as the brow for facial expressions), there needs to be enough vertices and edges in that particular area to deform. For instance If you are trying to make your character smile, and you only have 1 or 2 edge loops around the mouth, you have limited topology to deform, and you will experience undesired effects. You want enough edge loops and detail around areas which will experience deformation that you can weight these regions properly after you are finished rigging, but not so much that it drives up your poly count unnecessarily.
This same principle applies to other areas of your model as well, such as joints like the knees, elbows, knuckles of the fingers, etc. For these areas, it's a good rule of thumb to have one edge loop on either side of the crease (or loop) that makes up your joint.
So if you have an arm modeled like so: ====|==== Where the | is the elbow, you'd want to drop in an edge loop on either side of the elbow to make weighting easier, and give your model enough topology to deform naturally.
edit on 22-2-2014 by DeadSeraph because: (no reason given)
HomerinNC
ETA:L thought zbrush was free, i guess thats out of the question using that now
Why? Bless your heart
I say if ur not making money from it neither should they. They dont lose a customer. They gain a loyal fan.
reply to post by HomerinNC
Low poly alternative -
Model the general shape of the head then map it.
You wont get any movement of the eyes nor lips but you will have the head on a swivel and the body will be able to walk run ect provided you can animate.
If you go the other route- you'll have to rig for the eyes and lips and you'll be using mapped eyes, hair, skin ect.
Good luck
edit on 22-2-2014 by Nephalim because: (no reason given)
I 'acquired' zbrush last night, so today I'll be all about learning how to use it, so hope in the next few weeks my Grey will be ready to be
animated and used for demonstrations.
Anything i do will be posted here of course
Anything i do will be posted here of course
Good luck on that! I cannot wait to see what you do here! I love the animating and I would love it more if it did not take so darned long to plan
everything out to get the key frames in all the right places.

reply to post by groingrinder
I know, i had to do it in maya for a class and for a 30 second clip, it took me like 24 hours to get it right
I know, i had to do it in maya for a class and for a 30 second clip, it took me like 24 hours to get it right
HomerinNC
I 'acquired' zbrush last night, so today I'll be all about learning how to use it, so hope in the next few weeks my Grey will be ready to be animated and used for demonstrations.
Anything i do will be posted here of course
Looking forward to seeing your progress. There are some great tutorials on youtube, and also some introductory videos on the zbrush site which you can find here: link
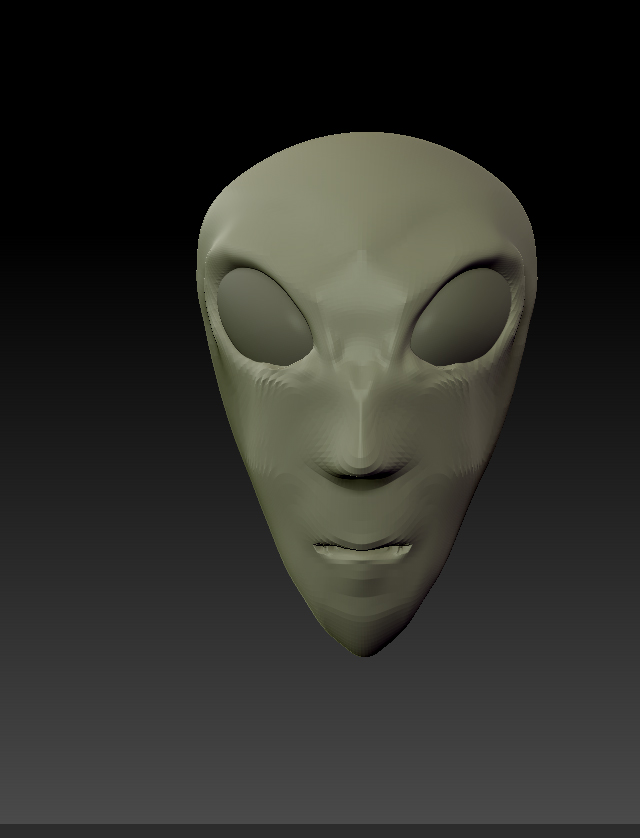
Well, here's my first attempt at a Grey after watching a basic tutorial on how to manipulate objects in zbrush
reply to post by HomerinNC
Excellent. Keep it up There are also long instructional videos to be *had under Gnomon Workshop and Digital Tutors and video2brain on Zbrush.
My favorite part is painting. I really enjoy painting in 3D. Especially how Zbrush handles it.
Excellent. Keep it up There are also long instructional videos to be *had under Gnomon Workshop and Digital Tutors and video2brain on Zbrush.
My favorite part is painting. I really enjoy painting in 3D. Especially how Zbrush handles it.
reply to post by Lucid Lunacy
Thanks! I need to get my internet turned back on this thursday, and watch the tutorials while following on my computer LOL
Thanks! I need to get my internet turned back on this thursday, and watch the tutorials while following on my computer LOL
Good work! I used Autodesk Mudbox for faces.....
You can sculpt straight onto the object and they made Maya as well.
Also exporting into Maya shouldn't be too hard....
Keep us updated with the progress.
marty
You can sculpt straight onto the object and they made Maya as well.
Also exporting into Maya shouldn't be too hard....
Keep us updated with the progress.
marty
reply to post by HomerinNC
Just thought I'd mention a few tips as you get started:
Once you are comfortable with the interface and how sculpting works in zbrush, I would suggest you redo your model (especially if you want to give it a body and legs/arms and rig it later). The reason for this is that you won't be getting the topology that you need if you keep pushing around one object (such as a single sphere), and using additional objects for the body parts wont produce the results you want for rigging.
-Start reviewing how zspheres work and playing around with them to build a base model to sculpt on. Zspheres will give you a really easy way of building a simple base mesh with all the basic parts where you need them right off the start (such as fingers, the head, hands, arms, etc etc)
-Once you are comfortable with how they work, build your aliens base model from scratch using zspheres
-Learn how the detail levels work. You can subdivide your mesh multiple times so that you can go up and down in levels of detail. This can make sculpting much easier, and will help you when it comes time to retopologize your model
In the screenshot you've posted, there are some artifacts that are showing. This looks like it is because you don't have the topology you need where you want it (for instance around the nose), and also because you haven't subdivided your model yet. There is a way to turn wireframe on and off in zbrush so that you can see where your edges are. This can help you identify problem areas that might need to be retopologized. Thats another thing you are going to want to learn about (on youtube or elsewhere). It's pretty much inevitable that at some point you are going to have to either completely redo the topology of your model or else modify the topology so that you have edge flow where you need it.
This tutorial gives an introductory lesson on how the topology tool works in zbrush so you can sort of see what I mean:
Basically what you are doing by changing the topology is modifying how the mesh you will be exporting to maya later is constructed. There is also a way to generate a default topology for your mesh, and then just alter the areas that need work by hand, but you will need to look up how to do that as I forget atm.
ETA:
Another topology tutorial. You can find more on youtube I'm sure, and I think the pixelogic website also has some instructional vids on the subject:
edit on 23-2-2014 by DeadSeraph because: (no reason given)
new topics
-
Mike Pinder The Moody Blues R.I.P.
Music: 26 minutes ago -
Putin, Russia and the Great Architects of the Universe
ATS Skunk Works: 3 hours ago -
A Warning to America: 25 Ways the US is Being Destroyed
New World Order: 7 hours ago
top topics
-
President BIDEN's FBI Raided Donald Trump's Florida Home for OBAMA-NORTH KOREA Documents.
Political Conspiracies: 13 hours ago, 31 flags -
A Warning to America: 25 Ways the US is Being Destroyed
New World Order: 7 hours ago, 13 flags -
Is AI Better Than the Hollywood Elite?
Movies: 15 hours ago, 4 flags -
Mike Pinder The Moody Blues R.I.P.
Music: 26 minutes ago, 2 flags -
Maestro Benedetto
Literature: 15 hours ago, 1 flags -
Putin, Russia and the Great Architects of the Universe
ATS Skunk Works: 3 hours ago, 1 flags
active topics
-
Gaza Terrorists Attack US Humanitarian Pier During Construction
Middle East Issues • 56 • : YourFaceAgain -
Mike Pinder The Moody Blues R.I.P.
Music • 1 • : RussianTroll -
Putin, Russia and the Great Architects of the Universe
ATS Skunk Works • 11 • : CriticalStinker -
Mood Music Part VI
Music • 3106 • : TheWoker -
University of Texas Instantly Shuts Down Anti Israel Protests
Education and Media • 275 • : Vermilion -
President BIDEN's FBI Raided Donald Trump's Florida Home for OBAMA-NORTH KOREA Documents.
Political Conspiracies • 22 • : 320MPH -
A Warning to America: 25 Ways the US is Being Destroyed
New World Order • 19 • : Cvastar -
Alternate Electors vs Fake Electors - What is the Difference.
2024 Elections • 118 • : Threadbarer -
HORRIBLE !! Russian Soldier Drinking Own Urine To Survive In Battle
World War Three • 51 • : BernnieJGato -
Nearly 70% Of Americans Want Talks To End War In Ukraine
Political Issues • 97 • : SchrodingersRat