It looks like you're using an Ad Blocker.
Please white-list or disable AboveTopSecret.com in your ad-blocking tool.
Thank you.
Some features of ATS will be disabled while you continue to use an ad-blocker.

My Tricks for Turning Carbon Fiber Arrows into 9 Inch Take Down Survival Arrows
page: 1share:
My Tricks for Turning Carbon Fiber Arrows into 9 Inch Take Down Arrows
I’ve built a lot of flattened PVC bows. You can learn how to do that from the master himself, BackyardBowyer. I love that I can build a $10 bow in an evening that outperforms and outlasts wooden bows that can take weeks to build.
Recently I built a 45 pound draw, 9 Inch, 1.3 pound take down, survival bow. BackyardBowyer has instructions for something similar to it here:
www.youtube.com...
My flattened PVC Survival Bow
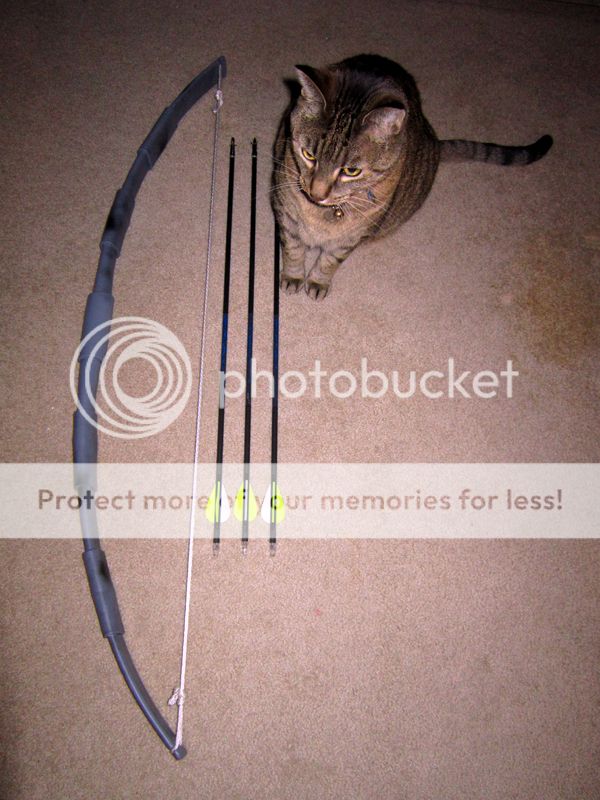
I wanted arrows that would fit into the same small carrying case, and came up with a kit that looks like this.
The whole kit fits into a small carry bag
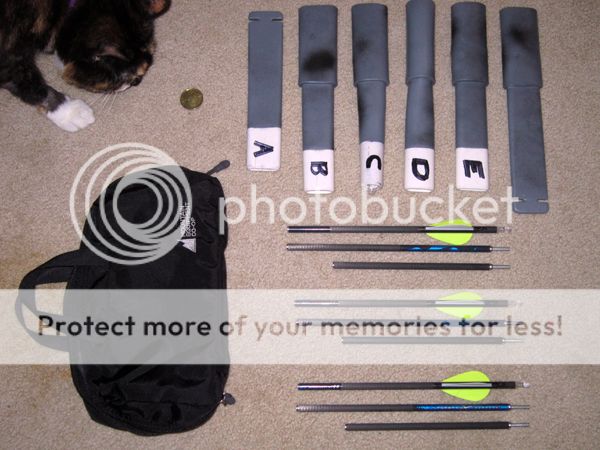
The arrows end up being a little over $10 dollars each (including broad head) but since I spent so little on the bow I figured I could splurge.
I have some neat tricks that really improve on the standard method for building a takedown arrow so I thought I would share.
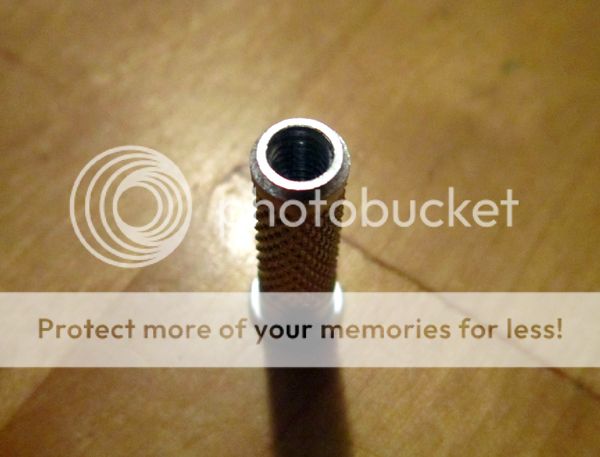
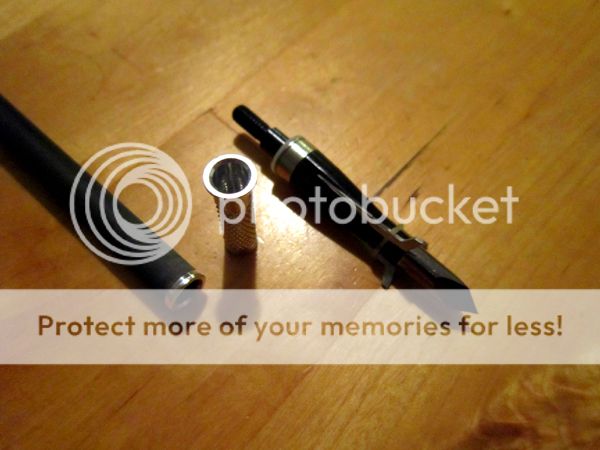
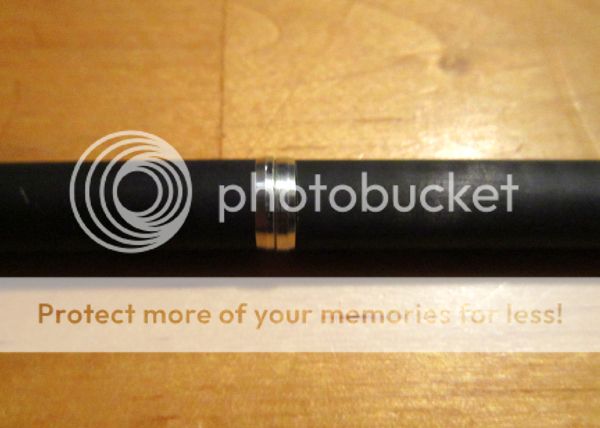
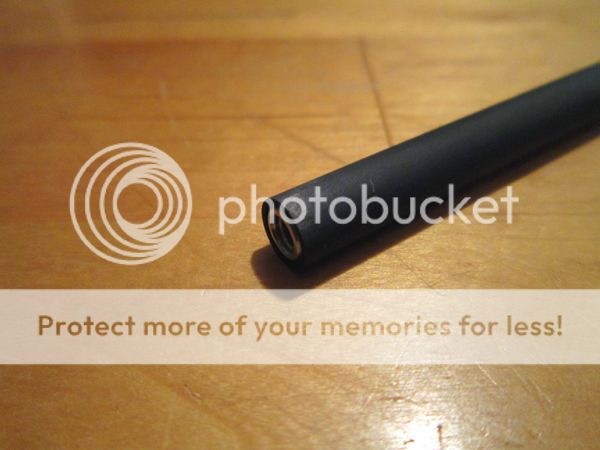
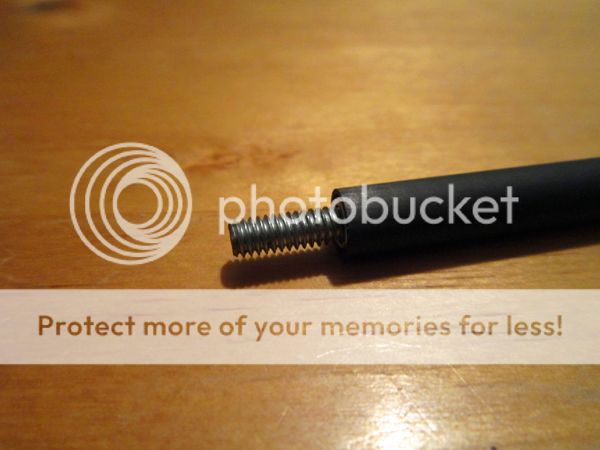
The standard way to make a take down arrow is to use tip inserts. These are standard, threaded, aluminum tubes that are normally pressed and or glued into the front end of a carbon fiber arrow shaft so that a modern field tip, or broad head can be threaded in.
A tip insert for a carbon fiber arrow shaft
An insert placed alongside where one is normally installed in the arrow
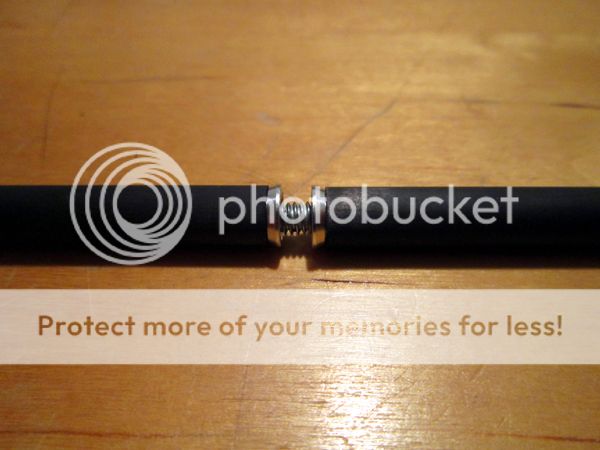
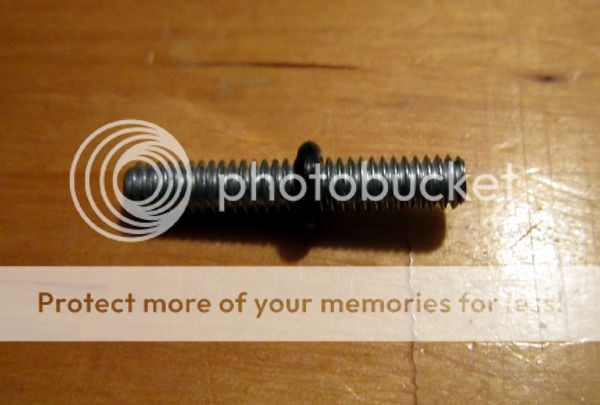
Two of these are used at each joint in the arrow. Then a piece of 8-32 ready-rod is threaded and glued into one insert allowing the arrow to be threaded together.
A joint with standard inserts threaded almost completely together with a section of ready-rod
There are three big problems with the standard system.
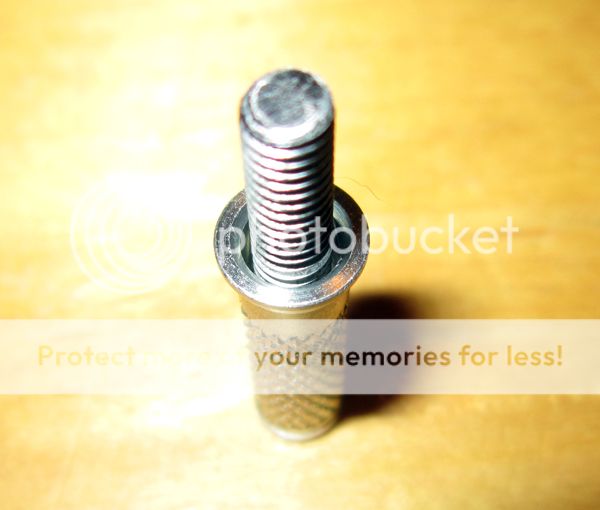
1) A large length of the inside of the inserts are not threaded and over sized. This means that the joint ends up sloppy, weak and doesn’t line up strait without some fiddling.
The hollowed out area in the front end of the insert

The joint is sloppy and doesn’t stay lined up when tightened together.
A section of ready-rod placed into the front of an insert to show the over sized inside diameter
2) For the same reason the ready-rod has to be nearly 2 inches long (1.6 to be exact) adding substantial weight to the arrow, especially if there is more than one joint in each arrow.
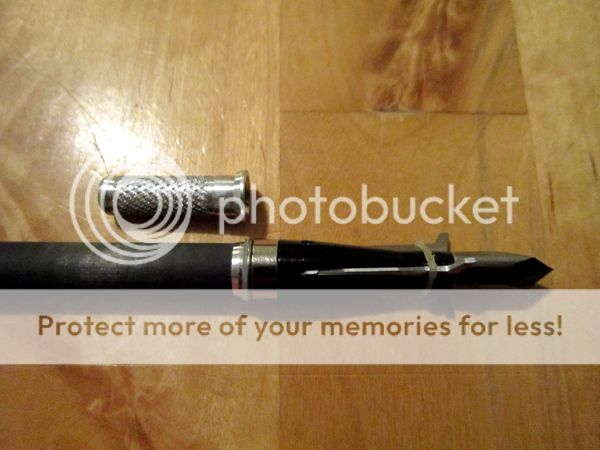
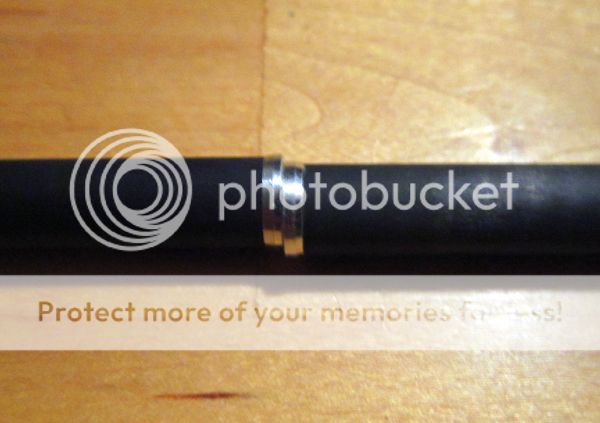
3) The inserts have a flange that is greater in diameter than the shaft and these flanges strike the bow when the arrow is shot, disrupting accuracy and potentially damaging the bow.
The flanges extend outside the diameter of the arrow shaft
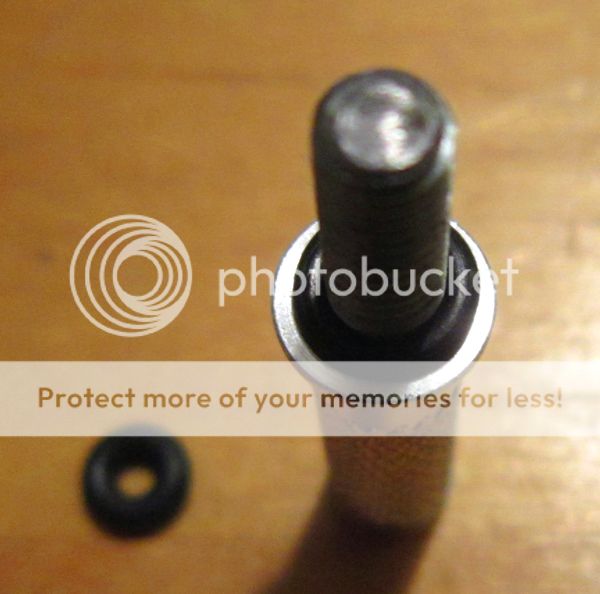
I used to add a 2-004 O-ring with a 75 or harder durometer over the middle of the ready-rod. This would help to take up space in the inserts at the middle of the joint but it wasn’t perfect. The joints still didn’t align perfectly, the bump was still there and the joint was still heavy. I’m mentioning it here because it is an easy improvement to the standard system.
A 2-004 V75 O-ring over the section of ready-rod
The O-ring takes up extra space inside the inserts
The O-ring in the middle of ready-rod before the joint is tightened up as the pieces would be inside the arrow shaft
How I do It Now
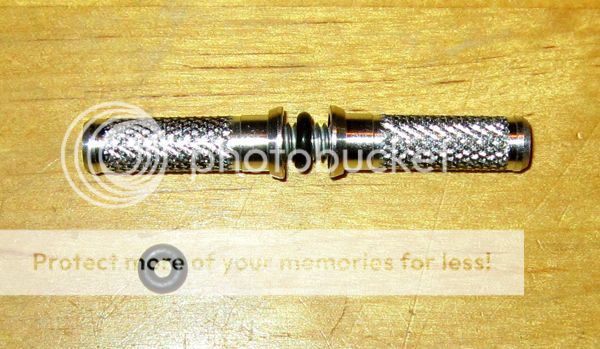
I use a variation of the standard system that I’ve found eliminates all of these issues. What I do essentially is take the flange off of the inserts so that they can be inserted backwards. This way the two threaded ends of the inserts are against each other so that a much shorter section of ready rod can be used. This makes the joint much more ridged and removes the bump produced by the flange.
The two modified inserts with a piece of ready-rod between them
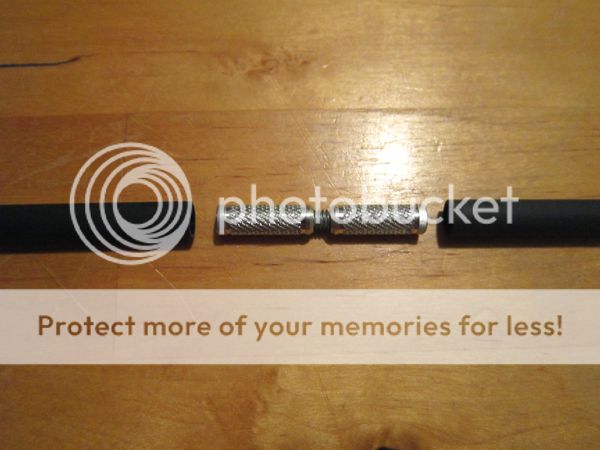
How a joint looks before being tightened up
Following are step by step instructions and tips.
For the arrows I modified, because they each have two joints, they require 5 inserts (two for each joint and one for the tip which is unmodified)
I start by hacksawing the flange off of the inserts. It takes about 15 seconds each.
Then I file the burs off of the cut end.

To make it easy to press into the arrow shaft I hold the cut end against the file at a 45 degree angle and file while turning the insert in my fingers. This puts a small chamfer onto the edge.
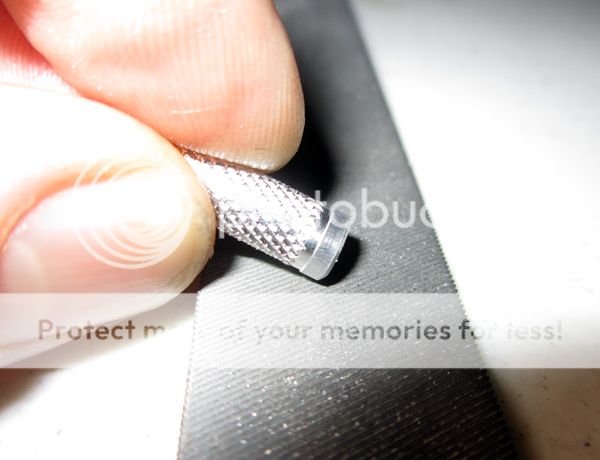
Time to move onto the ready-rod. I again use the hacksaw to section it. I like to use 1 inch sections because it guarantees that all of the insert threads will be populated.
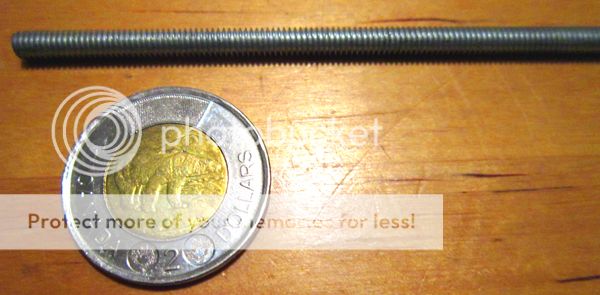
8-32 ready-rod
Once I have the sections of ready-rod cut to length I clean the ends up so that they will thread properly. First I put them straight into the grinder to flatten the ends.

Alternatively you can use a hand file.

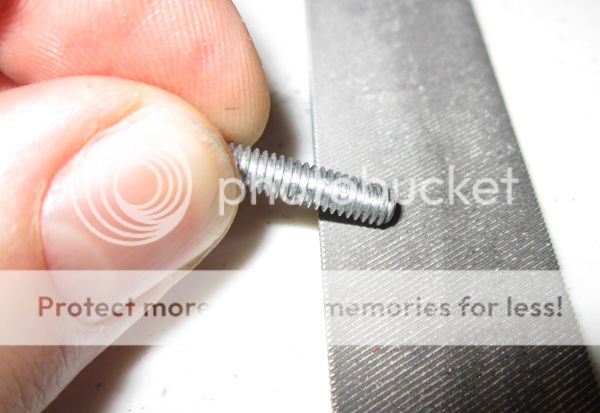
Then I hold them very lightly against the grinding wheel at about 45 degrees while turning them in my fingers so that it rounds the edge a bit.

Alternatively you can use a hand file for this too.
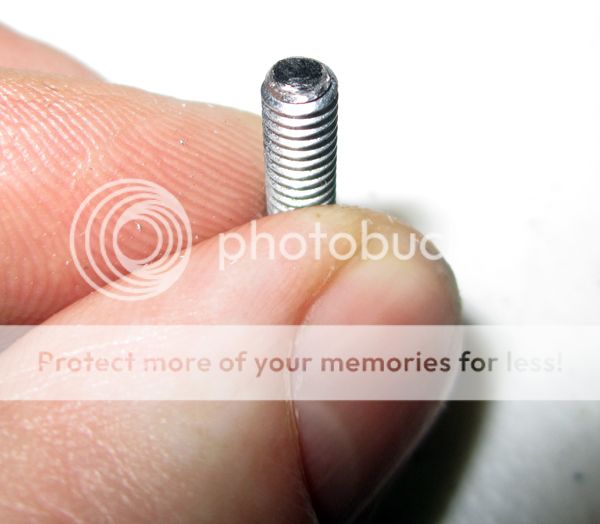
It should end up looking roughly like this on both ends.
I’ve built a lot of flattened PVC bows. You can learn how to do that from the master himself, BackyardBowyer. I love that I can build a $10 bow in an evening that outperforms and outlasts wooden bows that can take weeks to build.
Recently I built a 45 pound draw, 9 Inch, 1.3 pound take down, survival bow. BackyardBowyer has instructions for something similar to it here:
www.youtube.com...
My flattened PVC Survival Bow
I wanted arrows that would fit into the same small carrying case, and came up with a kit that looks like this.
The whole kit fits into a small carry bag
The arrows end up being a little over $10 dollars each (including broad head) but since I spent so little on the bow I figured I could splurge.
I have some neat tricks that really improve on the standard method for building a takedown arrow so I thought I would share.
The standard way to make a take down arrow is to use tip inserts. These are standard, threaded, aluminum tubes that are normally pressed and or glued into the front end of a carbon fiber arrow shaft so that a modern field tip, or broad head can be threaded in.
A tip insert for a carbon fiber arrow shaft
An insert placed alongside where one is normally installed in the arrow
Two of these are used at each joint in the arrow. Then a piece of 8-32 ready-rod is threaded and glued into one insert allowing the arrow to be threaded together.
A joint with standard inserts threaded almost completely together with a section of ready-rod
There are three big problems with the standard system.
1) A large length of the inside of the inserts are not threaded and over sized. This means that the joint ends up sloppy, weak and doesn’t line up strait without some fiddling.
The hollowed out area in the front end of the insert
The joint is sloppy and doesn’t stay lined up when tightened together.
A section of ready-rod placed into the front of an insert to show the over sized inside diameter
2) For the same reason the ready-rod has to be nearly 2 inches long (1.6 to be exact) adding substantial weight to the arrow, especially if there is more than one joint in each arrow.
3) The inserts have a flange that is greater in diameter than the shaft and these flanges strike the bow when the arrow is shot, disrupting accuracy and potentially damaging the bow.
The flanges extend outside the diameter of the arrow shaft
I used to add a 2-004 O-ring with a 75 or harder durometer over the middle of the ready-rod. This would help to take up space in the inserts at the middle of the joint but it wasn’t perfect. The joints still didn’t align perfectly, the bump was still there and the joint was still heavy. I’m mentioning it here because it is an easy improvement to the standard system.
A 2-004 V75 O-ring over the section of ready-rod
The O-ring takes up extra space inside the inserts
The O-ring in the middle of ready-rod before the joint is tightened up as the pieces would be inside the arrow shaft
How I do It Now
I use a variation of the standard system that I’ve found eliminates all of these issues. What I do essentially is take the flange off of the inserts so that they can be inserted backwards. This way the two threaded ends of the inserts are against each other so that a much shorter section of ready rod can be used. This makes the joint much more ridged and removes the bump produced by the flange.
The two modified inserts with a piece of ready-rod between them
How a joint looks before being tightened up
Following are step by step instructions and tips.
For the arrows I modified, because they each have two joints, they require 5 inserts (two for each joint and one for the tip which is unmodified)
I start by hacksawing the flange off of the inserts. It takes about 15 seconds each.
Then I file the burs off of the cut end.
To make it easy to press into the arrow shaft I hold the cut end against the file at a 45 degree angle and file while turning the insert in my fingers. This puts a small chamfer onto the edge.
Time to move onto the ready-rod. I again use the hacksaw to section it. I like to use 1 inch sections because it guarantees that all of the insert threads will be populated.
8-32 ready-rod
Once I have the sections of ready-rod cut to length I clean the ends up so that they will thread properly. First I put them straight into the grinder to flatten the ends.
Alternatively you can use a hand file.
Then I hold them very lightly against the grinding wheel at about 45 degrees while turning them in my fingers so that it rounds the edge a bit.
Alternatively you can use a hand file for this too.
It should end up looking roughly like this on both ends.
edit on 9-12-2012 by dainoyfb because: I typo'd.
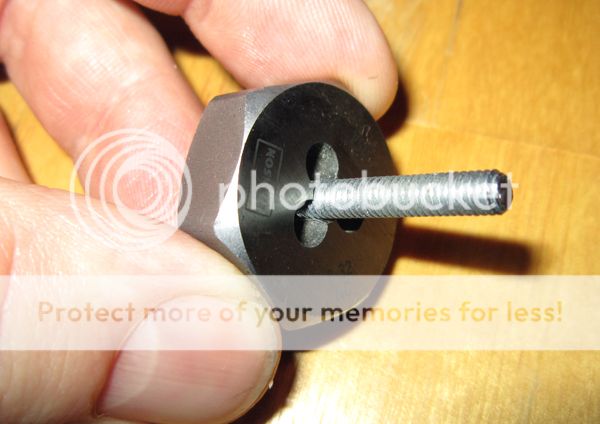
Often when you’re done there will be a bent thread on the very end that makes threading difficult. You can use a sharp pointed tool to bend it into
place, file it off, or what I like to do is run the end a short way into an 8-32 die.
The section of ready-rod threaded a few turns by hand into an 8-32 die
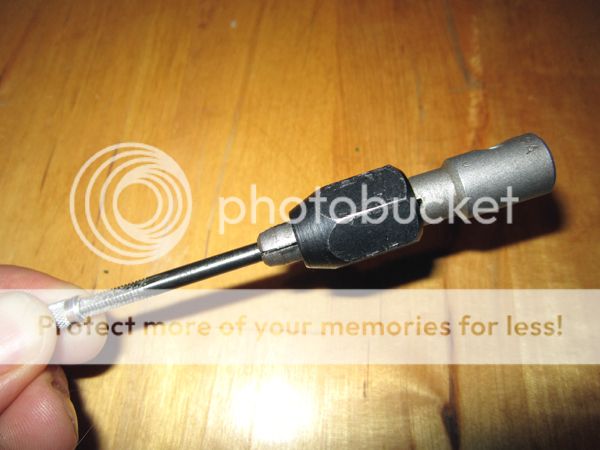
By the way, I also like to take an 8-32 tap and run it into what is now the front end of the insert. I’ve noticed that some manufactures don’t bother completing the threads on that end, sometimes to the point that I have to run the tap or a piece of ready-rod in from the other end first to build threads all the way through. The insert is aluminum so if you don’t have a tap you can make one by cutting a small slit into the threaded end of an 8-32 bolt.
Threading an 8-32 tap by hand, all the way through the insert.
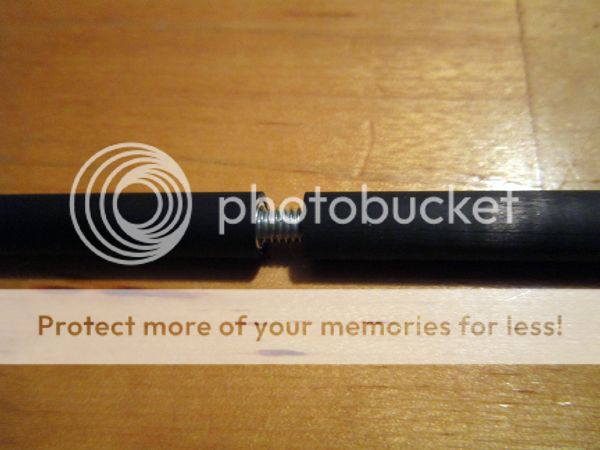
The joint, partially threaded together the way it will be situated inside the shaft section ends.
Now the arrows have to be cut to length. This length will vary according to the take down length of your bow (or maybe you just want two or three even sections).
I have some advice. First don’t forget to subtract ½ inch for the sections that will have the ready-rod sticking out of them.
Second, Don’t forget to subtract the length of broad head from the front section. Broad heads are typically 1 1/4 to 2 inches long so I just subtract two inches.
Alternatively, especially if you have a long draw, you can leave the ready-rod sections unglued and remove them and the broad heads during storage. This will give you up to 3 inches of more draw length.
Third, I choose section lengths so that the ready-rod is glued into the forward sections of each joint. This is so that the weight of the joints is placed forward another half inch on the arrow. This means that the back section will be a whole length of shaft (without any length subtracted by a section of ready rod) and the front section will have length removed for a half inch section of protruding ready-rod and a 2 inch section removed for a Broad head.
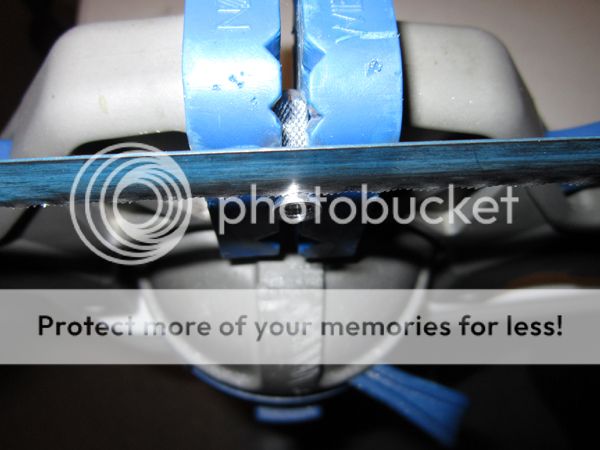
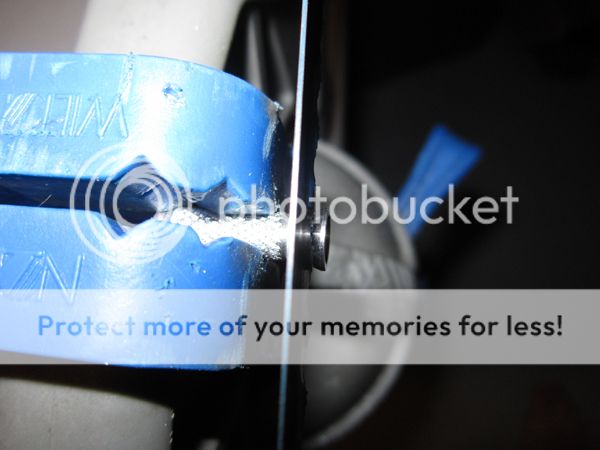
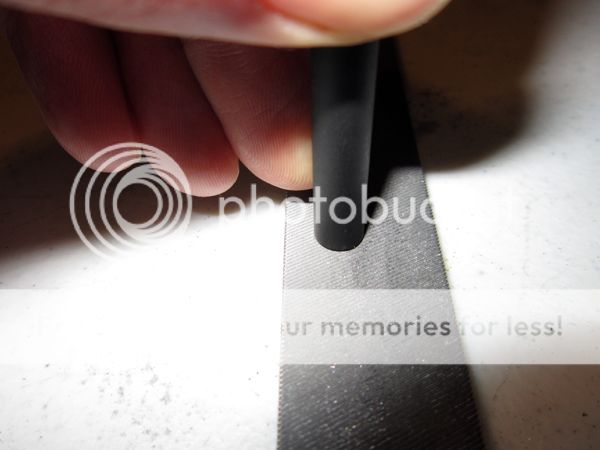
I like to clamp my dremel tool to the end of the work bench so that I get a fairly flush cut on the end of the shaft sections. I use a standard cutting wheel on it. I’m not sure what else works if you don’t have a dremel tool. I’m sure there is plenty of advice on line.
The dremel tool clamped to the end of a bench.

After the cut, I file the end flat. I hold the shaft segment as perpendicular to the file as possible and I rotate the shaft constantly while filing. It is fairly critical to get this edge strait so that the arrow is straight when it is put together.
Filing the end of the shaft flush.
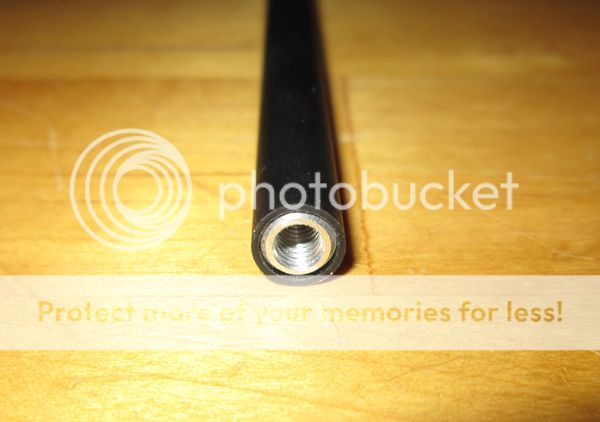
It’s time to press the inserts into the shaft section ends. Don’t forget to press them in backwards. You can use any number of glues or epoxies to secure the inserts into the shaft segments. On BackyardBowyer’s advice, I use hot melt glue so that I can replace or adjust things later. When you press the inserts in, I highly recommend pressing them against a flat surface so that the end of the insert doesn’t go below the highest edge of the end of the shaft segment. This is so the ends of inserts (which are milled and thus flush) butt together instead of the shaft ends (which may not be flush), increasing the straightness and strength of the joint.
The back of the insert is flush with the end of the shaft.
Each joint appears to add about 3 grams to an arrow.
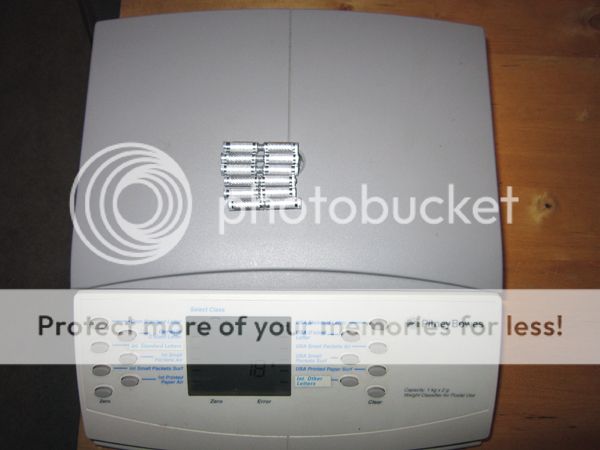
My arrows came out to be about 29 grams each.
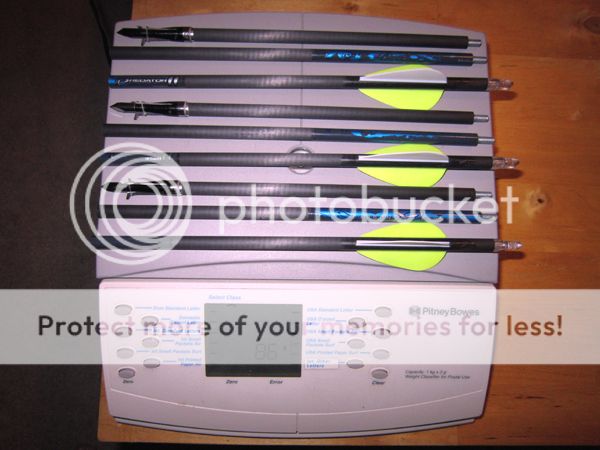
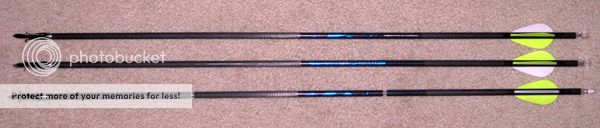
The arrows with one partially threaded together to show the joint locations
You can glue the sections of ready-rod into the forward ends of each joint so that it permanently protrudes by half an inch.
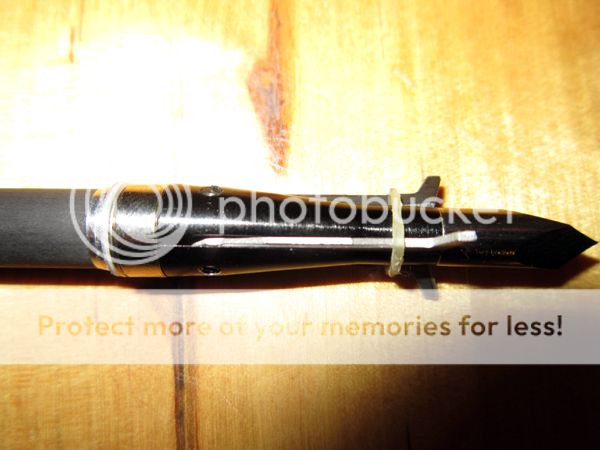
By the way, as you can see I choose a set of mechanical broad heads for this arrow set because of their small stored cross section. They are designed to open up as they pass into an animal creating a large cutting cross section which produces massive hemorrhaging. I think they would make a fairly good fishing point too.
The section of ready-rod threaded a few turns by hand into an 8-32 die
By the way, I also like to take an 8-32 tap and run it into what is now the front end of the insert. I’ve noticed that some manufactures don’t bother completing the threads on that end, sometimes to the point that I have to run the tap or a piece of ready-rod in from the other end first to build threads all the way through. The insert is aluminum so if you don’t have a tap you can make one by cutting a small slit into the threaded end of an 8-32 bolt.
Threading an 8-32 tap by hand, all the way through the insert.
The joint, partially threaded together the way it will be situated inside the shaft section ends.
Now the arrows have to be cut to length. This length will vary according to the take down length of your bow (or maybe you just want two or three even sections).
I have some advice. First don’t forget to subtract ½ inch for the sections that will have the ready-rod sticking out of them.
Second, Don’t forget to subtract the length of broad head from the front section. Broad heads are typically 1 1/4 to 2 inches long so I just subtract two inches.
Alternatively, especially if you have a long draw, you can leave the ready-rod sections unglued and remove them and the broad heads during storage. This will give you up to 3 inches of more draw length.
Third, I choose section lengths so that the ready-rod is glued into the forward sections of each joint. This is so that the weight of the joints is placed forward another half inch on the arrow. This means that the back section will be a whole length of shaft (without any length subtracted by a section of ready rod) and the front section will have length removed for a half inch section of protruding ready-rod and a 2 inch section removed for a Broad head.
I like to clamp my dremel tool to the end of the work bench so that I get a fairly flush cut on the end of the shaft sections. I use a standard cutting wheel on it. I’m not sure what else works if you don’t have a dremel tool. I’m sure there is plenty of advice on line.
The dremel tool clamped to the end of a bench.
After the cut, I file the end flat. I hold the shaft segment as perpendicular to the file as possible and I rotate the shaft constantly while filing. It is fairly critical to get this edge strait so that the arrow is straight when it is put together.
Filing the end of the shaft flush.
It’s time to press the inserts into the shaft section ends. Don’t forget to press them in backwards. You can use any number of glues or epoxies to secure the inserts into the shaft segments. On BackyardBowyer’s advice, I use hot melt glue so that I can replace or adjust things later. When you press the inserts in, I highly recommend pressing them against a flat surface so that the end of the insert doesn’t go below the highest edge of the end of the shaft segment. This is so the ends of inserts (which are milled and thus flush) butt together instead of the shaft ends (which may not be flush), increasing the straightness and strength of the joint.
The back of the insert is flush with the end of the shaft.
Each joint appears to add about 3 grams to an arrow.
My arrows came out to be about 29 grams each.
The arrows with one partially threaded together to show the joint locations
You can glue the sections of ready-rod into the forward ends of each joint so that it permanently protrudes by half an inch.
By the way, as you can see I choose a set of mechanical broad heads for this arrow set because of their small stored cross section. They are designed to open up as they pass into an animal creating a large cutting cross section which produces massive hemorrhaging. I think they would make a fairly good fishing point too.
edit on 9-12-2012 by dainoyfb because: I repaired an image link.
The mechanical broad head in its closed configuration
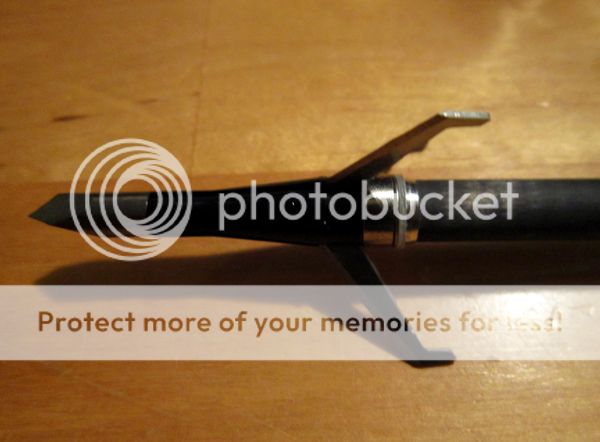
The mechanical broad head in its open configuration
The End
The mechanical broad head in its open configuration
The End
edit on 9-12-2012 by dainoyfb because: I cleaned things up a bit.
Excellent information! Thanks for taking the time to lay it out and document it for us.
If a person doesn't own a tap and die set, they can thread a nut onto the ready-rod (allthread to me) before they make the first cut, and then remove the nut to clean up the threads. Three nuts could then be threaded onto the rod, and two turned against each other to lock them on the end just cut. After the second cut is made, use the third nut to clean the threads of the end just cut, and the ready-rod held by a wrench on the two locked nuts.
If a person doesn't own a tap and die set, they can thread a nut onto the ready-rod (allthread to me) before they make the first cut, and then remove the nut to clean up the threads. Three nuts could then be threaded onto the rod, and two turned against each other to lock them on the end just cut. After the second cut is made, use the third nut to clean the threads of the end just cut, and the ready-rod held by a wrench on the two locked nuts.
Thanks for laying the process out man, might have to give it a try. Have you ever taken a deer with it? Just wondering about the accuracy, range and
killing power of your setup. S and F for a cool idea I have never seen before.
reply to post by QuestionsEverything
I don't hunt but I target shoot quite a bit. I stalk, and photograph wildlife about every other day. This setup is much deadlier than any bow and arrow you would be able to come up with in the bush in a short term survival scenario.
Personally, I'm much more a fan of the atl atl in the bush because of its ease of construction from natural materials and its effectiveness but I thought this would be a nice addition to my skill set.
edit on 9-12-2012 by dainoyfb because: I typo'd.
reply to post by dainoyfb
I was watching some vids on youtube with the atlatl a couple weeks ago, also looked like a good winter time activity to get proficient with.
How many yards out can you hit with accuracy with your bow set-up, also with the atlatl if you're skilled with that as well. Wood tick curiosity demands I ask.
reply to post by QuestionsEverything
Anybody with some proficiency should be able to manage consistent shots out to 20 yards with this setup. If you are desperate to eat you could weigh your ethics about taking much further shots.
Mechanical broad heads are among the most accurate and deepest penetrating points, so really accuracy comes down to the shooter getting used to this particular bow. I notice that with the take down version of this bow that the draw weight drops rapidly with release but other than that it is similar to any other 45-50 pound bow. I narrowed the riser quite a bit to make it more center shoot so it really is an easy bow to use.
Thanks for all the interest.
I highly recommend checking out some of the BackyardBowyer videos at Youtube. Nick is seriously talented and has over 200 videos showing different bow designs and related material that anybody can make in a day or two. Everything from kid bows to 170fps, 80 pound behemoths that cost around ten dollars. He is definitely an inspiration for this thread.
PS. He shows how to make a really great PVC version of the hunger games bow (and the same arrows) that would make a great inexpensive, very personalized Christmas gift to any Hunger Games fan.
edit on 9-12-2012 by dainoyfb because: I added content.
That's pretty cool,never seen that done before. Couple questions for you-How do the arrows fly now compared to regular arrows? I shoot with a a
couple of ver ygood recurve shooters,and they are super picky about consistent spine of thir arrows. I shoot recurve as well sometimes,although mostly
a compound shooter, and have also found that incorrectly spined arrows tend to fly rather poorly. Having a stiff spot in the centre of the arrow,do
you find it changes the flight characteristics and point of impact?
Secondly,about the mechanical heads-do you feel you have sufficient KE to open them and still achieve adequate penetration? I've used several mechanical heads myself,including those you have on you arrows,and while they performed fairly well out of my compound, I usually ended up with fixed heads because I was worried about penetration. This year I shot a good buck head on with an over-the-top mechanical similar to yours,and took a frontal,head on shot. I cut one rib going in,and the arrow ended up just past the heart into the lungs. It was a super quick kill, but I felt I would have penetrated further with a fixed blade.based on previous experiences. Have you ever chronographed the bow? I'd be really curious to see what kind of speeds your getting off of a PVC set-up like that. Either way,looks like you did good work, I'm impressed.
Secondly,about the mechanical heads-do you feel you have sufficient KE to open them and still achieve adequate penetration? I've used several mechanical heads myself,including those you have on you arrows,and while they performed fairly well out of my compound, I usually ended up with fixed heads because I was worried about penetration. This year I shot a good buck head on with an over-the-top mechanical similar to yours,and took a frontal,head on shot. I cut one rib going in,and the arrow ended up just past the heart into the lungs. It was a super quick kill, but I felt I would have penetrated further with a fixed blade.based on previous experiences. Have you ever chronographed the bow? I'd be really curious to see what kind of speeds your getting off of a PVC set-up like that. Either way,looks like you did good work, I'm impressed.
Amazing work Dainyofb
You've got me inspired to build one of these bow and arrow kits.
I have bad neck and shoulder issues that render even my lightest pull bow 56# painful to shoot.
And I LOVE to shoot.
Thanks so much for going to all this effort!
You've got me inspired to build one of these bow and arrow kits.
I have bad neck and shoulder issues that render even my lightest pull bow 56# painful to shoot.
And I LOVE to shoot.
Thanks so much for going to all this effort!
reply to post by xxclaro
Hi xxclaro, The arrows certainly wont shoot like expertly chosen and tuned arrows but the whole purpose of this kit is to give the survivor a much better option than making a bow in the bush in which case there would be no being picky about spine, tips, balance or even probably draw length. The survival bow is definitely a compromise over a well designed hunting recurve but it fits in your pocket, goes together in 30 seconds, the arrows will be much, much more consistent than improvised arrows made from branches, shoots, or cattails, and the heads will do much more damage than rock or wooden points.
I haven't run this bow through a chronograph. Nick of BackyardBoweyer fame has run many PVC bows through one and for the 50 pound bows he typically gets high 120s to low 130s. He did a reflex, non-recurve longbow recently (80 pounds) and got around 170fps from what I remember. Staggering for a bow that was built in a couple hours out of ten dollars worth of materials.
As for penetration, the mechanical broad heads are really impressive, and certainly more effective than points improvised in the bush even at lower fps. You should watch Nick's video where he test fires a bunch of different home made, large cross section heads with a recurve. The lesson is, if its sharp, its going in and its doing considerable damage. I watched a video the other day where a number of broad heads were tested against the mechanical heads and the mechanical heads penetrated at least as well and cut a greater cross section. So, I'm sold. There are a lot of people that know a lot more about archery then I do that would probably argue. I'm just glad I don't have to sit and spend half the day napping field stone or glass and then try and haft it to what is already going to be a heavy wooden arrow. That's my take on it, but I'm no expert.
reply to post by Asktheanimals
Asktheanimals, Backyardbowyer has demonstration videos for building PVC bows well under 40 pounds including a 25-30 pound take down bow. Check out his YouTube site.
Asktheanimals, Backyardbowyer has demonstration videos for building PVC bows well under 40 pounds including a 25-30 pound take down bow. Check out his YouTube site.
I am a huge fan of the Backyard Bowyer! I have watched all his videos and have of course made my own PVC bows. I would also like to throw out that
he has a video on how to make arrows with 5/16inch X 36 inch wooden dowels which can be bought at Walmart or at craft stores and places like Home
Depot and Lowe's. At Walmart they are only 47 cents each. Just make some duct tape fletching, put some kind of head on it, and you have a very
decent arrow. They won't be the takedown kind, but still.
I think the PVC bows are the ideal way to go for someone who wants a decent weapon to protect themselves and their loved ones, without spending a big amount of money. PVC is cheap and so are the dowels to make arrows. Plus, it's fun... so why not give it a try?
I think the PVC bows are the ideal way to go for someone who wants a decent weapon to protect themselves and their loved ones, without spending a big amount of money. PVC is cheap and so are the dowels to make arrows. Plus, it's fun... so why not give it a try?
reply to post by jeramie
I agree 100%. I have made many of the wooden dowel arrows. They are great for target shooting because when you break them its not going to empty your wallet. I have a pile of dowels sitting beside the couch and when I'm sitting watching videos or waiting for my computer to do something I grab one and start straightening. I tried making take downs out of them but I haven't found a method of joining that I like yet.
I agree 100%. I have made many of the wooden dowel arrows. They are great for target shooting because when you break them its not going to empty your wallet. I have a pile of dowels sitting beside the couch and when I'm sitting watching videos or waiting for my computer to do something I grab one and start straightening. I tried making take downs out of them but I haven't found a method of joining that I like yet.
I have maybe a dumb question.
Instead of making home made gear to hunt and possibly simply injure deer, why not just buy expertly made bow and arrows in bulk from the sporting goods store or online?
Spend a day working overtime instead of making arrows, and you'll probably be ahead money-wise.
Instead of making home made gear to hunt and possibly simply injure deer, why not just buy expertly made bow and arrows in bulk from the sporting goods store or online?
Spend a day working overtime instead of making arrows, and you'll probably be ahead money-wise.
reply to post by Dbriefed
Bows that take down to this size generally are not available and if they are they are gimmicky, made in China crap and or very expensive and also not custom suited to me or my needs. I learned a long time ago that if I want what I want I have to either extensivly modify what I buy or build it myself. Because I build my own stuff, I know what I'm getting, I know how to repair it, I am happy with what I end up with and I acquire the skills and tools that I need to build whatever else I need.
Also, because I have been building things since I was crawling (instead of spending my free time on a game console) I am formidable in the work force. So if need be I can work that extra hour of overtime. If I ever had go looking for a job I would never have a problem because I can problem solve and I can fix anything. In fact my customers flock to me for that very reason. If I ever end up in a survival situation (which I have) then I can problem solve there too.
I recently listened to a professor of medicine talking about how he is no longer able to teach his students how to do heart surgery. It's because they have no hands on experience anymore. They don't know how a pump works or in some cases what a pump is for. He can't explain to them how a heart is supposed to work, never mind how to use the tools to fix one. I have the same problem when teaching people survival skills. When I hand them a knife, their eyes glaze over and they look at me like "my mommy and daddy don't let me touch these." I'm talking about grown adults by the way. People (especially young people) like Nick from BackyardBowyer are rare jems these days. You just don't see people like him that know all the offshoot technical information from other trades that can be used to accomplish tasks. I can watch his videos endlessly while he talks about using a tile saw to make a nock or how to streak acrylic paint to make it look like a wood finish. How many people his age these days even know what acrylic paint is?
I am a huge proponent of DIY. Everything is crap now because we let other people make it and we no longer have the technical aptitude to know we are buying crap. Learn how to build things. Shop and sell locally. Enjoy and take pride in creating something yourself. Bring back the days before the shiny, useless thing that breaks in a week. Working an extra hour of overtime is not a hobby. I work to live. I don't live to work.
edit on 11-12-2012 by dainoyfb because: plenty of typos.
Originally posted by Dbriefed
I have maybe a dumb question.
Instead of making home made gear to hunt and possibly simply injure deer, why not just buy expertly made bow and arrows in bulk from the sporting goods store or online?
Spend a day working overtime instead of making arrows, and you'll probably be ahead money-wise.
What happens when there are no expertly made bows or sporting good stores?
Oh, and because it's fun.
edit on 11-12-2012 by khimbar because: (no reason given)
new topics
-
Putin, Russia and the Great Architects of the Universe
ATS Skunk Works: 1 hours ago -
A Warning to America: 25 Ways the US is Being Destroyed
New World Order: 6 hours ago
top topics
-
President BIDEN's FBI Raided Donald Trump's Florida Home for OBAMA-NORTH KOREA Documents.
Political Conspiracies: 12 hours ago, 29 flags -
A Warning to America: 25 Ways the US is Being Destroyed
New World Order: 6 hours ago, 12 flags -
Las Vegas UFO Spotting Teen Traumatized by Demon Creature in Backyard
Aliens and UFOs: 17 hours ago, 7 flags -
Is AI Better Than the Hollywood Elite?
Movies: 13 hours ago, 3 flags -
Maestro Benedetto
Literature: 13 hours ago, 1 flags -
Putin, Russia and the Great Architects of the Universe
ATS Skunk Works: 1 hours ago, 1 flags
active topics
-
Gaza Terrorists Attack US Humanitarian Pier During Construction
Middle East Issues • 40 • : WeMustCare -
Cats Used as Live Bait to Train Ferocious Pitbulls in Illegal NYC Dogfighting
Social Issues and Civil Unrest • 24 • : NoviceStoic4 -
A Warning to America: 25 Ways the US is Being Destroyed
New World Order • 13 • : 2025yuga -
Is AI Better Than the Hollywood Elite?
Movies • 19 • : GENERAL EYES -
University of Texas Instantly Shuts Down Anti Israel Protests
Education and Media • 271 • : CriticalStinker -
Weinstein's conviction overturned
Mainstream News • 27 • : brodby -
ChatGPT Beatles songs about covid and masks
Science & Technology • 24 • : iaylyan -
The Acronym Game .. Pt.3
General Chit Chat • 7754 • : bally001 -
Nearly 70% Of Americans Want Talks To End War In Ukraine
Political Issues • 96 • : andy06shake -
Rupert Murdoch engaged at 92
People • 8 • : brodby