It looks like you're using an Ad Blocker.
Please white-list or disable AboveTopSecret.com in your ad-blocking tool.
Thank you.
Some features of ATS will be disabled while you continue to use an ad-blocker.
9
share:
Can a couple of cardboard boxes, black paint, tin foil, and an acrylic cover help solve major environmental and social problems? Forum for the Future
certainly thinks it's possible.
The Kyoto Box, a surprisingly simple solar-powered cooker, won a $75,000 first prize in the sustainability group's climate competition.
Jon Bomer, the Kenya-based entrepreneur who invented the cooker, set out to transform the lives of villagers in developing world who use firewood to cook. What's more, the cooker costs about $6.60 to make, so it can actually benefit the people who need it most.
"We're saving lives and saving trees," he says in a press release. "I doubt if there is any other technology that can make so much impact for so little money."
Ironically, the Kyoto box uses the "greenhouse effect" to help the planet. An acrylic cover set atop two cardboard boxes (one inside of the other) traps the sun's energy. Black paint and silver foil help to concentrate the heat. A layer of newspaper or straw placed in between the two boxes provides insulation.
Here are just some of the ways this brilliant invention can make an impact:
Decreases carbon emissions created from burning firewood.
Slows down deforestation by curbing the need for firewood.
Removes indoor smoke pollution and the health problems associated with it.
Lowers the cost of energy since fuel from the sun is free.
Allows families to easily boil water so they can have access clean drinking water.
Eliminates the need for children to spend time looking for firewood so they can spend that time in school.
This just goes to show that sometimes less is more.
By Lori Bongiorno
See how the Kyoto Box will work in Africa in this video:
www.youtube.com...
Mod Edit: All Caps – Please Review This Link.
The Kyoto Box, a surprisingly simple solar-powered cooker, won a $75,000 first prize in the sustainability group's climate competition.
Jon Bomer, the Kenya-based entrepreneur who invented the cooker, set out to transform the lives of villagers in developing world who use firewood to cook. What's more, the cooker costs about $6.60 to make, so it can actually benefit the people who need it most.
"We're saving lives and saving trees," he says in a press release. "I doubt if there is any other technology that can make so much impact for so little money."
Ironically, the Kyoto box uses the "greenhouse effect" to help the planet. An acrylic cover set atop two cardboard boxes (one inside of the other) traps the sun's energy. Black paint and silver foil help to concentrate the heat. A layer of newspaper or straw placed in between the two boxes provides insulation.
Here are just some of the ways this brilliant invention can make an impact:
Decreases carbon emissions created from burning firewood.
Slows down deforestation by curbing the need for firewood.
Removes indoor smoke pollution and the health problems associated with it.
Lowers the cost of energy since fuel from the sun is free.
Allows families to easily boil water so they can have access clean drinking water.
Eliminates the need for children to spend time looking for firewood so they can spend that time in school.
This just goes to show that sometimes less is more.
By Lori Bongiorno
See how the Kyoto Box will work in Africa in this video:
www.youtube.com...
edit on 3/7/2011 by YAHUWAH SAVES because: WRONG LINK
Mod Edit: All Caps – Please Review This Link.
edit on 3/8/2011 by
semperfortis because: (no reason given)
Good on em
I am familiar with the concept...
It is a wonderful idea
I am familiar with the concept...
It is a wonderful idea
reply to post by YAHUWAH SAVES
Here is EHOW.com step by step directions and link:
www.ehow.com...
Instructions
Things You'll Need:
1 Sturdy cardboard box (approximately 36 inches x 30 inches and 18 inches tall)
Duct tape
Heavy duty aluminum foil
1 Sturdy cardboard box sized to fit inside the first box
High temperature flat black paint
Straw, shredded paper or other loose insulating material
1 clear acrylic or Plexiglas panel to match the 36 inch x 30 inch box size
Black metal pot with lid
Open the top flaps of the larger cardboard box and attach aluminum foil (shiny side up) to the interior sides of the flaps using duct tape.
Remove the lid or top flaps from the smaller cardboard box and paint the interior of the box with high temperature flat black paint (such as a grill paint). Allow to dry thoroughly.
Place the smaller box inside the larger box and seat to give the most even spacing available around the inner box. Pack your insulation material between the boxes to help keep heat inside the inner box.
Lay the clear panel horizontally over the larger box opening; it should rest on the inner box and provide a loose seal.
Place wet food and/or water in the black metal pot. Lift the clear panel and place the pot inside the inner box. Lower the clear panel.
Set the Kyoto solar oven in direct sunlight. Position the reflective flaps to direct the maximum amount of reflected light into the oven. Use duct tape to fix the reflective flaps into the best configuration.
Tips & Warnings
The interior of most solar ovens will reach or exceed 200 degrees F. As a result, food cooks in approximately twice the time it would take to cook in a conventional oven.
Unlike oven or crock pot cooking, solar cooked food rarely needs stirring to avoid scorching the food.
I think this is great, I have seen these at work. I built a large pit/solar/rocket stove of my own last year, and I love it. I wanted to add a link to
other solar stoves with blueprints that can be printed. Also has lots of recipes.
Also, it is written in many different languages.
solarcooking.org...
Peace, NRE.
Also, it is written in many different languages.
solarcooking.org...
Peace, NRE.
reply to post by NoRegretsEver
Excellent link! More of these types of links would be excellent. Was hoping to get more just like the link you posted. Thanks!

Excellent link! More of these types of links would be excellent. Was hoping to get more just like the link you posted. Thanks!

I made one two weeks ago, just to try it out and it works great!!
reply to post by notsosunny
Thats awesome! Here is another one I found:

Plans for many other solar cookers are available on the Solar cooker plans page.
The "Minimum" Solar Box Cooker is a solar oven that you can built quickly from two cardboard boxes.
The "Minimum" Solar Box Cooker is a simple box cooker that can be built in a few hours for very little money. When we designed this cooker, we named it the "Minimum Solar Box Cooker" because, at the time, it represented the simplest design we could devise. What we didn't communicate with that name was that this is a full-power cooker that works very well, and is in no way minimum as far as its cooking power goes.
What You Will Need:
Two cardboard boxes. We would suggest that you use an inner box that is at least 15 inch x 15 inch (38 cm x 38 cm), but bigger is better. The outer box should be larger than the small box all around, but it doesn't matter how much bigger, as long as there is a half inch (1.5cm) or more of an airspace between the two boxes. The distance between the two boxes does not have to be equal all the way around. Also, keep in mind that it is very easy to adjust the size of a cardboard box by cutting and gluing it.
One sheet of cardboard to make the lid. This piece must be approximately 2 to 3 inch (4 to 8 cm) larger all the way around than the top of the finished cooker (the outer box).
One small roll of aluminum foil.
One can of flat-black spray paint (look for the words "non-toxic when dry") or one small jar of black tempera paint. Some people have reported making their own paint out of soot mixed with wheat paste.
At least 8 ounces (250 g) of white glue or wheat paste.
One Reynolds Oven Cooking Bag®. These are available in almost all supermarkets in the U.S. and they can be mail-ordered from Solar Cookers International. They are rated for 400 °F (204 °C) so they are perfect for solar cooking. They are not UV-resistant; thus they will become more brittle and opaque over time and may need to be replaced periodically. A sheet of glass can also be used, but this is more expensive and fragile, and doesn't offer that much better cooking except on windy days.
Building the BaseEdit
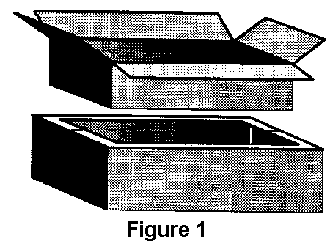
Fold the top flaps closed on the outer box and set the inner box on top and trace a line around it onto the top of the outer box, Remove the inner box and cut along this line to form a hole in the top of the outer box (Figure 1).
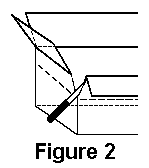
Decide how deep you want your oven to be. It should be about 1 inch (2.5 cm) deeper than your largest pot and about 1" shorter than the outer box so that there will be a space between the bottoms of the boxes once the cooker is assembled. Using a knife, slit the corners of the inner box down to that height. Fold each side down forming extended flaps (Figure 2). Folding is smoother if you first draw a firm line from the end of one cut to the other where the folds are to go.
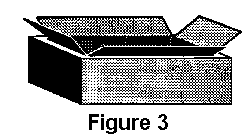
Glue aluminum foil to the inside of both boxes and also to the inside of the remaining top flaps of the outer box. Don't bother being neat on the outer box, since it will never be seen, nor will it experience any wear. The inner box will be visible even after assembly, so if it matters to you, you might want to take more time here. Glue the top flaps closed on the outer box. Place some wads of crumpled newspaper into the outer box so that when you set the inner box down inside the hole in the outer box, the flaps on the inner box just touch the top of the outer box (Figure 3). Glue these flaps onto the top of the outer box. Trim the excess flap length to be even with the perimeter of the outer box.
Finally, to make the drip pan, cut a piece of cardboard, the same size as the bottom of the interior of the oven and apply foil to one side. Paint this foiled side black and allow it to dry. Put this in the oven so that it rests on the bottom of the inner box (black side up), and place your pots on it when cooking. The base is now finished.
Building the Removable LidEdit
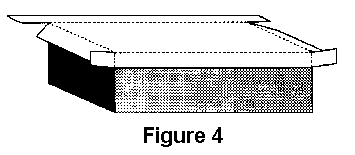
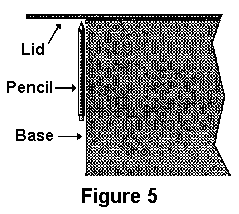
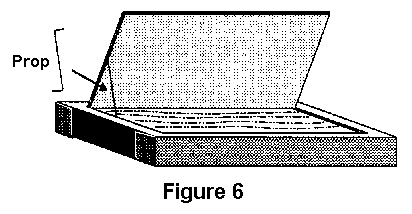
Take the large sheet of cardboard and lay it on top of the base. Trace its outline and then cut and fold down the edges to form a lip of about 3" (7.5cm). Fold the corner flaps around and glue to the side lid flaps. (Figure 4). Orient the corrugations so that they go from left to right as you face the oven so that later the prop may be inserted into the corrugations (Figure 6). One trick you can use to make the lid fit well is to lay the pencil or pen against the side of the box when marking (Figure 5). Don't glue this lid to the box; you'll need to remove it to move pots in and out of the oven. To make the reflector flap, draw a line on the lid, forming a rectangle the same size as the oven opening. Cut around three sides and fold the resulting flap up forming the reflector (Figure 6). Foil this flap on the inside.
To make a prop bend a 12" (30cm) piece of hanger wire as indicated in Figure 6. This can then be inserted into the corrugations as shown.
Next, turn the lid upside-down and glue the oven bag (or other glazing material) in place. We have had great success using the turkey size oven bag (19" x 23 1/2", 47.5cm x 58.5cm) applied as is, i.e., without opening it up. This makes a double layer of plastic. The two layers tend to separate from each other to form an airspace as the oven cooks. When using this method, it is important to also glue the bag closed on its open end. This stops water vapor from entering the bag and condensing. Alternately you can cut any size oven bag open to form a flat sheet large enough to cover the oven opening.
Improving Efficiency:
The oven you have built should cook fine during most of the solar season. If you would like to improve the efficiency to be able to cook on more marginal days, you can modify your oven in any or all of the following ways:
Make pieces of foiled cardboard the same size as the oven sides and place these in the wall spaces.
Make a new reflector the size of the entire lid (see photo above).
Make the drip pan using sheet metal, such as aluminum flashing. Paint this black and elevate this off the bottom of the oven slightly with small cardboard strips.
Thats awesome! Here is another one I found:


Plans for many other solar cookers are available on the Solar cooker plans page.
The "Minimum" Solar Box Cooker is a solar oven that you can built quickly from two cardboard boxes.
The "Minimum" Solar Box Cooker is a simple box cooker that can be built in a few hours for very little money. When we designed this cooker, we named it the "Minimum Solar Box Cooker" because, at the time, it represented the simplest design we could devise. What we didn't communicate with that name was that this is a full-power cooker that works very well, and is in no way minimum as far as its cooking power goes.
What You Will Need:
Two cardboard boxes. We would suggest that you use an inner box that is at least 15 inch x 15 inch (38 cm x 38 cm), but bigger is better. The outer box should be larger than the small box all around, but it doesn't matter how much bigger, as long as there is a half inch (1.5cm) or more of an airspace between the two boxes. The distance between the two boxes does not have to be equal all the way around. Also, keep in mind that it is very easy to adjust the size of a cardboard box by cutting and gluing it.
One sheet of cardboard to make the lid. This piece must be approximately 2 to 3 inch (4 to 8 cm) larger all the way around than the top of the finished cooker (the outer box).
One small roll of aluminum foil.
One can of flat-black spray paint (look for the words "non-toxic when dry") or one small jar of black tempera paint. Some people have reported making their own paint out of soot mixed with wheat paste.
At least 8 ounces (250 g) of white glue or wheat paste.
One Reynolds Oven Cooking Bag®. These are available in almost all supermarkets in the U.S. and they can be mail-ordered from Solar Cookers International. They are rated for 400 °F (204 °C) so they are perfect for solar cooking. They are not UV-resistant; thus they will become more brittle and opaque over time and may need to be replaced periodically. A sheet of glass can also be used, but this is more expensive and fragile, and doesn't offer that much better cooking except on windy days.
Building the BaseEdit
Fold the top flaps closed on the outer box and set the inner box on top and trace a line around it onto the top of the outer box, Remove the inner box and cut along this line to form a hole in the top of the outer box (Figure 1).
Decide how deep you want your oven to be. It should be about 1 inch (2.5 cm) deeper than your largest pot and about 1" shorter than the outer box so that there will be a space between the bottoms of the boxes once the cooker is assembled. Using a knife, slit the corners of the inner box down to that height. Fold each side down forming extended flaps (Figure 2). Folding is smoother if you first draw a firm line from the end of one cut to the other where the folds are to go.
Glue aluminum foil to the inside of both boxes and also to the inside of the remaining top flaps of the outer box. Don't bother being neat on the outer box, since it will never be seen, nor will it experience any wear. The inner box will be visible even after assembly, so if it matters to you, you might want to take more time here. Glue the top flaps closed on the outer box. Place some wads of crumpled newspaper into the outer box so that when you set the inner box down inside the hole in the outer box, the flaps on the inner box just touch the top of the outer box (Figure 3). Glue these flaps onto the top of the outer box. Trim the excess flap length to be even with the perimeter of the outer box.
Finally, to make the drip pan, cut a piece of cardboard, the same size as the bottom of the interior of the oven and apply foil to one side. Paint this foiled side black and allow it to dry. Put this in the oven so that it rests on the bottom of the inner box (black side up), and place your pots on it when cooking. The base is now finished.
Building the Removable LidEdit
Take the large sheet of cardboard and lay it on top of the base. Trace its outline and then cut and fold down the edges to form a lip of about 3" (7.5cm). Fold the corner flaps around and glue to the side lid flaps. (Figure 4). Orient the corrugations so that they go from left to right as you face the oven so that later the prop may be inserted into the corrugations (Figure 6). One trick you can use to make the lid fit well is to lay the pencil or pen against the side of the box when marking (Figure 5). Don't glue this lid to the box; you'll need to remove it to move pots in and out of the oven. To make the reflector flap, draw a line on the lid, forming a rectangle the same size as the oven opening. Cut around three sides and fold the resulting flap up forming the reflector (Figure 6). Foil this flap on the inside.
To make a prop bend a 12" (30cm) piece of hanger wire as indicated in Figure 6. This can then be inserted into the corrugations as shown.
Next, turn the lid upside-down and glue the oven bag (or other glazing material) in place. We have had great success using the turkey size oven bag (19" x 23 1/2", 47.5cm x 58.5cm) applied as is, i.e., without opening it up. This makes a double layer of plastic. The two layers tend to separate from each other to form an airspace as the oven cooks. When using this method, it is important to also glue the bag closed on its open end. This stops water vapor from entering the bag and condensing. Alternately you can cut any size oven bag open to form a flat sheet large enough to cover the oven opening.
Improving Efficiency:
The oven you have built should cook fine during most of the solar season. If you would like to improve the efficiency to be able to cook on more marginal days, you can modify your oven in any or all of the following ways:
Make pieces of foiled cardboard the same size as the oven sides and place these in the wall spaces.
Make a new reflector the size of the entire lid (see photo above).
Make the drip pan using sheet metal, such as aluminum flashing. Paint this black and elevate this off the bottom of the oven slightly with small cardboard strips.
new topics
-
Putin, Russia and the Great Architects of the Universe
ATS Skunk Works: 2 hours ago -
A Warning to America: 25 Ways the US is Being Destroyed
New World Order: 6 hours ago
top topics
-
President BIDEN's FBI Raided Donald Trump's Florida Home for OBAMA-NORTH KOREA Documents.
Political Conspiracies: 12 hours ago, 29 flags -
A Warning to America: 25 Ways the US is Being Destroyed
New World Order: 6 hours ago, 12 flags -
Las Vegas UFO Spotting Teen Traumatized by Demon Creature in Backyard
Aliens and UFOs: 17 hours ago, 7 flags -
Is AI Better Than the Hollywood Elite?
Movies: 14 hours ago, 3 flags -
Maestro Benedetto
Literature: 14 hours ago, 1 flags -
Putin, Russia and the Great Architects of the Universe
ATS Skunk Works: 2 hours ago, 1 flags
active topics
-
Hate makes for strange bedfellows
US Political Madness • 50 • : 19Bones79 -
Weinstein's conviction overturned
Mainstream News • 28 • : burritocat -
Sunak spinning the sickness figures
Other Current Events • 25 • : Ohanka -
Krystalnacht on today's most elite Universities?
Social Issues and Civil Unrest • 5 • : crayzeed -
University of Texas Instantly Shuts Down Anti Israel Protests
Education and Media • 272 • : burritocat -
Gaza Terrorists Attack US Humanitarian Pier During Construction
Middle East Issues • 40 • : WeMustCare -
Cats Used as Live Bait to Train Ferocious Pitbulls in Illegal NYC Dogfighting
Social Issues and Civil Unrest • 24 • : NoviceStoic4 -
A Warning to America: 25 Ways the US is Being Destroyed
New World Order • 13 • : 2025yuga -
Is AI Better Than the Hollywood Elite?
Movies • 19 • : GENERAL EYES -
ChatGPT Beatles songs about covid and masks
Science & Technology • 24 • : iaylyan
9
