It looks like you're using an Ad Blocker.
Please white-list or disable AboveTopSecret.com in your ad-blocking tool.
Thank you.
Some features of ATS will be disabled while you continue to use an ad-blocker.

D&D minis: the Beholder - PIC HVY
page: 1share:
I needed a “boss” for an upcoming session while the party is in a new town dealing with a guild of adventurers funded by an unknown
person(beholder) that seem to always be where the party is, minutes before they arrive. The bounties are being taken up and cashed in left and right,
leaving our brave crew to lose money and resources.
The Beholder. en.wikipedia.org...(Dungeons_%26_Dragons)
One of the most infamous monsters in Dungeons and Dragons, an egomaniacal floating eyeball with numerous slithering and alert eye stalks each possessing a unique power it uses to control the environment and all trespassers.
Apologies for the formatting!!
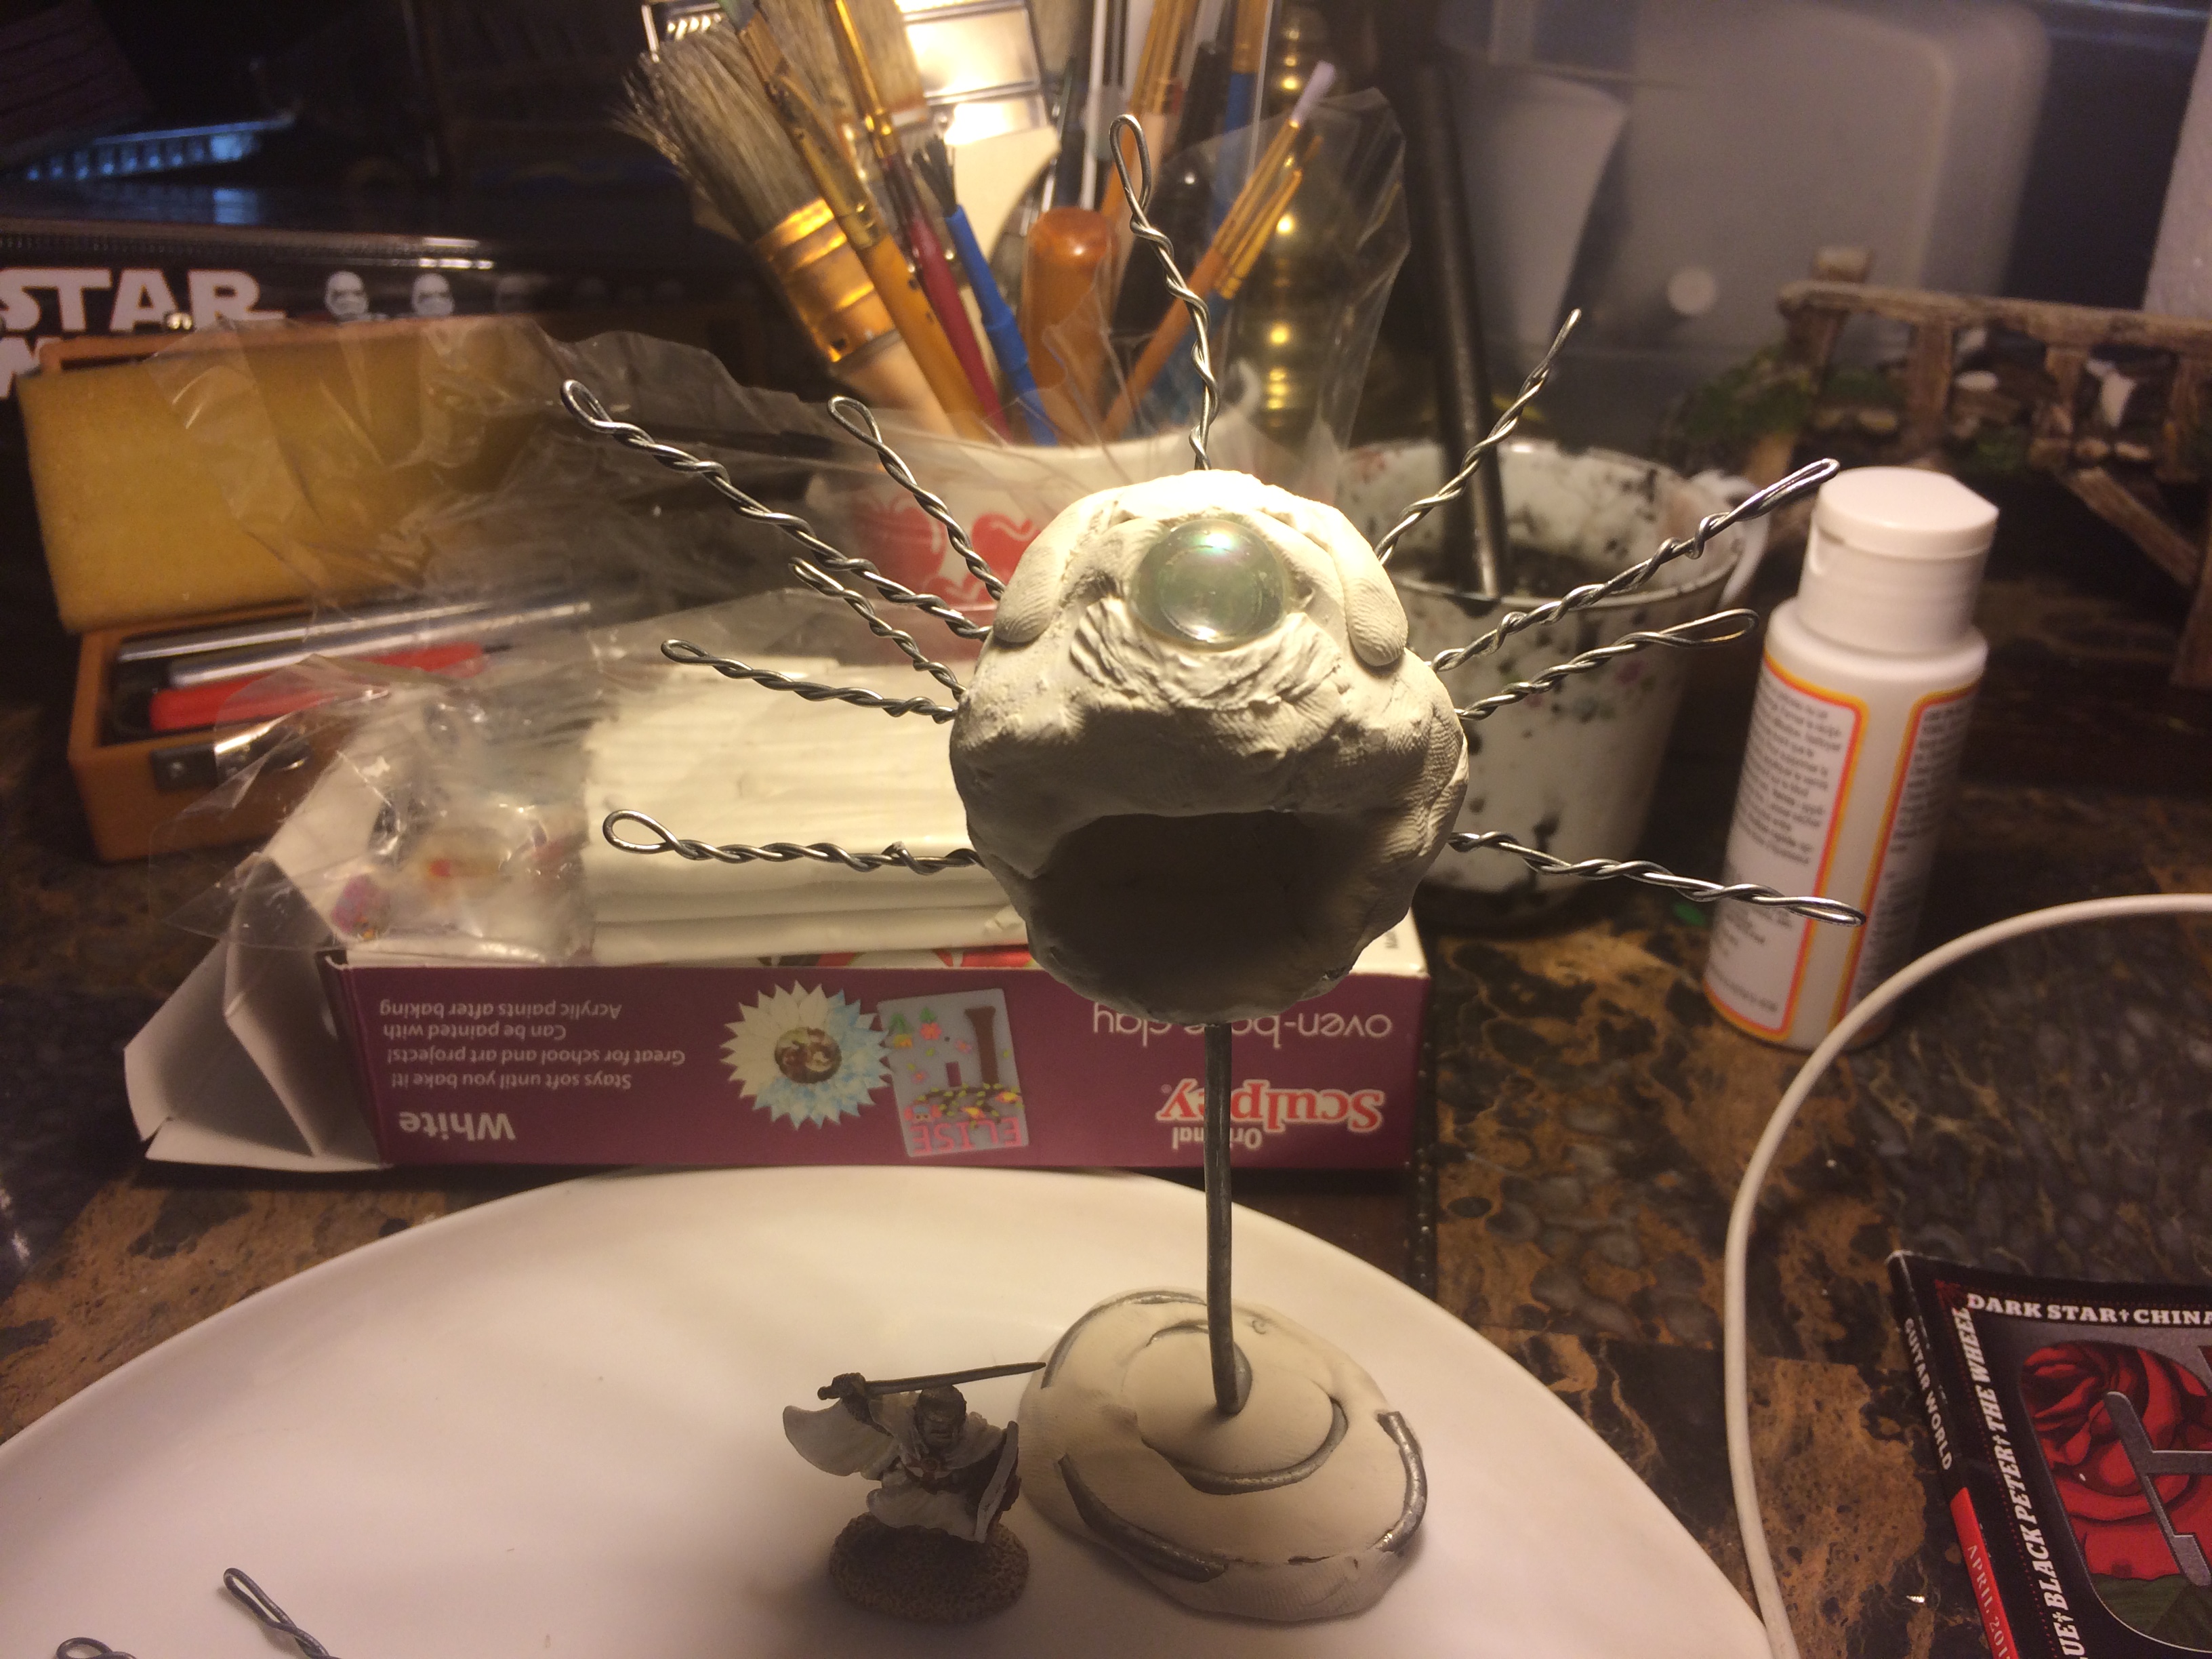
He started off as a ball of aluminum foil and a fractured marble that looked like an iris, and a stick up its rear. With a fresh pack of Sculpy oven bake polymer clay I built his round (m)ass , wound up some wire for eye stalks and before I knew it he was surprised as I was at the progress! Time to bake it to give a solid point to contunue layering.
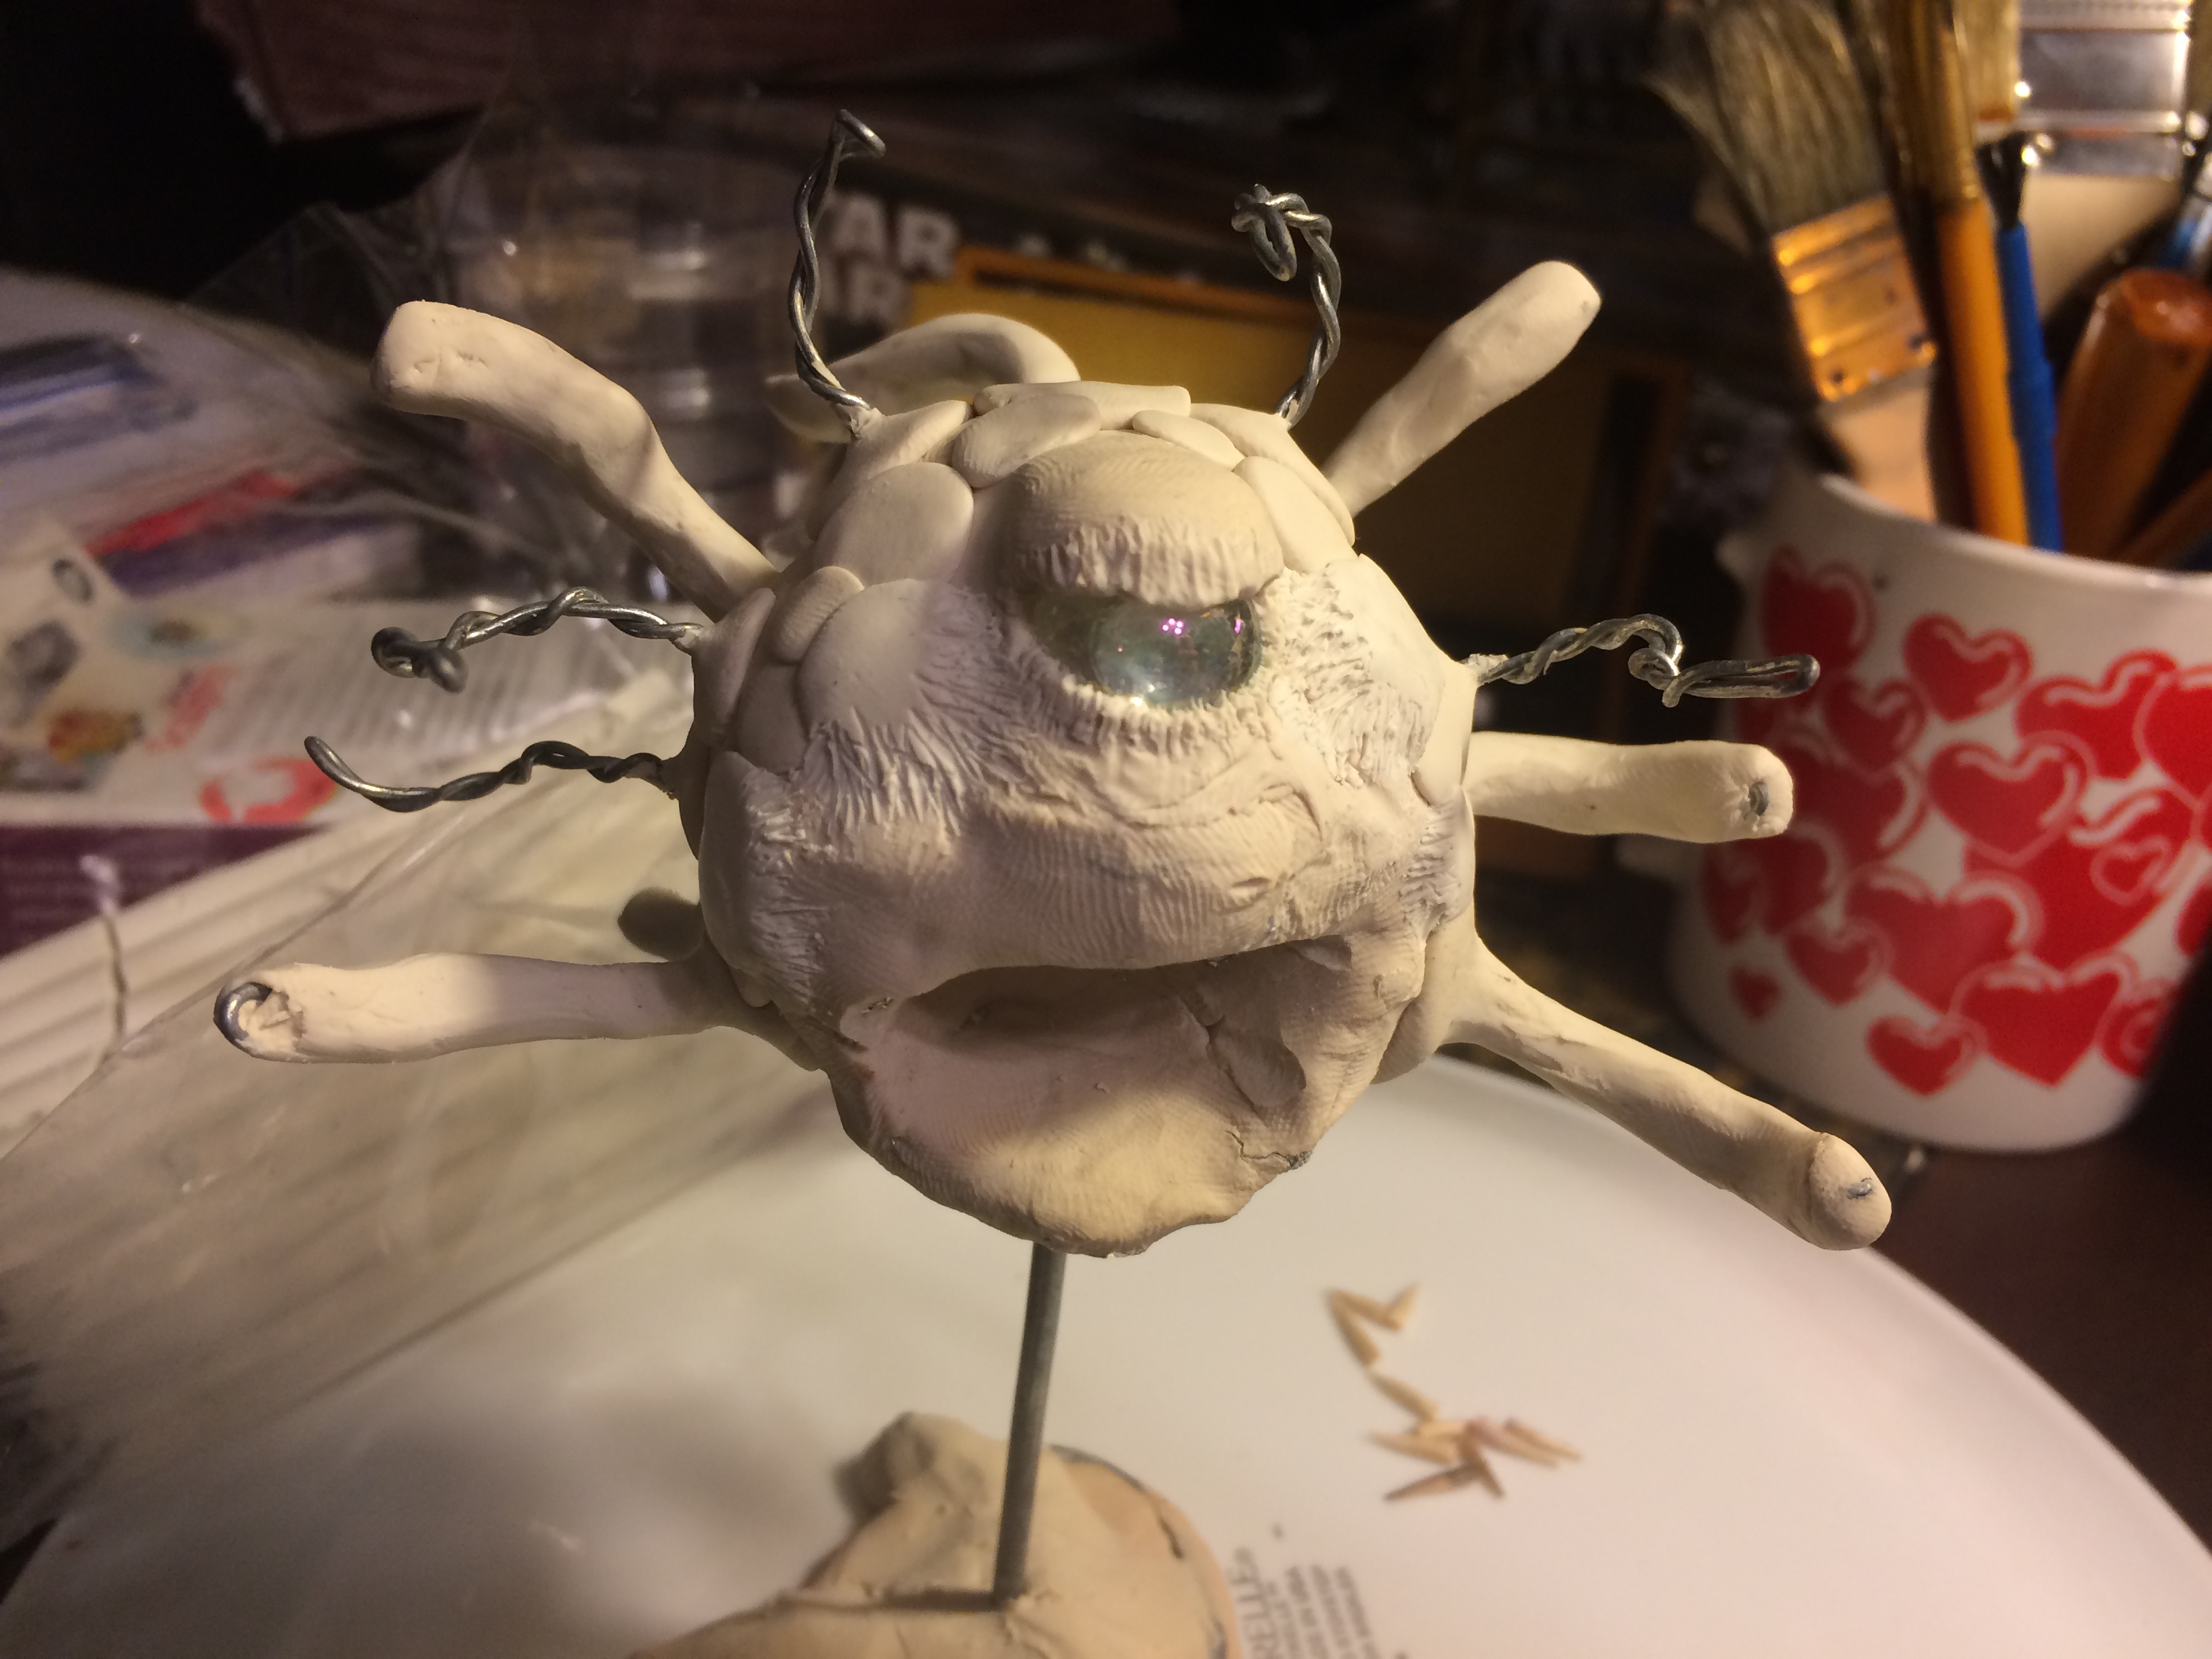
Put a lid on it; eye lid in place its not so silly now, but its an absurd monster to begin with!
Adding some flesh to the stalks was difficult, sculpy is pretty soft and tacky requiring me to keep dry clean hands and tools. Water helps but if you get it on a surface you want more sculpy on, its not going to stick like regular clay would. I found lightly smearing the finger prints down and using a tool helped, albeit slowly. Bake it again!
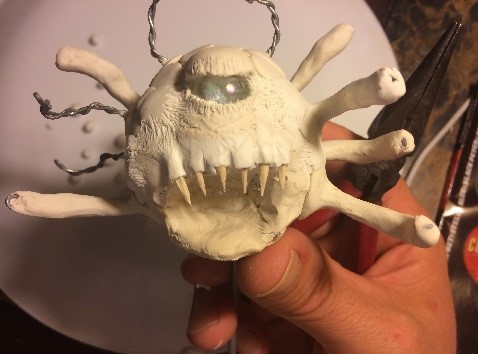
Here he is fitted with his new dentures, lookin’ good buddy!
The mouth is toothpick ends with a strip of clay across for gums and textured in.
The eye stalks are still in progress… it was tedious doing 12 of them. I rolled a dozen balls and baked them, then worked them onto the stalks and textured them in. I went back to the manual and found they only have 10 stalks but we can fudge those rules while the game is on! This isn’t Warhammer where WYSIWYG is a rule.
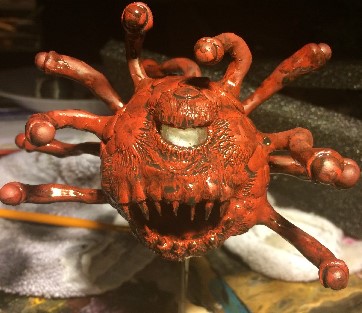
Base colors! Once all the sculpting is done and baked I hit the whole thing with a dark red- “Tuscan Red” apple barrel brand. He will be pretty dark once finished, this is Ok.
I made a black and brown mix wash to cover the whole deal, darkening the red in successive coats and pooling up in the recesses. Essentially it’s a watered down black and brown with dawn dish soap added in to break surface tension and push all pigments into corners and deep areas. Kind of dark here but once its dry and the highlights begin, the pools of wash will even out.
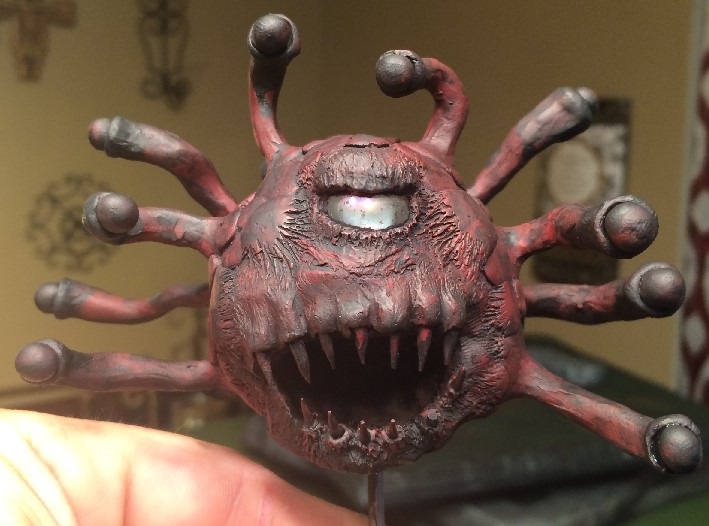
Here you see the dried wash after maybe 5 coats. Working a few extra layers on the ends of the stalks to darken them to black, contrasting the eyeballs. I applied it sloppily in the last few to mottle up the overall undercoat for a bit of realism… relatively real I mean.
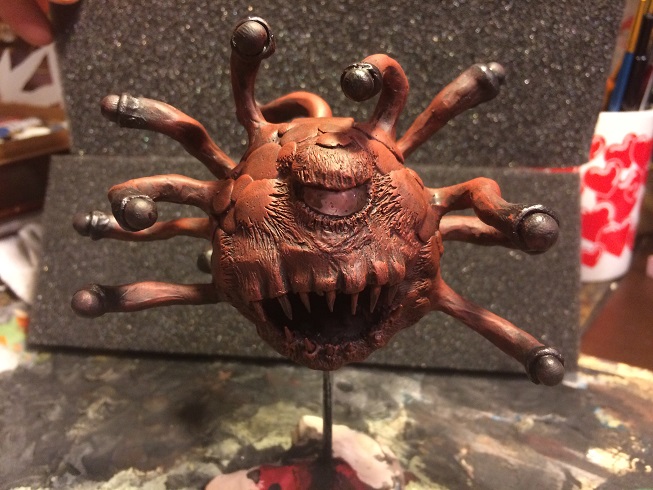
Heavy drybrushing of the original red, the eye is a glass marble so I was able to rub off the paint easily.
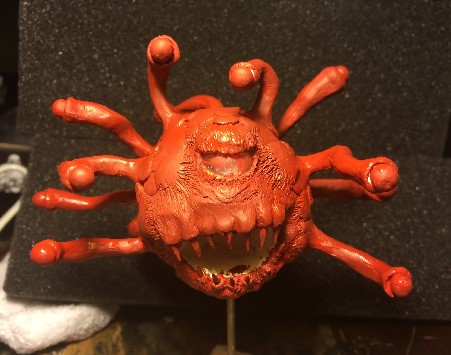
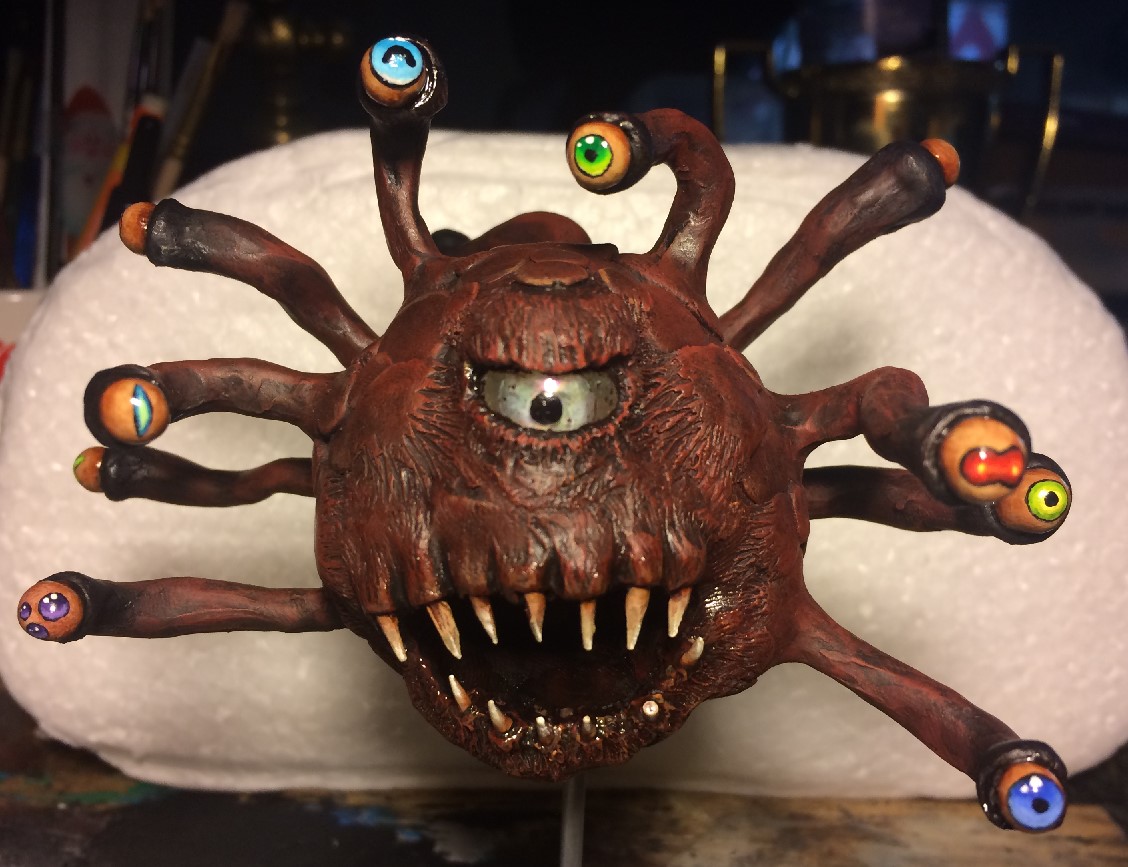
Details! Teeth and eyeballs both began with a beige, shaded with Citadel brand chestnut colored wash. Chestnut wash in successive layers to darken it quite a bit, leaving a nice color for a monster’s lidless eyeball! I began the shapes of the irises with black and white base for the bright colors to come.

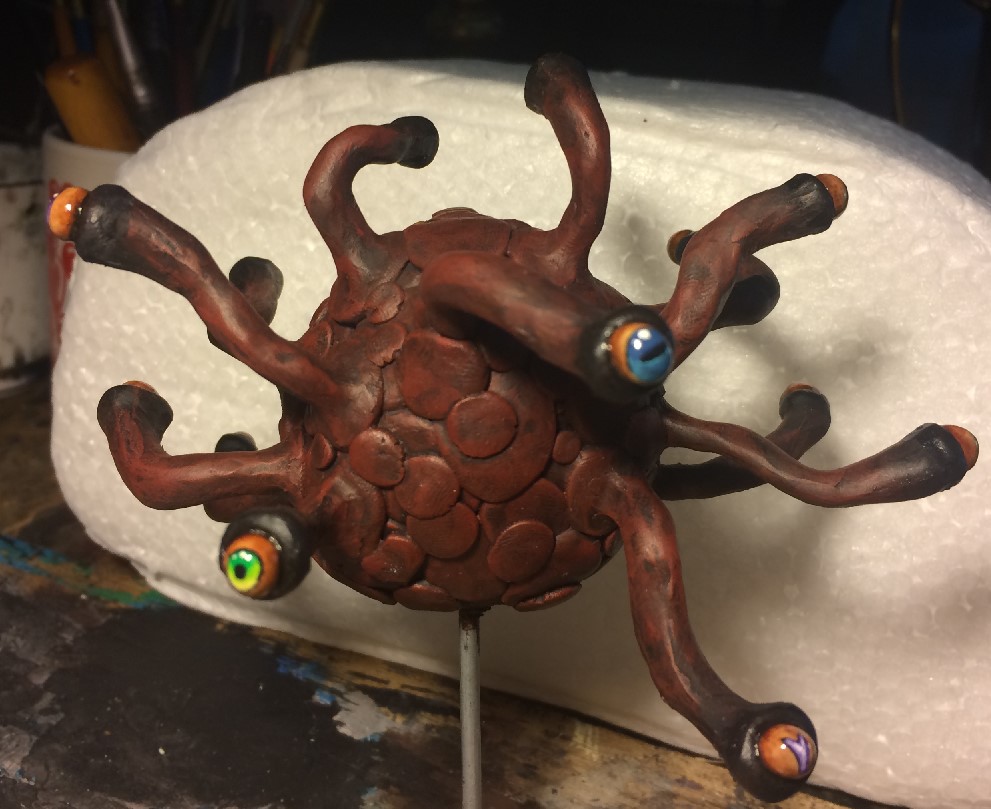
Here he is completed! I wanted each eyeball to be unique to represent different powers they have. I didnt assign the eyes to powers literally, just need to be different from the rest in some way. It hit them all a few times with gloss varnish, it helps sell the eye shine effects I painted in.
The back. Hard to get a pic of all the eyes but you get the idea!
Next is the base, something he is hovering above. I’ll get to it this weekend, I have time for this as he will be the bad guy for a quest thread a few sessions away. I’ll probably p[ost in-game pics like last time, whenever we get to play it.
I hope you all enjoyed my second sculpture, it was fun but I don’t think I’ll have the energy to do more eye stalks!
Next? Purple Wyrm, but I need a lot of clay for that beast!
Thank you and have a nice day
The Beholder. en.wikipedia.org...(Dungeons_%26_Dragons)
One of the most infamous monsters in Dungeons and Dragons, an egomaniacal floating eyeball with numerous slithering and alert eye stalks each possessing a unique power it uses to control the environment and all trespassers.
Apologies for the formatting!!
He started off as a ball of aluminum foil and a fractured marble that looked like an iris, and a stick up its rear. With a fresh pack of Sculpy oven bake polymer clay I built his round (m)ass , wound up some wire for eye stalks and before I knew it he was surprised as I was at the progress! Time to bake it to give a solid point to contunue layering.
Put a lid on it; eye lid in place its not so silly now, but its an absurd monster to begin with!
Adding some flesh to the stalks was difficult, sculpy is pretty soft and tacky requiring me to keep dry clean hands and tools. Water helps but if you get it on a surface you want more sculpy on, its not going to stick like regular clay would. I found lightly smearing the finger prints down and using a tool helped, albeit slowly. Bake it again!
Here he is fitted with his new dentures, lookin’ good buddy!
The mouth is toothpick ends with a strip of clay across for gums and textured in.
The eye stalks are still in progress… it was tedious doing 12 of them. I rolled a dozen balls and baked them, then worked them onto the stalks and textured them in. I went back to the manual and found they only have 10 stalks but we can fudge those rules while the game is on! This isn’t Warhammer where WYSIWYG is a rule.
Base colors! Once all the sculpting is done and baked I hit the whole thing with a dark red- “Tuscan Red” apple barrel brand. He will be pretty dark once finished, this is Ok.
I made a black and brown mix wash to cover the whole deal, darkening the red in successive coats and pooling up in the recesses. Essentially it’s a watered down black and brown with dawn dish soap added in to break surface tension and push all pigments into corners and deep areas. Kind of dark here but once its dry and the highlights begin, the pools of wash will even out.
Here you see the dried wash after maybe 5 coats. Working a few extra layers on the ends of the stalks to darken them to black, contrasting the eyeballs. I applied it sloppily in the last few to mottle up the overall undercoat for a bit of realism… relatively real I mean.
Heavy drybrushing of the original red, the eye is a glass marble so I was able to rub off the paint easily.
Details! Teeth and eyeballs both began with a beige, shaded with Citadel brand chestnut colored wash. Chestnut wash in successive layers to darken it quite a bit, leaving a nice color for a monster’s lidless eyeball! I began the shapes of the irises with black and white base for the bright colors to come.
Here he is completed! I wanted each eyeball to be unique to represent different powers they have. I didnt assign the eyes to powers literally, just need to be different from the rest in some way. It hit them all a few times with gloss varnish, it helps sell the eye shine effects I painted in.
The back. Hard to get a pic of all the eyes but you get the idea!
Next is the base, something he is hovering above. I’ll get to it this weekend, I have time for this as he will be the bad guy for a quest thread a few sessions away. I’ll probably p[ost in-game pics like last time, whenever we get to play it.
I hope you all enjoyed my second sculpture, it was fun but I don’t think I’ll have the energy to do more eye stalks!
Next? Purple Wyrm, but I need a lot of clay for that beast!
Thank you and have a nice day
Very cool art.
What type(s) of paint do you use? Ever play around with Rustoleum Hammered Finish? The way it bubbles upon contact you can spray other colors at it to create other effects. Might work out on some of your projects.
What type(s) of paint do you use? Ever play around with Rustoleum Hammered Finish? The way it bubbles upon contact you can spray other colors at it to create other effects. Might work out on some of your projects.
a reply to: IgnoranceIsntBlisss
Thanks everybody!
I use cheap acrylics from walmart mostly, but I have had a buddy use the hammered and crackle finish to some cool volcanic terrain!
Thanks everybody!
I use cheap acrylics from walmart mostly, but I have had a buddy use the hammered and crackle finish to some cool volcanic terrain!
a reply to: Butterfinger
That is absolutely awesome!
I used to paint all of my miniatures when I was younger. It was truly a labor of love. These days I simply don't have the time or patience I did back then and I have taken to purchasing pre-painted miniatures from eBay.
Kudos to you sir...beautiful work!
That is absolutely awesome!
I used to paint all of my miniatures when I was younger. It was truly a labor of love. These days I simply don't have the time or patience I did back then and I have taken to purchasing pre-painted miniatures from eBay.
Kudos to you sir...beautiful work!
You did a wonderful job creating such a frightening creature. I look forward to seeing more of your handiwork.
Nice!! Nothing like adding miniatures to game sessions for added imaginations. Awesome work. Makes me miss my gaming group here where I live. I've not
rolled any dice in over a year. But they still go everywhere my laptop bag goes just in case a game breaks out and dice are thrown!
Love it!
Love it!
originally posted by: karmicecstasy
That is amazing. Wish I could do what you do.
Thanks! Your Avatar is appropriate!
Nice work! I kept scrolling down, thinking each picture was the finished product. But there were more pictures, and it kept on improving! That is
still a giant miniature, what size of a battle grid are you using?
edit on 12pmWed, 12 Jul 2017 15:44:49 -0500kbpmkAmerica/Chicago by darkbake
because: (no reason given)
a reply to: Butterfinger
Use Goof Off to thin Rustoleum paints.
You can play around with spraying a solid color, and immediately spraying the hammer over it to alter the effects (this is where wanting the solid still wet spritzing the solid with spray-can Goof Off might assist). You can also spray hammered plus solid simultaneously. Then you can spray multiple thick layers of each, one after the other, to get it really going nuts. Etc.
a reply to: Butterfinger
So I decided I'd go look for a video of what I'm talking about. Didn't find any, but did notice these other sweet paint layer tek videos.
Dont knwo that they'd do your mini projects much good, but still very cool.
I used to restore pinball / arcade machines and to me acrylic paints are a pinballs worst enemy. So I had a red harbor freight cart and every color of Rustoleum and for the art rework stuff I'd do the art on sometimes 10 pin's lined up simultaneously (its better doing them in groups for the color work [do the black on them all, then the red, etc]). I'd use odd disposable pieces of firm thick solid cardboard material for my palletes, although I'd run each one a while (they'd end up THICK & HEAVY by the time I'd toss them lol). Had a sort of pile in the bottom of the cart for different colors (applying to them via spray cans you sort of need a full pallete area for each major color group with all the overspray). So then I'd spray a big glob of se black; and then I'd spray the other colors up against it, or just to the side; and then swirl the colors I was making in between.
So when its all hot, or you're just doing this stuff all day the blobs of paint naturally stiffen up on you, but that's when I'd spritz the spray Goof Off across them and keep them going. Pretty much up to the point they dry mostly solid you can keep rewetting them almost indefinitely and keep the blobs going.
I cant speak to trying to run that game on other paint types, but Rustoleum oils can be very forgiving like that via Goof Off.
But I havent done any of that this decade so felt compelled to see if anyone has videos with some of my Hammered experiments I used to have fun with.
edit on 12-7-2017 by IgnoranceIsntBlisss because: (no reason given)
a reply to: Butterfinger
he looks very cool.
I think the only time we fought a beholder in my d&d adventuring we took it out in a round.
We weren't going to mess around with that thing.
he looks very cool.
I think the only time we fought a beholder in my d&d adventuring we took it out in a round.
We weren't going to mess around with that thing.
a reply to: Butterfinger
Is "that" what its called? A buddy of a friend does this thing, he has one of those tall walled kiddie pools under his carport, filled with this viscous liquid I think he said 'cellulose', that he'll splash a bunch of squirts of oils paints across the surface and then dip stuff in it to create the most brilliant 'tie dyed' sort of effects. All his shirts he made like that (yes with oil paints), and half the stuff in his house like his coffee table. He figured out this odd trick I think it was nylons over coat hanger silhouettes to make these odd alien structure looking little sort of statues, that actually look effing sweet dipped like that.
Is "that" what its called? A buddy of a friend does this thing, he has one of those tall walled kiddie pools under his carport, filled with this viscous liquid I think he said 'cellulose', that he'll splash a bunch of squirts of oils paints across the surface and then dip stuff in it to create the most brilliant 'tie dyed' sort of effects. All his shirts he made like that (yes with oil paints), and half the stuff in his house like his coffee table. He figured out this odd trick I think it was nylons over coat hanger silhouettes to make these odd alien structure looking little sort of statues, that actually look effing sweet dipped like that.
a reply to: IgnoranceIsntBlisss
Theres a middle eastern name for it, but yeah.
Ive seen some done with spray paint as well on youtube
Theres a middle eastern name for it, but yeah.
Ive seen some done with spray paint as well on youtube
new topics
-
Maestro Benedetto
Literature: 56 minutes ago -
Is AI Better Than the Hollywood Elite?
Movies: 1 hours ago -
Las Vegas UFO Spotting Teen Traumatized by Demon Creature in Backyard
Aliens and UFOs: 4 hours ago -
2024 Pigeon Forge Rod Run - On the Strip (Video made for you)
Automotive Discussion: 5 hours ago -
Gaza Terrorists Attack US Humanitarian Pier During Construction
Middle East Issues: 5 hours ago -
The functionality of boldening and italics is clunky and no post char limit warning?
ATS Freshman's Forum: 6 hours ago -
Meadows, Giuliani Among 11 Indicted in Arizona in Latest 2020 Election Subversion Case
Mainstream News: 7 hours ago -
Massachusetts Drag Queen Leads Young Kids in Free Palestine Chant
Social Issues and Civil Unrest: 7 hours ago -
Weinstein's conviction overturned
Mainstream News: 9 hours ago -
Supreme Court Oral Arguments 4.25.2024 - Are PRESIDENTS IMMUNE From Later Being Prosecuted.
Above Politics: 10 hours ago
top topics
-
Krystalnacht on today's most elite Universities?
Social Issues and Civil Unrest: 10 hours ago, 9 flags -
Supreme Court Oral Arguments 4.25.2024 - Are PRESIDENTS IMMUNE From Later Being Prosecuted.
Above Politics: 10 hours ago, 8 flags -
University of Texas Instantly Shuts Down Anti Israel Protests
Education and Media: 13 hours ago, 7 flags -
Weinstein's conviction overturned
Mainstream News: 9 hours ago, 7 flags -
Gaza Terrorists Attack US Humanitarian Pier During Construction
Middle East Issues: 5 hours ago, 7 flags -
Massachusetts Drag Queen Leads Young Kids in Free Palestine Chant
Social Issues and Civil Unrest: 7 hours ago, 6 flags -
Meadows, Giuliani Among 11 Indicted in Arizona in Latest 2020 Election Subversion Case
Mainstream News: 7 hours ago, 5 flags -
Las Vegas UFO Spotting Teen Traumatized by Demon Creature in Backyard
Aliens and UFOs: 4 hours ago, 4 flags -
2024 Pigeon Forge Rod Run - On the Strip (Video made for you)
Automotive Discussion: 5 hours ago, 2 flags -
Any one suspicious of fever promotions events, major investor Goldman Sachs card only.
The Gray Area: 15 hours ago, 2 flags
active topics
-
VP's Secret Service agent brawls with other agents at Andrews
Mainstream News • 61 • : Scratchpost -
University of Texas Instantly Shuts Down Anti Israel Protests
Education and Media • 228 • : cherokeetroy -
SETI chief says US has no evidence for alien technology. 'And we never have'
Aliens and UFOs • 72 • : yuppa -
My Poor Avocado Plant.
General Chit Chat • 77 • : JonnyC555 -
New whistleblower Jason Sands speaks on Twitter Spaces last night.
Aliens and UFOs • 61 • : Ophiuchus1 -
Is AI Better Than the Hollywood Elite?
Movies • 2 • : 5thHead -
Gaza Terrorists Attack US Humanitarian Pier During Construction
Middle East Issues • 25 • : CarlLaFong -
Mood Music Part VI
Music • 3102 • : Hellmutt -
Las Vegas UFO Spotting Teen Traumatized by Demon Creature in Backyard
Aliens and UFOs • 9 • : Ophiuchus1 -
British TV Presenter Refuses To Use Guest's Preferred Pronouns
Education and Media • 164 • : Annee