It looks like you're using an Ad Blocker.
Please white-list or disable AboveTopSecret.com in your ad-blocking tool.
Thank you.
Some features of ATS will be disabled while you continue to use an ad-blocker.

The Solatron Cometh...
page: 11
share:
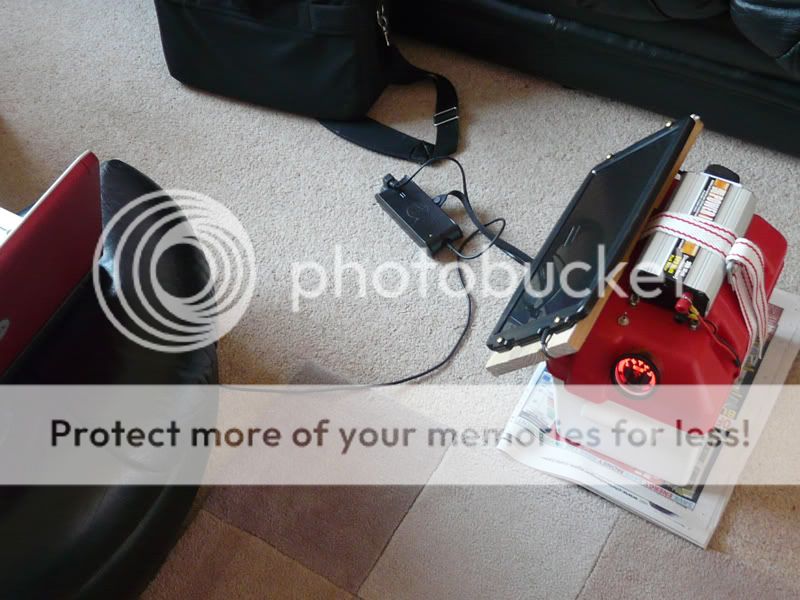
Well, after a good few hours in the workshop my solar generator is now up and running.
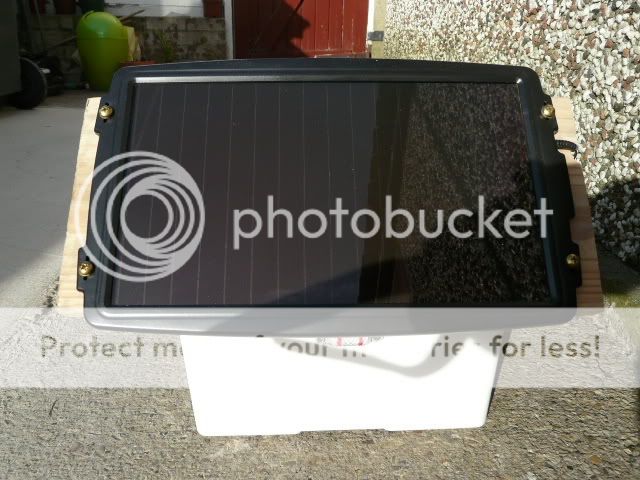
Basically its a way of continuously re-charging a 12v battery using a solar panel (with light obviously).
I can't trumpet this as my own idea as I got the inspiration from this link (off ATS originally).
www.rain.org...
I've made some interesting modifications though so it's not all wires everywhere and cumbersome set-ups.
You see on the link that the guy has the solar panel completely separate from the main unit. Leaving it on the floor in grass etc with nowhere to keep to up at height means it's likely to be stood on and booted by accident.
You have the hassle of setting up the panel everytime you move somewhere else and in SitX you might not have time for that.
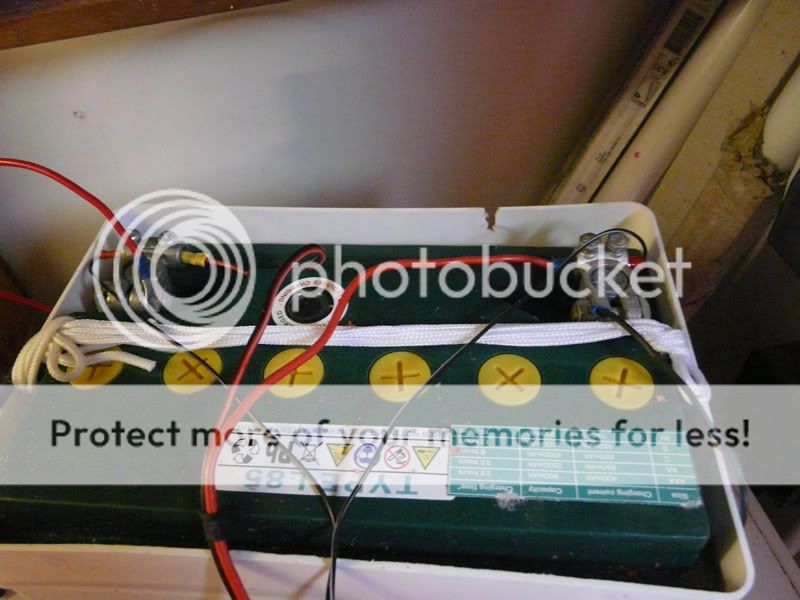
Hence I've installed a frame for a panel to go directly onto the slanting part of the battery container to catch the suns rays.
The tie down strap is useful for keeping the lid on firmly and could be used to carry it one-handed. But the side staples probably wouldn't take the weight (despite being drilled into the container box.
The system isn't that heavy (about 10 kilos) and should be very portable if I get a carry frame made up. As it is it would make an excellent tool for living off the grid, a shelter, from your vehicle etc.
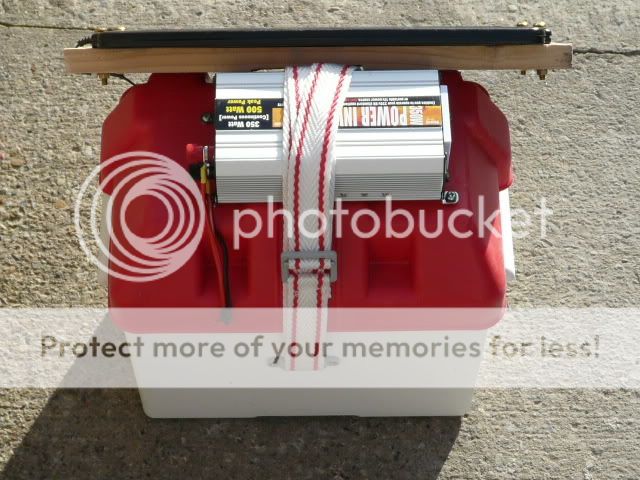
The inverter which allows AC power plug-ins I've also mounted on top so it doesn't have to be carried loosely.
So the whole unit can be moved about and as long as its daylight the battery will be getting its precious energy topped up
I don't have worry about disconnecting wires, packing up the loose bits etc.

My next goal is to environmentally seal the inverter and battery box. So far I've silicon sealed a few excesse drill holes and I'll be seeing about getting a small poncho/bag grafted onto the box and thrown over the generator if rain threatens.
I'm mulling over attaching a plastic frame I can modify to fit over the inverter and box bit.
A voltmeter and ampmeter is another thing I'll get later and install.
They seem to be the wrong size that I see for sale. Either too big or too expensive for what they are worth.
THe final step would be fitting a master switch and buying a larger panel to tie into the generator if it's used for power hungry machines.
Decent thoughts and feedback appreciated
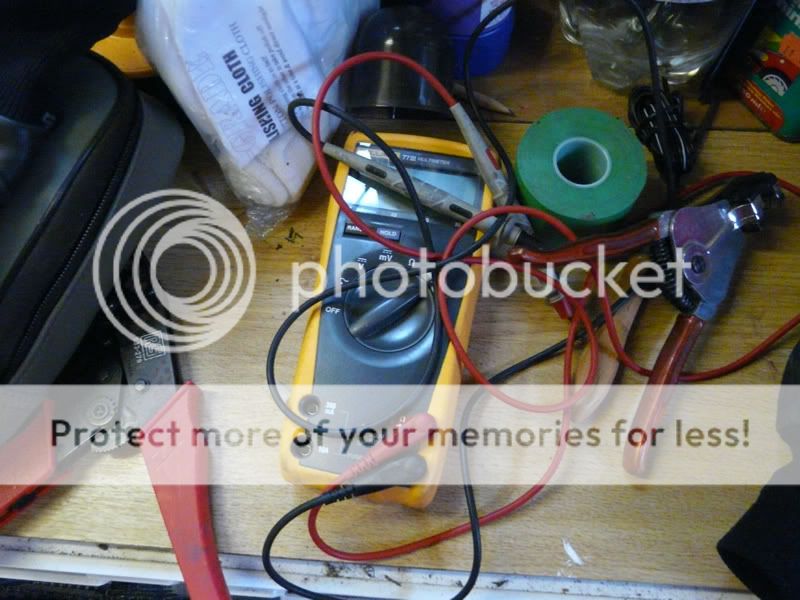
For anyone that wants to build one of these make sure you have a multimeter and know how to use it. I converted a commercially available solar panel and played at re-wiring it to tie into the DC battery. Make sure you get you polarities correct otherwise the inverter may blow fuses (and taking inverters apart is a game of soldiers to say the least!)
[edit on 8-6-2008 by WatchRider]
Basically its a way of continuously re-charging a 12v battery using a solar panel (with light obviously).
I can't trumpet this as my own idea as I got the inspiration from this link (off ATS originally).
www.rain.org...
I've made some interesting modifications though so it's not all wires everywhere and cumbersome set-ups.
You see on the link that the guy has the solar panel completely separate from the main unit. Leaving it on the floor in grass etc with nowhere to keep to up at height means it's likely to be stood on and booted by accident.
You have the hassle of setting up the panel everytime you move somewhere else and in SitX you might not have time for that.
Hence I've installed a frame for a panel to go directly onto the slanting part of the battery container to catch the suns rays.
The tie down strap is useful for keeping the lid on firmly and could be used to carry it one-handed. But the side staples probably wouldn't take the weight (despite being drilled into the container box.
The system isn't that heavy (about 10 kilos) and should be very portable if I get a carry frame made up. As it is it would make an excellent tool for living off the grid, a shelter, from your vehicle etc.
The inverter which allows AC power plug-ins I've also mounted on top so it doesn't have to be carried loosely.
So the whole unit can be moved about and as long as its daylight the battery will be getting its precious energy topped up
I don't have worry about disconnecting wires, packing up the loose bits etc.
My next goal is to environmentally seal the inverter and battery box. So far I've silicon sealed a few excesse drill holes and I'll be seeing about getting a small poncho/bag grafted onto the box and thrown over the generator if rain threatens.
I'm mulling over attaching a plastic frame I can modify to fit over the inverter and box bit.
A voltmeter and ampmeter is another thing I'll get later and install.
They seem to be the wrong size that I see for sale. Either too big or too expensive for what they are worth.
THe final step would be fitting a master switch and buying a larger panel to tie into the generator if it's used for power hungry machines.
Decent thoughts and feedback appreciated
For anyone that wants to build one of these make sure you have a multimeter and know how to use it. I converted a commercially available solar panel and played at re-wiring it to tie into the DC battery. Make sure you get you polarities correct otherwise the inverter may blow fuses (and taking inverters apart is a game of soldiers to say the least!)
[edit on 8-6-2008 by WatchRider]
Hey WR its good to see your solar generator finished! It looks very impressive its a good start to living off the grid, for moving it have you thought
about stickin some wheels on the bottom of the frame your gonna build? 10Kg isn't to heavy but lugging something like that for hours will give you
arms of lead! whats your plan for making it more transportable?
Keep up the good work!
Keep up the good work!
Wheels are a good suggestion.
For wheels though they fall down when you go offroad and into rought terrain. For me I'm gearing towards the a 351 army radio style carrying frame you can carry on your back.
For now it just lives in the back of the car when I'm on the move.
It's handy for if the beast runs out of battery charge when I leave it stood for weeks on end too
[edit on 8-6-2008 by WatchRider]
Nice design WatchRider, It looks good
Whats up with the rear stays on your Giant, Is it part carbon?
Whats up with the rear stays on your Giant, Is it part carbon?
Hey Dar dude!
good to see I'm not the only bight owl up at this hour
No rear suspension on the giant, no carbon either, only alloy.
Still light though.
I forgot to add on the OP that the whole set-up for one of these costs about £115.
There isn't a DC multi-outlet like on the link pages example, but that's only cause I don't use DC items. (If I did I'd probably just wire em in direct to the terminals )
Originally posted by WatchRider
Wheels are a good suggestion.
For wheels though they fall down when you go offroad and into rought terrain. For me I'm gearing towards the a 351 army radio style carrying frame you can carry on your back.
For now it just lives in the back of the car when I'm on the move.
It's handy for if the beast runs out of battery charge when I leave it stood for weeks on end too
[edit on 8-6-2008 by WatchRider]
Instead of wheels, you could use a sled type base. That way rough terrain wont be too much of a problem.
Good work btw
I just noticed, That looks like a hefty piece of wood you used for the back, Maybe you could get a piece of 2mm aluminium.
It would be lighter.
[edit on 9-6-2008 by Dar Kuma]
It would be lighter.
[edit on 9-6-2008 by Dar Kuma]
I know, I was mulling over a metal sheet but the wood does makes a good tool for leaving the top lid on its side while I'm configuring the wiring.
Excellent tinkering-skills WR...starred, flagged, and blue-peter-badged!
Now, if I can only get the time in the workshop to complete the windatron we'll have power for getting the kettle on for making a nice cup of tea to have with biscuits whilst tuning into The Archers in all seasons and Sit. X's...
Go UK survival team! Huzzah!
Now, if I can only get the time in the workshop to complete the windatron we'll have power for getting the kettle on for making a nice cup of tea to have with biscuits whilst tuning into The Archers in all seasons and Sit. X's...
Go UK survival team! Huzzah!
Yo Bro! LOL. Cheers for the badge dude.
Yeah the SitX prep. will be on hold while I blast offshore for a funds replenishing excercise (I've spent bombs these past 8 months).
Can't wait to see 'The Windatron Cometh' on the board!
The UK Teams are groovin alright
Slaps on backs all round boys and kisses on lips for the girls
Yeah the SitX prep. will be on hold while I blast offshore for a funds replenishing excercise (I've spent bombs these past 8 months).
Can't wait to see 'The Windatron Cometh' on the board!
The UK Teams are groovin alright
Slaps on backs all round boys and kisses on lips for the girls
The Solatron Project continues...
Voltmeter Upgrade
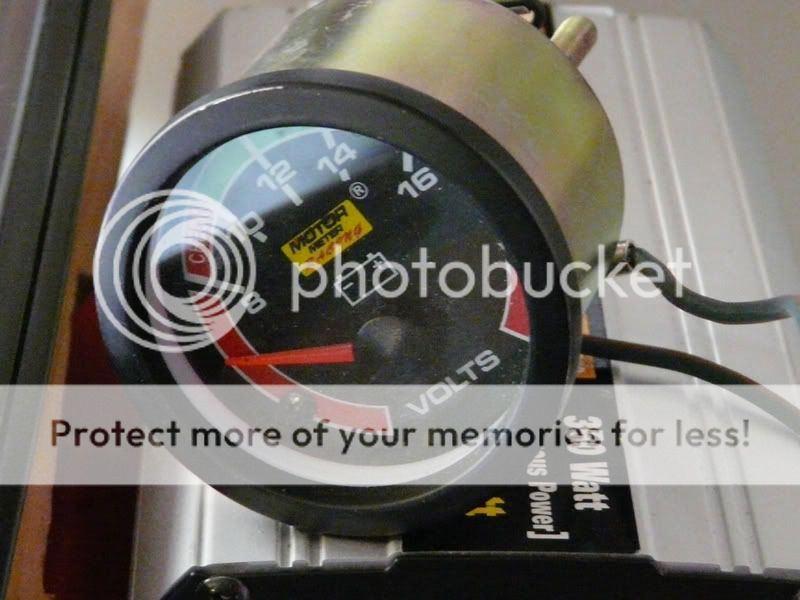
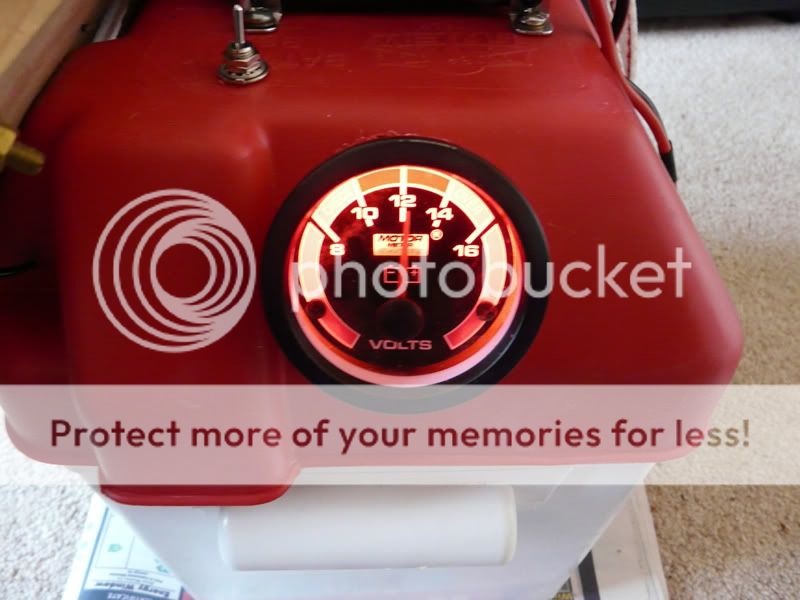
Ok so I got around to installing the voltmeter today.
This is where it'll be going:
The first major problem was the size of it really was irritating.
No matter how I weevilled and gimbled the thing inside the box the dam lid just wouldn't close properly. The second problem was ensuring it remained secure and wasn't going to become a smashed up part while on the move.
Eventually I settled on a novel method. Using my trusty drill and dremel I drilled out a smaller circular piece from the generator box and carefully pushed the device into it. The fit was beyond flush and positively was a struggle. But being plastic and a very tight fit means it won't be going anywhere.

A red lightbulb cover on the bulb means the light it gives out is subdued red.
I stumbled across a flick switch of my dads in a drawer, perfect, now it won't be draining the power while I have it hooked up to the battery cause I can turn it off and on at leisure.
Some continuity checks on the switch for functionality and all is good.
No room on the old connection points, no problem just two blue spade connectors on the main locking nut instead
Some silicon sealant on the inside, around voltmeter hole to help keep moisture out.
If you look closely you might just be able to make out the switches three terminals poking through.
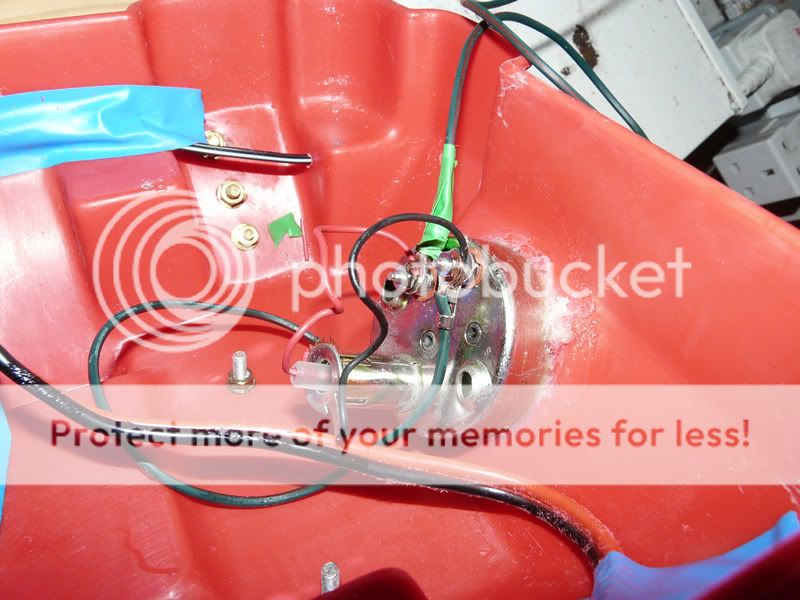
Just a case of crimping the + wire onto the spade, done.
Final part is soldering the - wire to the switch and running another wire off it to the - terminal.
Then it'll be time for testing the new upgrade
Watch this space...
Voltmeter Upgrade
Ok so I got around to installing the voltmeter today.
This is where it'll be going:
The first major problem was the size of it really was irritating.
No matter how I weevilled and gimbled the thing inside the box the dam lid just wouldn't close properly. The second problem was ensuring it remained secure and wasn't going to become a smashed up part while on the move.
Eventually I settled on a novel method. Using my trusty drill and dremel I drilled out a smaller circular piece from the generator box and carefully pushed the device into it. The fit was beyond flush and positively was a struggle. But being plastic and a very tight fit means it won't be going anywhere.
A red lightbulb cover on the bulb means the light it gives out is subdued red.
I stumbled across a flick switch of my dads in a drawer, perfect, now it won't be draining the power while I have it hooked up to the battery cause I can turn it off and on at leisure.
Some continuity checks on the switch for functionality and all is good.
No room on the old connection points, no problem just two blue spade connectors on the main locking nut instead
Some silicon sealant on the inside, around voltmeter hole to help keep moisture out.
If you look closely you might just be able to make out the switches three terminals poking through.
Just a case of crimping the + wire onto the spade, done.
Final part is soldering the - wire to the switch and running another wire off it to the - terminal.
Then it'll be time for testing the new upgrade
Watch this space...
frogive me for sounding abit thick but what applications do you have in mind for this?
Household appliances, charging smaller batteries, laptops, augmenting an existing solar array, jumpstarting drained / dead car batteries (several
times successful on this).
With the inverter connected you get hours of use.
Get yourself off the grid or at least less reliant on it people
With the inverter connected you get hours of use.
Get yourself off the grid or at least less reliant on it people
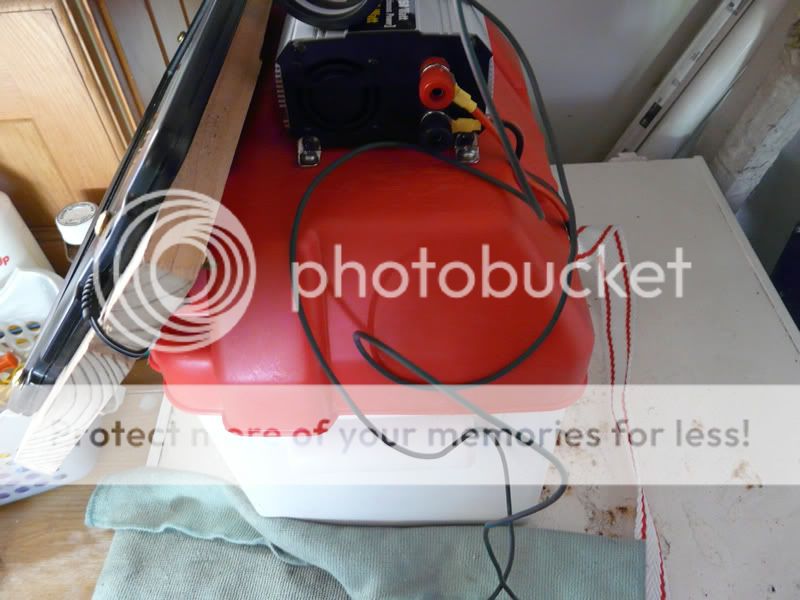
Ok, yesterday was soldering day.
The terminals were tiny things but I managed to get both wires from the meter and battery terminal onto the prongs.

It's not my finest weavery on the soldering iron but asthetics aren't my thing when it's tight space and awkward to wield properly. It's good to go.
Let there be light!
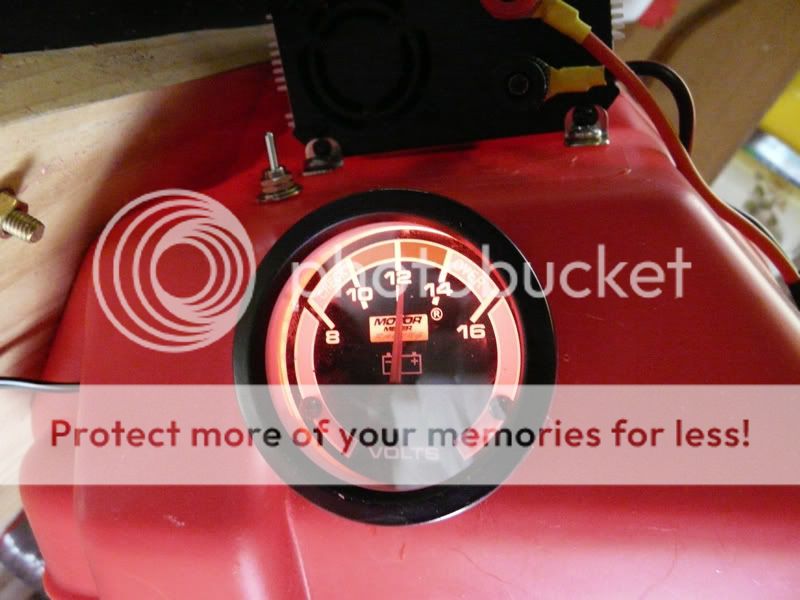
All good, just a bit of glue onto the switch, some sealant on the meter and switch and the Solatron is ready for the field
[edit on 24-5-2009 by WatchRider]
The terminals were tiny things but I managed to get both wires from the meter and battery terminal onto the prongs.
It's not my finest weavery on the soldering iron but asthetics aren't my thing when it's tight space and awkward to wield properly. It's good to go.
Let there be light!
All good, just a bit of glue onto the switch, some sealant on the meter and switch and the Solatron is ready for the field
[edit on 24-5-2009 by WatchRider]
Putting it to the Test!
Ok, Ace's post got me motivated into giving the Solatron her first proper test.
I made sure she'd got a full charge from all the sunny weather we had by putting it outside from 1300 til about 1630 hrs.

Then it was time for food and then to begin the clock.
At 1650 hrs the clock started!
On went the inverter and in went the plug for a Dell Inspiron 1520!
The Charge is good, 12.3 or so volts.
Now it's the waiting game to see how long it'll last!
The inverters a little bit noisy with the fan whiz constantly going but the device is still lukewarm after an hour, a good sign. The Box itself is cool also.
I've cheated a little bit by having the devices solar panel pointing at the window so it catches some indirect light from there.
But the scenario I'm using is that we've all been out and about during the day, foraging, building and keeping busy, then at dusk we've hit the retreat and are getting settled in for the night.
I have high hopes, though and project about 12 hours of power until the voltage falls below the inverters threshold (9 volts or so).
I'll be up all night and will keep you posted on the progress
Ok, Ace's post got me motivated into giving the Solatron her first proper test.
I made sure she'd got a full charge from all the sunny weather we had by putting it outside from 1300 til about 1630 hrs.
Then it was time for food and then to begin the clock.
At 1650 hrs the clock started!
On went the inverter and in went the plug for a Dell Inspiron 1520!
The Charge is good, 12.3 or so volts.
Now it's the waiting game to see how long it'll last!
The inverters a little bit noisy with the fan whiz constantly going but the device is still lukewarm after an hour, a good sign. The Box itself is cool also.
I've cheated a little bit by having the devices solar panel pointing at the window so it catches some indirect light from there.
But the scenario I'm using is that we've all been out and about during the day, foraging, building and keeping busy, then at dusk we've hit the retreat and are getting settled in for the night.
I have high hopes, though and project about 12 hours of power until the voltage falls below the inverters threshold (9 volts or so).
I'll be up all night and will keep you posted on the progress
Lets see if I can make your project even cheaper. You know those dayglo orange road signs that have the big arrows pointing left or right or warn you
about the road construction up ahead? Those are all solar powered these days. And drivers smash into those things every day. Bad for them good for
this idea.
When one of those signs get smacked the solar cell is normally damaged but not worthless. The companies normally just throw the broken solar cell away and replace it with a new one.
What you would want to do is this: Next time you see those dayglo orange road signs STOP and get the phone number off of it. Somewhere on that thing is the number of the company that owns it. You call that number and just ask them for their old broken solar cells. Normally you can get them for FREE!
Now they do operate at decreased effeciences. Like 80% or 50 % still what you lack in effenecy you can make up for in volume.. because they are FREE! You just gotta ask for the old broken solar cells... and if some other solar hunter is already in league with said road sign company Bake them a pie for the bribe...Or just to say thanks for the free solar cells.
Hopefully a trick like that could take your cost of production of 300 to 100 or less depending on the materials you use to fuse that thing together.
Cheers
new topics
-
SETI chief says US has no evidence for alien technology. 'And we never have'
Aliens and UFOs: 1 hours ago -
This is our Story
General Entertainment: 4 hours ago -
President BIDEN Vows to Make Americans Pay More Federal Taxes in 2025 - Political Suicide.
2024 Elections: 6 hours ago -
Ode to Artemis
General Chit Chat: 7 hours ago -
Ditching physical money
History: 10 hours ago -
One Flame Throwing Robot Dog for Christmas Please!
Weaponry: 10 hours ago -
Don't take advantage of people just because it seems easy it will backfire
Rant: 11 hours ago
top topics
-
University student disciplined after saying veganism is wrong and gender fluidity is stupid
Education and Media: 15 hours ago, 14 flags -
President BIDEN Vows to Make Americans Pay More Federal Taxes in 2025 - Political Suicide.
2024 Elections: 6 hours ago, 10 flags -
One Flame Throwing Robot Dog for Christmas Please!
Weaponry: 10 hours ago, 6 flags -
Should Biden Replace Harris With AOC On the 2024 Democrat Ticket?
2024 Elections: 12 hours ago, 6 flags -
Ditching physical money
History: 10 hours ago, 4 flags -
Don't take advantage of people just because it seems easy it will backfire
Rant: 11 hours ago, 4 flags -
God lived as a Devil Dog.
Short Stories: 16 hours ago, 3 flags -
SETI chief says US has no evidence for alien technology. 'And we never have'
Aliens and UFOs: 1 hours ago, 3 flags -
VirginOfGrand says hello
Introductions: 12 hours ago, 2 flags -
Ode to Artemis
General Chit Chat: 7 hours ago, 2 flags
active topics
-
University student disciplined after saying veganism is wrong and gender fluidity is stupid
Education and Media • 32 • : BedevereTheWise -
So this is what Hamas considers 'freedom fighting' ...
War On Terrorism • 227 • : HopeForTheFuture -
Remember These Attacks When President Trump 2.0 Retribution-Justice Commences.
2024 Elections • 51 • : Justoneman -
British TV Presenter Refuses To Use Guest's Preferred Pronouns
Education and Media • 131 • : FlyersFan -
Spectrophilia - Women Who Have Had Affairs With Ghosts Say Spooks Are Better Lovers Than Real Men
Paranormal Studies • 30 • : FlyersFan -
Breaking Baltimore, ship brings down bridge, mass casualties
Other Current Events • 471 • : bally001 -
-@TH3WH17ERABB17- -Q- ---TIME TO SHOW THE WORLD--- -Part- --44--
Dissecting Disinformation • 639 • : Justoneman -
SETI chief says US has no evidence for alien technology. 'And we never have'
Aliens and UFOs • 8 • : 19Bones79 -
Republican Voters Against Trump
2024 Elections • 289 • : Justoneman -
The Acronym Game .. Pt.3
General Chit Chat • 7742 • : bally001
1