It looks like you're using an Ad Blocker.
Please white-list or disable AboveTopSecret.com in your ad-blocking tool.
Thank you.
Some features of ATS will be disabled while you continue to use an ad-blocker.

Giving People the Finger: Realism in Art
page: 17
share:
A lot of art is sheerly about technique... many have their own ways to go about art by obviously various techniques or tools and mediums... Some tools
such as a fan brush make pretty good conifers without much effort(Thanks, Bob Ross) and we pick up certain techniques and process from all over the
place, some work for us and some don't and sometimes the foundation is enough to try ones hand and trail blaze to find ones own palette of
presentation for it.
Some stuff I will present here is nothing new if familiar, some stuff I present here will be if not familiar... yet in the attempt at both is to simplify the process so it's easy to recall. Yes, the title may be click bait saying come in like the finger in a come hither as figurative and well representative in presentation so quite literally... I'm giving a finger in this tutorial as the subject matter although, this tutorial is in digital format it can be worked to work in other mediums such as paper, canvas, paint, pencils etc. and well practice in that medium will show one their limit in it or the tools limit in it's usage... smarter not harder like the fan brush mentioned above is a great example of that... so edges of brushes and angle etc are important but in the digital you only get pressure differences and I dont use any of that in digital... just zooming in and out, and resizing the tip in relation to that zooming in and out.
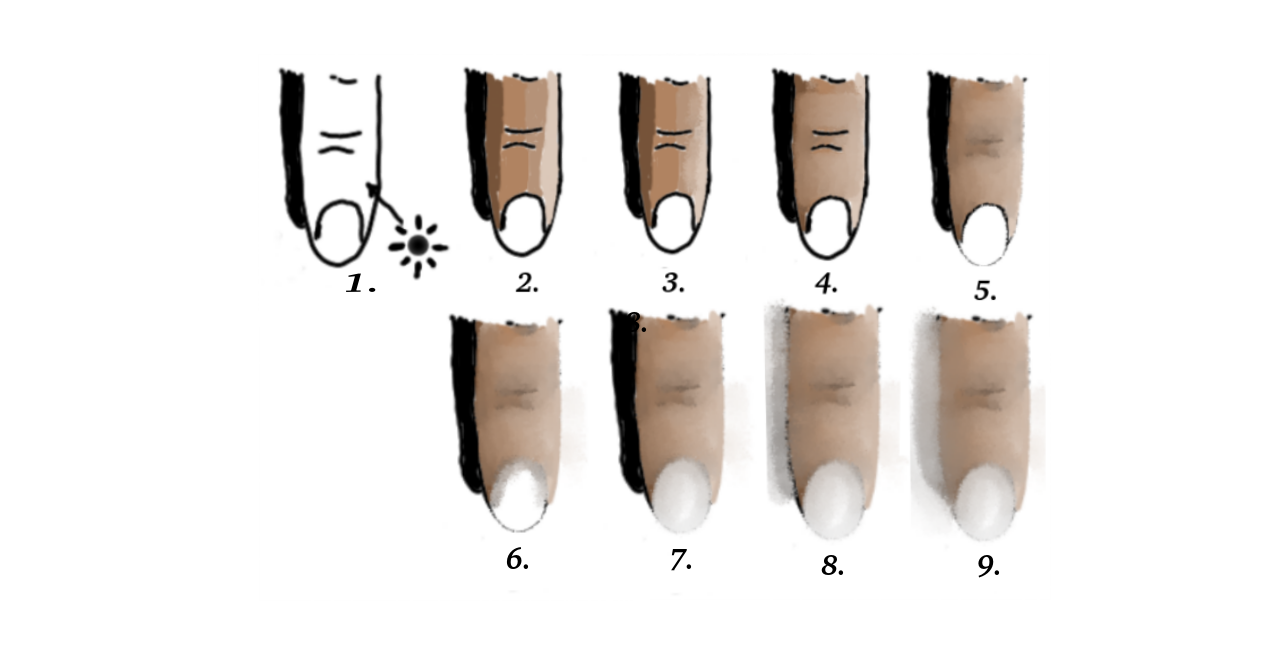
First and foremost... notice the outline around an object... and picture the inside and outside the edges as blank spaces and just the very edge of object and space existing... this will be the outline.
1. This figure is an example of that outline... notice it is irregular same as a finger instead of a circle with two lines... although, it is circular with two sides. You'll notice the little sun figure. This is the light source... and very very important to keep that light source in the same place unless it is a reflection(bounce light) refraction(under light) and well curved which wraps around from light to dark or between light and where the shadow is on the opposite side and the middle is simply the true color with shades on either side in relation to light and shadow.
2. Now that the outline is drawn and light source point of striking is chosen... we want to place in our tones... well the true color is the one we want in the middle so choose a color as close as possible to the middle between light and shadow as on either side of that middle area is tones. The shadow side colors are slightly darker in tone than the middle color chosen and the lighter in tones are brighter in contrast towards the light source.
3. Now we want to find the edge where two of these meet and then blend with the blend tool both of them together... this is the entire crux of realism blending.
4. So if we see there has been a lot of blending... the blending here has had one thing in mind... contour of the actual object in mind... so after the edges of dissimilar are blended in... then we can start sweeping away from the lightest edge of the light source in a bending motion around and to the shape we know it to be... so if roundish in shape the blend stroke is going to make that same curve over and over and of course this takes practice to pull the same contour as a guide one can use the tip of the finger as that shape and gradually widen it from small to width of the object.
5. Since there are no true shadows or edges of black found in realism just gradients of this same thing all over in varying contrasts then we trim or thin out the edges... if done on the light side use an eraser tool so it does not become a shadow side as well... remember light to dark... one can use the color itself to edge that down as well that was there already... I do this myself if the blending contours do not fit the light or contour one wants it to follow so a little splash of color remember a little goes a long way and will need to be blended out.
6. We can use these outlines as shadow and contour itself as seen in the finger nail as a blend... so pulling down adds the shadow to the nail and can be pulled in the contour the finger nail takes...
7. Ok now we mentioned the three types of light from the direct source since there also is ambient light this is often the bounce light or under light so be aware of the other sources and any reflective source or surface that would strike the object or reflect off of a surface or the object itself on a surface such as a shadow.
8. The shadow is not solid black as mentioned even with a very bright light source it is still a gradient, and to achieve such a dark shadow the light source would be very very close or directly above it... this position of the light source determines the length and placement of the shadow aside from the darkness of it. The highest spot to the eye is typically the brightest so be sure if lost in contour to keep that spot the closest to true color a touch of white or lighter in that area can also achieve a wet look or a glare.
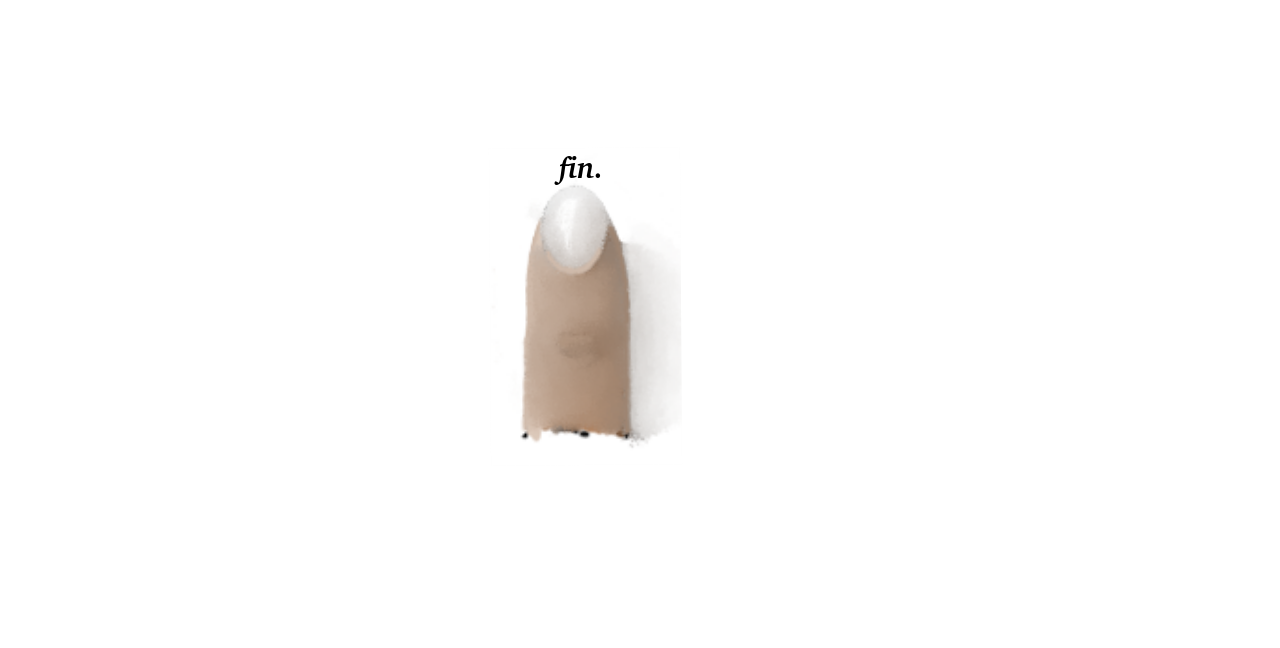
9. As we are nearing completion we want to refine our edges as clean as possible from all of that blending... this means the background typically is placed in last this can trim just as easy the outline and clean the edge all at once... for a very clean sharp edge... sometimes an eraser tool in a program sizes better than the drawing tool so if the drawing tool cannot get small enough then try the eraser tool... sometimes if digital one needs to calibrate their screen so it can size correctly and more accurately.
So one thing left to say:
Viewing tip: On regular PC's Ctrl and + increases and Ctrl and - decreases screen size if difficult to see Ctrl and 0 resets to original size... feel free to right click and save for personal use of study and practice....
Some stuff I will present here is nothing new if familiar, some stuff I present here will be if not familiar... yet in the attempt at both is to simplify the process so it's easy to recall. Yes, the title may be click bait saying come in like the finger in a come hither as figurative and well representative in presentation so quite literally... I'm giving a finger in this tutorial as the subject matter although, this tutorial is in digital format it can be worked to work in other mediums such as paper, canvas, paint, pencils etc. and well practice in that medium will show one their limit in it or the tools limit in it's usage... smarter not harder like the fan brush mentioned above is a great example of that... so edges of brushes and angle etc are important but in the digital you only get pressure differences and I dont use any of that in digital... just zooming in and out, and resizing the tip in relation to that zooming in and out.
First and foremost... notice the outline around an object... and picture the inside and outside the edges as blank spaces and just the very edge of object and space existing... this will be the outline.
1. This figure is an example of that outline... notice it is irregular same as a finger instead of a circle with two lines... although, it is circular with two sides. You'll notice the little sun figure. This is the light source... and very very important to keep that light source in the same place unless it is a reflection(bounce light) refraction(under light) and well curved which wraps around from light to dark or between light and where the shadow is on the opposite side and the middle is simply the true color with shades on either side in relation to light and shadow.
2. Now that the outline is drawn and light source point of striking is chosen... we want to place in our tones... well the true color is the one we want in the middle so choose a color as close as possible to the middle between light and shadow as on either side of that middle area is tones. The shadow side colors are slightly darker in tone than the middle color chosen and the lighter in tones are brighter in contrast towards the light source.
3. Now we want to find the edge where two of these meet and then blend with the blend tool both of them together... this is the entire crux of realism blending.
4. So if we see there has been a lot of blending... the blending here has had one thing in mind... contour of the actual object in mind... so after the edges of dissimilar are blended in... then we can start sweeping away from the lightest edge of the light source in a bending motion around and to the shape we know it to be... so if roundish in shape the blend stroke is going to make that same curve over and over and of course this takes practice to pull the same contour as a guide one can use the tip of the finger as that shape and gradually widen it from small to width of the object.
5. Since there are no true shadows or edges of black found in realism just gradients of this same thing all over in varying contrasts then we trim or thin out the edges... if done on the light side use an eraser tool so it does not become a shadow side as well... remember light to dark... one can use the color itself to edge that down as well that was there already... I do this myself if the blending contours do not fit the light or contour one wants it to follow so a little splash of color remember a little goes a long way and will need to be blended out.
6. We can use these outlines as shadow and contour itself as seen in the finger nail as a blend... so pulling down adds the shadow to the nail and can be pulled in the contour the finger nail takes...
7. Ok now we mentioned the three types of light from the direct source since there also is ambient light this is often the bounce light or under light so be aware of the other sources and any reflective source or surface that would strike the object or reflect off of a surface or the object itself on a surface such as a shadow.
8. The shadow is not solid black as mentioned even with a very bright light source it is still a gradient, and to achieve such a dark shadow the light source would be very very close or directly above it... this position of the light source determines the length and placement of the shadow aside from the darkness of it. The highest spot to the eye is typically the brightest so be sure if lost in contour to keep that spot the closest to true color a touch of white or lighter in that area can also achieve a wet look or a glare.
9. As we are nearing completion we want to refine our edges as clean as possible from all of that blending... this means the background typically is placed in last this can trim just as easy the outline and clean the edge all at once... for a very clean sharp edge... sometimes an eraser tool in a program sizes better than the drawing tool so if the drawing tool cannot get small enough then try the eraser tool... sometimes if digital one needs to calibrate their screen so it can size correctly and more accurately.
So one thing left to say:
Viewing tip: On regular PC's Ctrl and + increases and Ctrl and - decreases screen size if difficult to see Ctrl and 0 resets to original size... feel free to right click and save for personal use of study and practice....
edit on 25-6-2016 by BigBrotherDarkness because: (no reason
given)
new topics
-
Electrical tricks for saving money
Education and Media: 26 minutes ago -
VP's Secret Service agent brawls with other agents at Andrews
Mainstream News: 1 hours ago -
Sunak spinning the sickness figures
Other Current Events: 2 hours ago -
Nearly 70% Of Americans Want Talks To End War In Ukraine
Political Issues: 2 hours ago -
Late Night with the Devil - a really good unusual modern horror film.
Movies: 4 hours ago -
Cats Used as Live Bait to Train Ferocious Pitbulls in Illegal NYC Dogfighting
Social Issues and Civil Unrest: 5 hours ago -
The Good News According to Jesus - Episode 1
Religion, Faith, And Theology: 7 hours ago -
HORRIBLE !! Russian Soldier Drinking Own Urine To Survive In Battle
World War Three: 9 hours ago
7