It looks like you're using an Ad Blocker.
Please white-list or disable AboveTopSecret.com in your ad-blocking tool.
Thank you.
Some features of ATS will be disabled while you continue to use an ad-blocker.

Photoshop Tutorial: Making small images large with Content-Aware
page: 14
share:
Hey there ATS. It doesn't matter if you're a pro with Photoshop, or you're brand new to the program, the Content-Aware feature is an incredibly
useful tool, and I use it in almost every ATS Avatar I've made to some degree.
If you don't have Photoshop yet, or have an earlier version of it, you can find a link to the Free Trial to the most recent Photoshop software here at my ATS Avatar Tutorial and Resource Thread: Photoshop. Content Aware is a feature that's available in Photoshop CS5 and beyond.
The Content-Aware examines the actual content within the image you've opened in Photoshop and tries to figure out the best way to remove or repair any damaged or unwanted area you've clicked on.
In this case we're using the Content Aware Fill, as we don't have any damaged parts of our image we're trying to fix, but instead we're using it's photo awareness to expand on a small image and make it larger than it actually is.
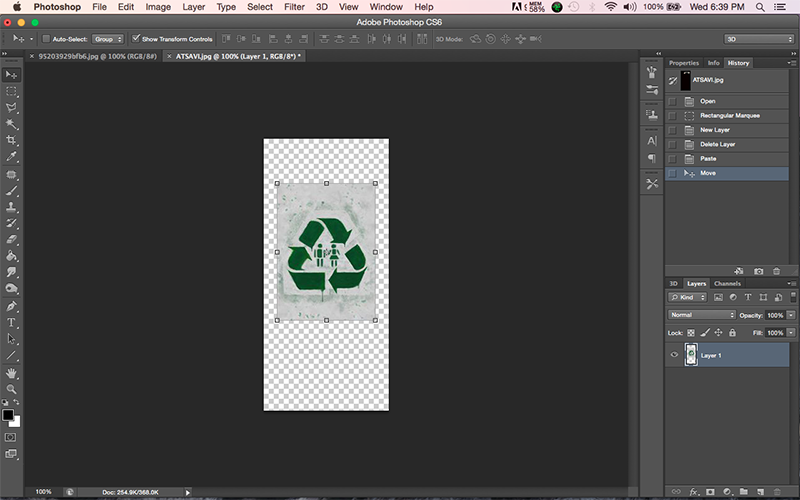
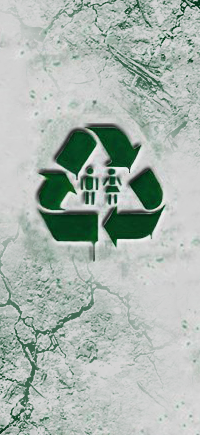
This is the image we're working with (donated by the member Soylent Green Is People)
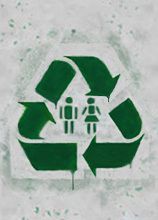
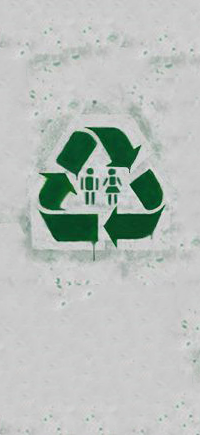
As you can see, it's too small to fit as a full avatar, but with the Content Aware Fill, we can make it full sized like this:
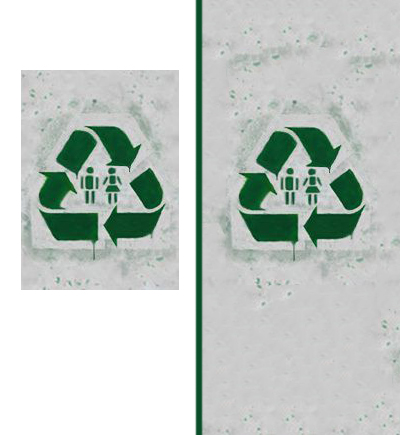
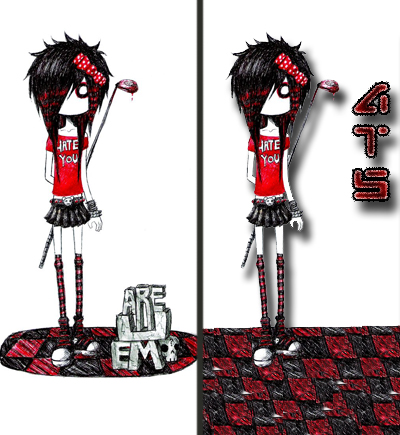
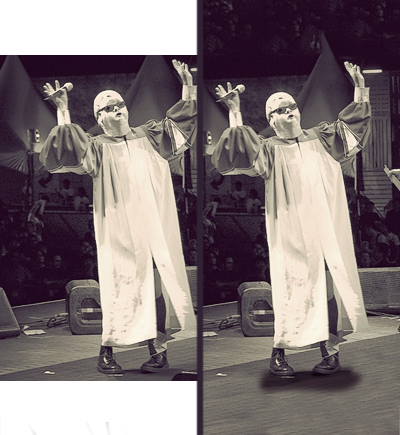
Here's the side-by-side comparison to see just how much content aware added:
It's important to note that not all images will are ideal with this technique. Remember that the Content Aware Fill considers the full image, so if your subject takes up most of the room, the Content Aware feature may think that it's the subject you want filled in, rather than say, the background itself. With this image in the tutorial, the subject (the recycle sign) isn't significant enough for the Content Aware to think that that is what we want filling the blanks.
So, lets get started.
__________________________________________
Open up a new project in Photoshop. The avatar size you'll want for a full sized avatar on ATS is 200 pixels wide by 435 pixels tall.
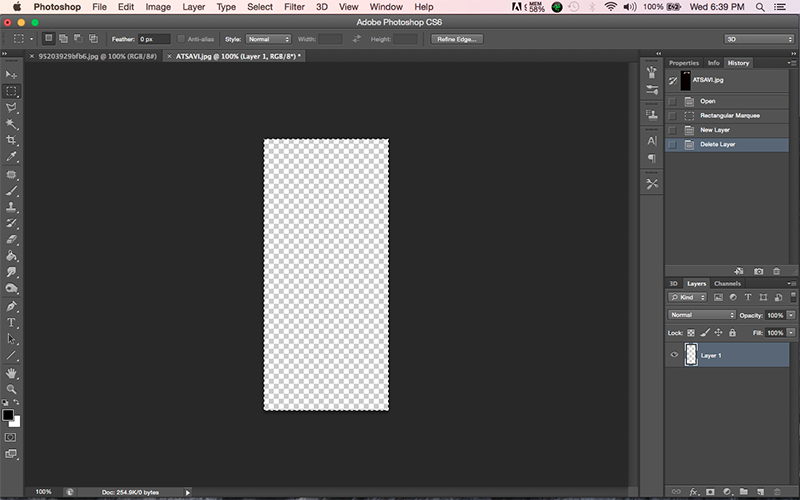
Drop the image you want into the project and drag it to the position you feel is best. Remember that ATS will overlay your membership name, and a host of information both at the top left corner and the bottom 1/4 of the avatar.
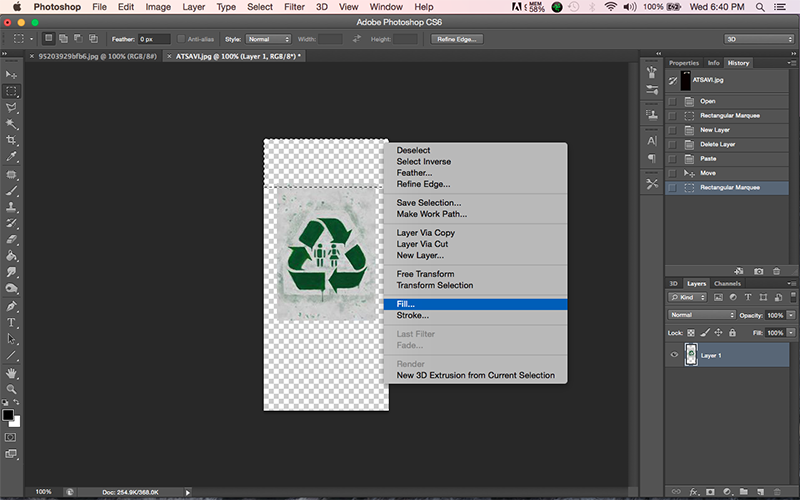
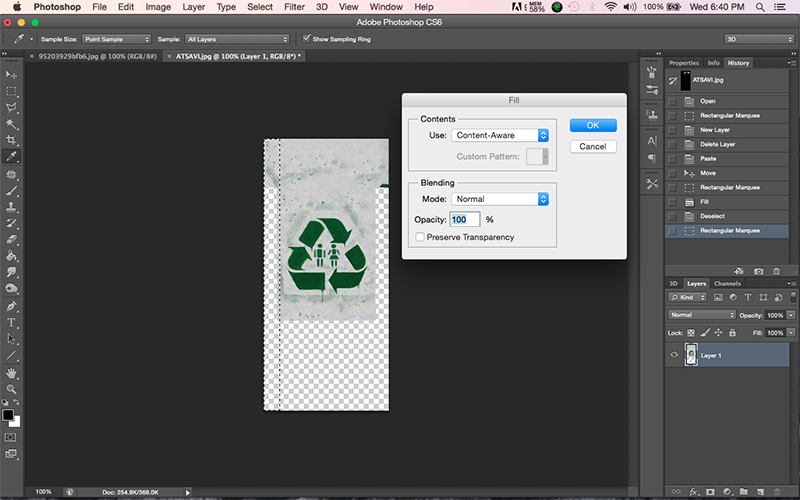
Next you'll want to select the Rectangular Marquee tool and click and drag over the blank area you want filled in. Right click on that area and select "Fill"
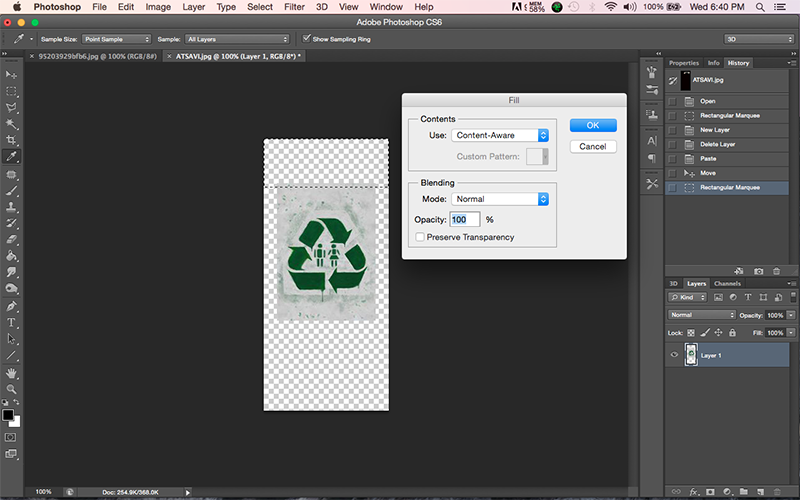
The Fill feature box will pop up and you'll need to select the 'Content Aware' option out of the Content > Use scroll tab. Make sure all your other settings are set how I have them, then click "OK"
That's it! You're done!
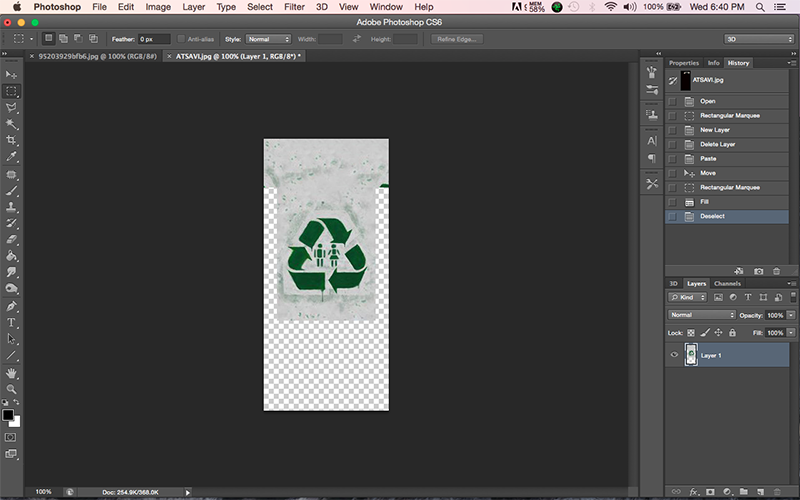
You've successfully used the Content Aware Fill feature. You'll notice in the example below that there's a little green mark from the recycle sign that's been used as filler. Just select over it again, and do all the blank areas and repeat the Fill > Content Aware > Ok steps to fill in the remaining empty parts of the avatar
Doing the same steps will fill in the rest of your project
And here's the final product!
You can save it as it is and set it as your Avatar, or if you feel the filled areas are too simple you can add in whatever effects you want. The great thing is the previous blank spots now carry the signature appearance of the original small image, just as a larger size, and without looking odd, stretched, or reduced in resolution and clarity.
You can use this final product to add whatever other effects you want, and they will more easily blend in with what used to be the original, small image. Like this:
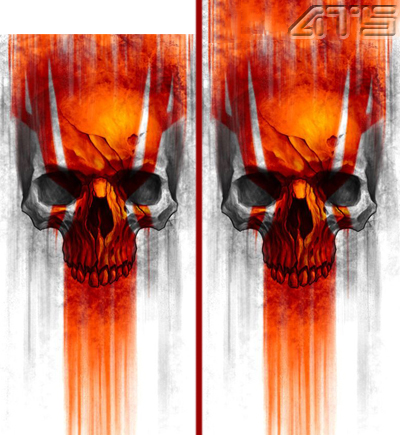
Here are a few other examples to show you the power of Content Aware:
Let me know if this tutorial has helped you, and post your work! I'd love to see the success you've made
If you don't have Photoshop yet, or have an earlier version of it, you can find a link to the Free Trial to the most recent Photoshop software here at my ATS Avatar Tutorial and Resource Thread: Photoshop. Content Aware is a feature that's available in Photoshop CS5 and beyond.
The Content-Aware examines the actual content within the image you've opened in Photoshop and tries to figure out the best way to remove or repair any damaged or unwanted area you've clicked on.
In this case we're using the Content Aware Fill, as we don't have any damaged parts of our image we're trying to fix, but instead we're using it's photo awareness to expand on a small image and make it larger than it actually is.
This is the image we're working with (donated by the member Soylent Green Is People)
As you can see, it's too small to fit as a full avatar, but with the Content Aware Fill, we can make it full sized like this:
Here's the side-by-side comparison to see just how much content aware added:
It's important to note that not all images will are ideal with this technique. Remember that the Content Aware Fill considers the full image, so if your subject takes up most of the room, the Content Aware feature may think that it's the subject you want filled in, rather than say, the background itself. With this image in the tutorial, the subject (the recycle sign) isn't significant enough for the Content Aware to think that that is what we want filling the blanks.
So, lets get started.
__________________________________________
Open up a new project in Photoshop. The avatar size you'll want for a full sized avatar on ATS is 200 pixels wide by 435 pixels tall.
Drop the image you want into the project and drag it to the position you feel is best. Remember that ATS will overlay your membership name, and a host of information both at the top left corner and the bottom 1/4 of the avatar.
Next you'll want to select the Rectangular Marquee tool and click and drag over the blank area you want filled in. Right click on that area and select "Fill"
The Fill feature box will pop up and you'll need to select the 'Content Aware' option out of the Content > Use scroll tab. Make sure all your other settings are set how I have them, then click "OK"
That's it! You're done!
You've successfully used the Content Aware Fill feature. You'll notice in the example below that there's a little green mark from the recycle sign that's been used as filler. Just select over it again, and do all the blank areas and repeat the Fill > Content Aware > Ok steps to fill in the remaining empty parts of the avatar
Doing the same steps will fill in the rest of your project
And here's the final product!
You can save it as it is and set it as your Avatar, or if you feel the filled areas are too simple you can add in whatever effects you want. The great thing is the previous blank spots now carry the signature appearance of the original small image, just as a larger size, and without looking odd, stretched, or reduced in resolution and clarity.
You can use this final product to add whatever other effects you want, and they will more easily blend in with what used to be the original, small image. Like this:
Here are a few other examples to show you the power of Content Aware:
Let me know if this tutorial has helped you, and post your work! I'd love to see the success you've made
Thanks for the tip!
I downloaded cs6 about 6 months ago but only last weekend did i try it out.
Im getting the hang of it. Was able to follow a tutorial on youtube on how to create a business logo.
Pretty basic stuff, but i was happy with it considering i never used the program before that.
I downloaded cs6 about 6 months ago but only last weekend did i try it out.
Im getting the hang of it. Was able to follow a tutorial on youtube on how to create a business logo.
Pretty basic stuff, but i was happy with it considering i never used the program before that.
I use paint shop pro 9 lol
I kinda still prefer the clone tool.. it's a manual process, but any repetition is removed, though I do like that bald guy one, how the floor is well done.
might have to really learn photoshop. seems a lot of the automated tools are impressive, but would sometimes still need fixing up for repetition in areas.
originally posted by: Brotherman
a reply to: Ghost147
I dont have PhotoShop but this was useful information. Can you use this tool to make the images Here look like clean straight pages? All I have to use is a cell phone camera so it makes it difficult to get them look like they were scanned.
For that you may want to simply use the Free Transformation > Warp too (found in most, if not all Photoshop programs)
I can think of a way that you could do it, but it would take quite some time to achieve and would seem like too much effort for so little change.
For example:
You could make another layer, Draw the straight boxes around each frame, select that area in that layer within each box, then go back to the original layer with the artwork in it and fill in any blank areas with content aware, and that could work. It's just that there are better, easier options to go about achieving that.
originally posted by: laminatedsoul
I use paint shop pro 9 lol
I kinda still prefer the clone tool.. it's a manual process, but any repetition is removed, though I do like that bald guy one, how the floor is well done.
might have to really learn photoshop. seems a lot of the automated tools are impressive, but would sometimes still need fixing up for repetition in areas.
There's also a cloning tool in Photoshop as well, and I also use it in just about every photo edit I do. You'll notice that sometimes when using Content Aware, when you deselect the area you just filled, there's a noticeable line between the original content and the newly filled one where the pixels just don't match alongside each other, That would be a good time to use the Clone tool to print pixels over that line and really achieve the effect you're going for - seamless content addition. The clone tool was used a lot in the picture you're referring to, the one with the man.
a reply to: Ghost147
Im looking to move to print in a few months hopefully so I have to keep that in mind as well, I am going to need to do a lot of digital touching up everything from lettering to centering and all kinds of things. I have to keep that in mind too cause I don't want to print artifacts, well as little artifacts as possible. I may have to get help with what I am doing =o
Im looking to move to print in a few months hopefully so I have to keep that in mind as well, I am going to need to do a lot of digital touching up everything from lettering to centering and all kinds of things. I have to keep that in mind too cause I don't want to print artifacts, well as little artifacts as possible. I may have to get help with what I am doing =o
a reply to: Brotherman
I see. Well in that case your most simplest option would be to just find a scanner
As for the artifacts, that is very easy to get rid of. I'd suggest looking up tutorials on any program you have that teaches someone to get rid of 'Watermarks' (copyright symbols). The techniques you can learn there would be the same you would use for artifacts in your scans.
Whenever I'm doing something like that, I use the Smudge tool, the Clone Stamp and a host of other techniques, like duplicating the image, making it darker or lighter, and simply erasing everything but the part that needs to be darkened or lightened to match it with the original image and remove that lightened or darkened artifact.
a reply to: kellyshane
I'm truly curious, why are you forum sliding?
It seems every other day you pick a forum and bump every thread there-in...
I'm honestly wondering which one of the threads in off topic you don't want on the recent posts page.
Also did you know one liner posts are frowned on..
At least put some effort into bumping years old threads...
-on topic-
Sweet tutorial OP thank you for taking the time and effort to put that together. I wouldn't even have an avatar if it were not for the help of some very patient ats'rs.. the process of uploading images still eludes my meager computer skills..
Respectfully,
~meathead
new topics
-
George Knapp AMA on DI
Area 51 and other Facilities: 2 hours ago -
Not Aliens but a Nazi Occult Inspired and then Science Rendered Design.
Aliens and UFOs: 2 hours ago -
Louisiana Lawmakers Seek to Limit Public Access to Government Records
Political Issues: 5 hours ago -
The Tories may be wiped out after the Election - Serves them Right
Regional Politics: 6 hours ago -
So I saw about 30 UFOs in formation last night.
Aliens and UFOs: 8 hours ago -
Do we live in a simulation similar to The Matrix 1999?
ATS Skunk Works: 9 hours ago -
BREAKING: O’Keefe Media Uncovers who is really running the White House
US Political Madness: 9 hours ago -
Biden--My Uncle Was Eaten By Cannibals
US Political Madness: 10 hours ago -
"We're All Hamas" Heard at Columbia University Protests
Social Issues and Civil Unrest: 10 hours ago
top topics
-
BREAKING: O’Keefe Media Uncovers who is really running the White House
US Political Madness: 9 hours ago, 23 flags -
Biden--My Uncle Was Eaten By Cannibals
US Political Madness: 10 hours ago, 18 flags -
George Knapp AMA on DI
Area 51 and other Facilities: 2 hours ago, 16 flags -
African "Newcomers" Tell NYC They Don't Like the Free Food or Shelter They've Been Given
Social Issues and Civil Unrest: 15 hours ago, 12 flags -
"We're All Hamas" Heard at Columbia University Protests
Social Issues and Civil Unrest: 10 hours ago, 7 flags -
Russia Flooding
Fragile Earth: 17 hours ago, 7 flags -
Russian intelligence officer: explosions at defense factories in the USA and Wales may be sabotage
Weaponry: 14 hours ago, 6 flags -
Louisiana Lawmakers Seek to Limit Public Access to Government Records
Political Issues: 5 hours ago, 6 flags -
So I saw about 30 UFOs in formation last night.
Aliens and UFOs: 8 hours ago, 5 flags -
Not Aliens but a Nazi Occult Inspired and then Science Rendered Design.
Aliens and UFOs: 2 hours ago, 3 flags
active topics
-
"We're All Hamas" Heard at Columbia University Protests
Social Issues and Civil Unrest • 121 • : marg6043 -
Not Aliens but a Nazi Occult Inspired and then Science Rendered Design.
Aliens and UFOs • 6 • : visitedbythem -
Russian intelligence officer: explosions at defense factories in the USA and Wales may be sabotage
Weaponry • 165 • : andy06shake -
Biden--My Uncle Was Eaten By Cannibals
US Political Madness • 39 • : Zanti Misfit -
The Tories may be wiped out after the Election - Serves them Right
Regional Politics • 18 • : alldaylong -
Silent Moments --In Memory of Beloved Member TDDA
Short Stories • 43 • : Naftalin -
Alabama Man Detonated Explosive Device Outside of the State Attorney General’s Office
Social Issues and Civil Unrest • 56 • : DBCowboy -
What do you do to get to sleep and stay asleep ??
Health & Wellness • 108 • : TheGoondockSaint -
George Knapp AMA on DI
Area 51 and other Facilities • 9 • : nerbot -
MULTIPLE SKYMASTER MESSAGES GOING OUT
World War Three • 28 • : Astrocometus
4