It looks like you're using an Ad Blocker.
Please white-list or disable AboveTopSecret.com in your ad-blocking tool.
Thank you.
Some features of ATS will be disabled while you continue to use an ad-blocker.

The Collaborative Gimp tutorial for ATS members. [updated]
page: 2share:
reply to post by PurpleChiten
The point of this thread is to share your Gimp experience, and provide insights that aren't often covered in online tuts.
The point of this thread is to share your Gimp experience, and provide insights that aren't often covered in online tuts.
reply to post by ecapsretuo
Layer, Path and Channel....Anyone?
I know a layer is the right side window, and you can have layers that get condensed.
I'll default to the pros for a real answer.
Layer, Path and Channel....Anyone?
I know a layer is the right side window, and you can have layers that get condensed.
I'll default to the pros for a real answer.
This is a thread that I am going to be visiting a LOT.... there is a particular issue that I've failed to master time and time again in Gimp -
learning how to separate a person in the foreground from the background. I've tried using the wand tool but the darned thing always wants to go off
in directions I've never intended.
reply to post by Hefficide
A lot of times that need to be done by hand with the pen tool. If the background and the person have high contrast between each other, you can get a lot of the work done with the magic wand. If a GIMP user that has used PS can tell me if the pens works the same, I could try to make a tutorial for that.
A lot of times that need to be done by hand with the pen tool. If the background and the person have high contrast between each other, you can get a lot of the work done with the magic wand. If a GIMP user that has used PS can tell me if the pens works the same, I could try to make a tutorial for that.
edit on Mon, 19 Nov 2012 21:25:45 -0600 by TKDRL because: (no reason given)
reply to post by TKDRL
That is no fun - means more work!
In the interest of the lazy, I'll contribute to this by adding that I also use Photoscape in addition to GIMP. It's nowhere near as versatile an application - but it does some things much more easily than GIMP. I find that I use it a LOT for resizing and for changing color/lighting settings.
It's been my experience that using both of these programs, as a tag team, is easiest for me.
~Heff
reply to post by Hefficide
Yeah, I hate it myself lol. I try to use 3D renderings as much as possible, I can make it render with alpha channels, no need to do hand cutting then
Yeah, I hate it myself lol. I try to use 3D renderings as much as possible, I can make it render with alpha channels, no need to do hand cutting then
reply to post by Hefficide
The way I do it is if the background is a single color use the wand tool, then go to select and click grow. I usually only use a setting of 1, this will grow the selection by one pixel all along the boarder. Then click the color tab and select "color to Alpha" (if it is not highlighted/selectable then go to the image tab, then mode and click render in RGB or right click on the image in the right tools panel and select add alpha channel) or select "cut". This process will eliminate all the single pixels usually missed and makes a cleaner edge.
If it has a faded boarder you may have to select a higher setting in the grow function and then use the "color to alpha" selection. If you use cut you will loose that fade.
Now if the background is faded or multiple colors I will click "layer", "new" and select the transparent. Then I will decide which is the more complex the background or the person I am trying to separate. This least complex I will color in with a solid, single color, then use the wand tool to select it on that layer. I then delete the colored in layer leaving the selection intact and then select the "selection" tool and invert then cut. Then to be sure I cut the edges right I will again create a new layer then use the "bucket" tool to fill it in and then reorder the layer so it is in the back. The color fill should be something that will allow both the background color, if any, and the main part I am keeping(a lot of the time it is bright red)then I clean it up by hand or use the wand and grow or shrink then cut to clean it up. I hope this helps.
edit on 19-11-2012 by Agarta
because: Spelling
reply to post by ecapsretuo
This is the layers tab selected. This will show you all the layers you are working with. It will allow you to make them visual or not, link them for moving the whole picture or gif, reorder the layers, select specific layers to work on, etc. I have an animated gif in the image below to show haw the layers show in this view of the panel.
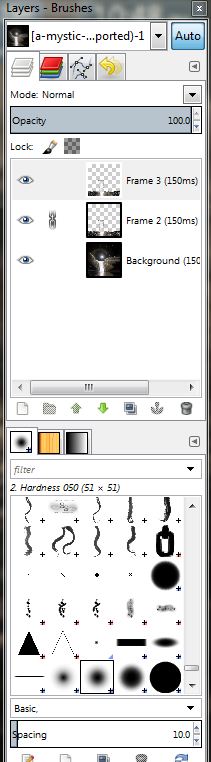
As you can see your brush selection is located at the bottom of this view.
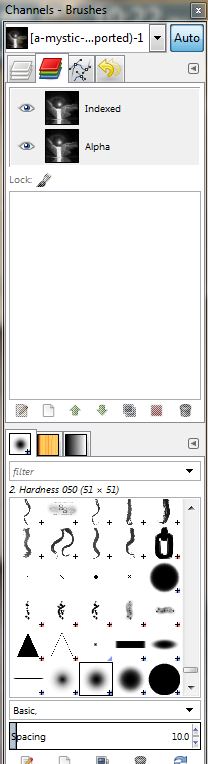
This is the Channel tab selected. this shows you the color layers separated in the RGB and allows you to adjust the color settings of the individual colors.
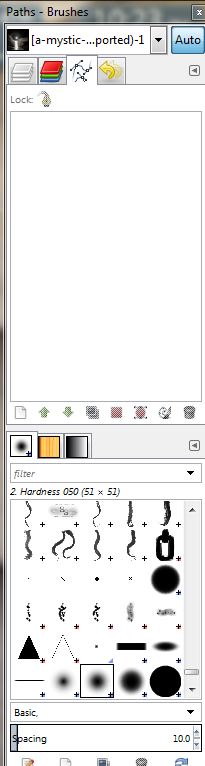
This is the Paths tab selected. I have not selected any so it is showing blank, however if you have selected a path it will show you not only the path you made but variations that you can select in order to adjust or clean up the path you have made.
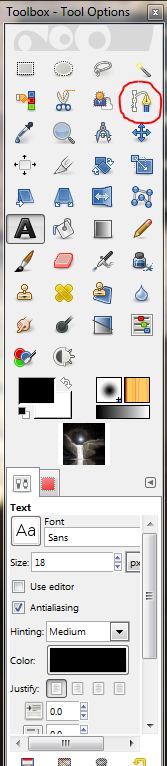
Here is where the path selection tool is located on the left panel
This is the undo tab. If you are undoing a single or couple of things ie. backing up a few steps you can click the edit tab on the top bar of your image and undo. However if you are backing up a distance to begin a process again you select this tab and it gives you a history of what you have done. By selecting how far back you wish to go it will back up your main image to that point. Once you have made a new move it will delete all the actions you backed up over.
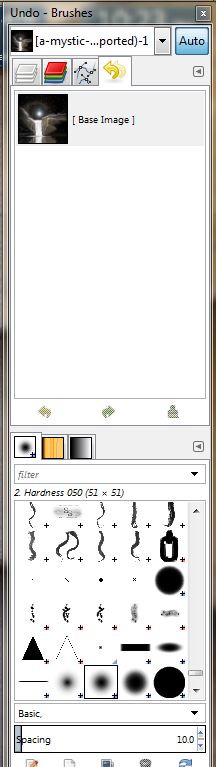
I hope this has answered your questions.
This is the layers tab selected. This will show you all the layers you are working with. It will allow you to make them visual or not, link them for moving the whole picture or gif, reorder the layers, select specific layers to work on, etc. I have an animated gif in the image below to show haw the layers show in this view of the panel.
As you can see your brush selection is located at the bottom of this view.
This is the Channel tab selected. this shows you the color layers separated in the RGB and allows you to adjust the color settings of the individual colors.
This is the Paths tab selected. I have not selected any so it is showing blank, however if you have selected a path it will show you not only the path you made but variations that you can select in order to adjust or clean up the path you have made.
Here is where the path selection tool is located on the left panel
This is the undo tab. If you are undoing a single or couple of things ie. backing up a few steps you can click the edit tab on the top bar of your image and undo. However if you are backing up a distance to begin a process again you select this tab and it gives you a history of what you have done. By selecting how far back you wish to go it will back up your main image to that point. Once you have made a new move it will delete all the actions you backed up over.
I hope this has answered your questions.
edit on 19-11-2012 by Agarta because: Changed the first pic to show where the link is located
reply to post by Agarta
I almost get that.
Seriously, thanks for your contributions, and I hope to see you as a repeating poster here. I'll have other questions myself. Thank You.
I almost get that.
Seriously, thanks for your contributions, and I hope to see you as a repeating poster here. I'll have other questions myself. Thank You.
reply to post by Druid42
Sure I will be happy to help out and answer questions as needed. I would like to state though, I have the pre beta version(3.6.1) ie the newest version not available yet so some of the images may look different but I will walk through those differences as needed as well.
To All that may be interested, you may have noticed that in my brushes section I have brushes that are not in your program. There are thousands of brushes available for download and I can help with the installation if needed. Just Google "Free GIMP Brushes" and you will get a multitude of sites. There are many free plugins and scripts that can be downloaded and installed as well just Google "free gimp plugins" or "Free gimp Scripts" and again I can help with installation.Actually you don't even have to put "free" in your search as they are all free and if anyone is charging for them they are breaking the GIMP rules and should be alerted.
For all you PhotoShop fans, all PhotoShop brushes,scripts, and plugins are compatible with gimp as well. OR you can make your own brushes right there on your GIMP platform and save it directly to your installation files both in color, black and white, or select a color. I can show you how to do this as well if interested.
edit on 19-11-2012 by Agarta because: Spelling
Originally posted by Druid42
reply to post by PurpleChiten
The point of this thread is to share your Gimp experience, and provide insights that aren't often covered in online tuts.
Definitely! As well as give a nice interactive touch to it!
It'll also let us build on the tutorial we may have checked out or even alter them a bit for our own purposes here
Great idea on the thread! I can't wait until the workday is over and I get a long T-Giving break to participate a little more!
reply to post by Agarta
Don't forget those awesome plugins you shared with me Agarta!
Agarta is the go-to-guy for me. Anytime I've had a question, he's always there with an answer and has even sent me some AWESOME tutorials/hints he has come across that have applied to something I was working on.
He's the Gimp-Yoda!
Again, AWESOME thread idea Druid!
Cool thread!
I have bookmarked this thread and the Gimp link for when I have some time to play. I only recently became interested in image manipulation and have been experimenting with a few different free programs, but they are fairly limited and I will give Gimp a try once I feel I've become proficient with the "small potatoes".
I have bookmarked this thread and the Gimp link for when I have some time to play. I only recently became interested in image manipulation and have been experimenting with a few different free programs, but they are fairly limited and I will give Gimp a try once I feel I've become proficient with the "small potatoes".
I'm also bookmarking the thread and appreciate this. I've been in graphics courses where at least one class has been Photoshop now for two
semesters. After seeing this thread last night I went back to look at Gimp which I hadn't really messed with since before going into the graphics
program at school. It was too confusing and difficult at the time (or so I thought). Now? Hey! Neat! After all the Photoshop training, Gimp is
actually more intuitive and easier to work in, in my opinion. It took the formal training in Photoshop to see that but I think I may very well
move into this more often than CS 6. It doesn't do everything for bells and whistles but that's not what I'm looking for anyway.
If I might add to this with a suggestion and as a companion to Gimp? Install and get familiar with Inkscape It's a very similar layout and feel to Gimp but serves the role of Adobe Illustrator to Gimp's serving as Photoshop. The difference primarily being Gimp being image based and Inkscape being vector graphics. I'm also looking at it as a replacement to Illustrator for many things as it's far more intuitive as well. I was able to do some quick things in Inkscape last night that would take me 3-4x's longer in Illustrator or require switching between programs to finish. (MAJOR Bonus point. Inkscape opens old Corel clipart in legacy corel format. as in...Corel 5 clipart. )
The two together cover all the bases from what I'm seeing and I'm using them both this week (since they seem easier) to do the graphics side of a major animation project, so I'll check back next week and let everyone know how it turned out. Maybe post the movie I'm making too for class too. Thanks again for giving me a reason to look at Gimp again though! I'm falling out of love with Ps and into love with Gimp real quick.
Great, I read the thread title and got all ready to make a lanyard out of plastic lace.
In defense of Gimp...I have loaded it on a PC, and unloaded it many times.
I will say that over my last few attempts at using it, I've noticed the GUI has become easier to navigate.
So it has stayed loaded on the machine!
Also, I recently downloaded a plugin called Pandora, for Gimp....It's for stitching images together to make nice PANORAMAS...I;ve only done a few so far...The results were nice. I now have to dig through my personal collection of photos. I have a lot of images the were originally taken with the intent fo creating Huge panoramas.
Has nyone used this Pandora, Panorama plugin?
thanks for the post Druid!
I have the newest GIMP right now and I'm still learning on it.
By any chance, will someone whip up a tutorial for cropping a picture neatly and blending it with it's new source material like this:

and this was quickly done in MSPaint, mind you, but as an example.
I have the newest GIMP right now and I'm still learning on it.
By any chance, will someone whip up a tutorial for cropping a picture neatly and blending it with it's new source material like this:
and this was quickly done in MSPaint, mind you, but as an example.
reply to post by Agarta
I'yes, I' would love to see how to attach plugins and that.
Also, if you're more into digital painting- MyPaint
I use this sometimes, comes with awesome brushes, much easier to use than GIMP and Photoshop, but wouldn't help to have at least one of the two on the side for scaling and that.
I'yes, I' would love to see how to attach plugins and that.
Also, if you're more into digital painting- MyPaint
I use this sometimes, comes with awesome brushes, much easier to use than GIMP and Photoshop, but wouldn't help to have at least one of the two on the side for scaling and that.
new topics
-
VirginOfGrand says hello
Introductions: 9 minutes ago -
Should Biden Replace Harris With AOC On the 2024 Democrat Ticket?
2024 Elections: 39 minutes ago -
Intro once again
Introductions: 2 hours ago -
University student disciplined after saying veganism is wrong and gender fluidity is stupid
Education and Media: 3 hours ago -
Geddy Lee in Conversation with Alex Lifeson - My Effin’ Life
People: 4 hours ago -
God lived as a Devil Dog.
Short Stories: 4 hours ago -
Police clash with St George’s Day protesters at central London rally
Social Issues and Civil Unrest: 6 hours ago -
TLDR post about ATS and why I love it and hope we all stay together somewhere
General Chit Chat: 7 hours ago -
Hate makes for strange bedfellows
US Political Madness: 9 hours ago -
Who guards the guards
US Political Madness: 11 hours ago
top topics
-
Hate makes for strange bedfellows
US Political Madness: 9 hours ago, 17 flags -
Who guards the guards
US Political Madness: 11 hours ago, 13 flags -
Police clash with St George’s Day protesters at central London rally
Social Issues and Civil Unrest: 6 hours ago, 8 flags -
TLDR post about ATS and why I love it and hope we all stay together somewhere
General Chit Chat: 7 hours ago, 5 flags -
University student disciplined after saying veganism is wrong and gender fluidity is stupid
Education and Media: 3 hours ago, 5 flags -
Has Tesla manipulated data logs to cover up auto pilot crash?
Automotive Discussion: 13 hours ago, 2 flags -
Intro once again
Introductions: 2 hours ago, 2 flags -
Geddy Lee in Conversation with Alex Lifeson - My Effin’ Life
People: 4 hours ago, 2 flags -
God lived as a Devil Dog.
Short Stories: 4 hours ago, 2 flags -
Should Biden Replace Harris With AOC On the 2024 Democrat Ticket?
2024 Elections: 39 minutes ago, 1 flags
active topics
-
Terrifying Encounters With The Black Eyed Kids
Paranormal Studies • 66 • : FlyersFan -
Should Biden Replace Harris With AOC On the 2024 Democrat Ticket?
2024 Elections • 5 • : Disgusted123 -
"We're All Hamas" Heard at Columbia University Protests
Social Issues and Civil Unrest • 258 • : DBCowboy -
Candidate TRUMP Now Has Crazy Judge JUAN MERCHAN After Him - The Stormy Daniels Hush-Money Case.
Political Conspiracies • 735 • : Annee -
VirginOfGrand says hello
Introductions • 0 • : VirginOfGrand -
Lawsuit Seeks to ‘Ban the Jab’ in Florida
Diseases and Pandemics • 27 • : worldstarcountry -
-@TH3WH17ERABB17- -Q- ---TIME TO SHOW THE WORLD--- -Part- --44--
Dissecting Disinformation • 630 • : RookQueen2 -
University student disciplined after saying veganism is wrong and gender fluidity is stupid
Education and Media • 15 • : TzarChasm -
Mood Music Part VI
Music • 3092 • : TheWoker -
Hate makes for strange bedfellows
US Political Madness • 35 • : Degradation33