It looks like you're using an Ad Blocker.
Please white-list or disable AboveTopSecret.com in your ad-blocking tool.
Thank you.
Some features of ATS will be disabled while you continue to use an ad-blocker.

How to Investigate UFOS and do other things good too!
page: 2share:
I did have a more detailed post prepared to be honest, but I’ll take what you said on board to keep the attention span in check.
The only thing I’m really guilty of here is referring to photography stills and video at times seemingly interchangeably to persons that don’t know me. Would have appreciated if you had asked your questions nicely, rather than trying to promote that I don’t know what I’m talking about. I have no problem with your questions, just your attitude.
And if you do present any applicable information, I’d be happy to discuss it.
It’s not madness at all.
If you had bothered to read the whole post clearly, and efficiently you would have realised I’m a post artist, and I’m discussing post work flow and investigation of an 8 bit image. Am also at a loss how you read that sentence as describing how a camera works.
Here is my sentence: "Whilst a film camera can record a 12 bit images with 4096 brightness levels … the average digital camera or digital print is usually 8 bit (256 brightness levels).”
I perhaps didn’t go into enough depth here, generally I’m referring to ATS applications and prosumer. I’ve worked with higher bits per channel film before, and I can assure you that film has a bit depth in a post environment. You choose an appropriate DI (digital intermediate) to digitize your film into and bang you have film with a bit depth. If you had paid attention to the fact I’m a post artist you would realise this.
Explaining the art of digitizing film to ATS’ers in the context this article is written in would just be self indulgent descriptions of parts of my job which is nothing to do with ATS, which I try to avoid!
Most digital and analog theory is actually vice versa. It’s just maths. Unsharp masks were actually developed from the analog method funnily enough and have been around for probably 100 years or maybe even more. Film has tonal range and ergo bit depth once it is digitized. It should have been clear when I was referring to logarithmic and linear also. There are also limitations to this tonal range thus limitations to film bit depth of an analog medium.
I’m referring to film camera (motion) vs digital camera (motion) and digital print (still). My main background is motion, but I’ve also worked with stills. The theory and application of maths is the same, but some of the ranges are a bit different.
The average picture ATS deals with is 8 bit. Even consumer cameras that shoot raw often have a 24 bits 'color depth’ which is actually an 8 bits per channel image (RGB) which means 256 ‘shades of grey’ in each channel regardless of what RAW can do. If the person creates a jpeg, it goes straight to 8 bit regardless of camera (until someone proves to me otherwise). Consumer video is certainly often 8 bit. I haven’t done an indepth survey of camera phones, but I’ve seen plenty of results from them which are certainly 8 bit!
I think it’s pretty obvious I’m aware there are 10/12/14 bits per channel stills cameras out there. You should have noticed I was referring to my assumptions, and my assumptions from the view of ATS are pretty accurate I still believe. I don’t believe that the consumer norm is working with DSLR images shooting raw format, or shooting a UFO with a Red One camera. I’m discussing investigating imagery, not your camera collection.
And, as you may have realised from my reply, a lot of the time I work with many different types of hardware. I assure you, some hardware does have chemical processes. I’m not talking about your camera collection.
You actually seemed to have missed the entire point of that sentence actually in an effort to demonstrate your knowledge a bit.
Did you remind yourself that Pinke is a post artist and doesn’t care about your personal photography habits?
Would you like me to redo my tutorial to demonstrate the work flow of dealing with 10 – 14 bit per channel images? Perhaps let me know after you’ve politely read it.
On one hand … you want me to cut down my post. On the other hand, you want detailed survey data on consumer cameras and shooting habits, as well as perhaps explanations on why we mostly tend to deal with 8 bits per channel images on ATS, as well as my writing catered for your individual camera collection …
I’m at a loss for what you actually expect here! If you do provide any useful information to the topic, I’d be happy to incorporate it and work with people who believe they know more than me.
Contrary to whatever belief you might have, I’d just like to work with people at ATS to share some information I have. If you happen to be able to add to my information, please do! But perhaps understand what it is there for first.
It's not a peer reviewed text book article, it's something vaguely helpful I wrote up in my spare time.
The only thing I’m really guilty of here is referring to photography stills and video at times seemingly interchangeably to persons that don’t know me. Would have appreciated if you had asked your questions nicely, rather than trying to promote that I don’t know what I’m talking about. I have no problem with your questions, just your attitude.
And if you do present any applicable information, I’d be happy to discuss it.
Originally posted by ShamattI stopped reading when you started to incorrecttly explain how a digital camera and film camer works. Film is analogue, where do you get this 12 bit digital from? Madness.
It’s not madness at all.
If you had bothered to read the whole post clearly, and efficiently you would have realised I’m a post artist, and I’m discussing post work flow and investigation of an 8 bit image. Am also at a loss how you read that sentence as describing how a camera works.
Here is my sentence: "Whilst a film camera can record a 12 bit images with 4096 brightness levels … the average digital camera or digital print is usually 8 bit (256 brightness levels).”
I perhaps didn’t go into enough depth here, generally I’m referring to ATS applications and prosumer. I’ve worked with higher bits per channel film before, and I can assure you that film has a bit depth in a post environment. You choose an appropriate DI (digital intermediate) to digitize your film into and bang you have film with a bit depth. If you had paid attention to the fact I’m a post artist you would realise this.
Explaining the art of digitizing film to ATS’ers in the context this article is written in would just be self indulgent descriptions of parts of my job which is nothing to do with ATS, which I try to avoid!
Most digital and analog theory is actually vice versa. It’s just maths. Unsharp masks were actually developed from the analog method funnily enough and have been around for probably 100 years or maybe even more. Film has tonal range and ergo bit depth once it is digitized. It should have been clear when I was referring to logarithmic and linear also. There are also limitations to this tonal range thus limitations to film bit depth of an analog medium.
And 8 bit depth on digital cameras? Mine is 12 bit - the Sony Alpha A77 is 24 bit. As is the Nikon D700 and a new Pentax, I think it is the K2.
I’m referring to film camera (motion) vs digital camera (motion) and digital print (still). My main background is motion, but I’ve also worked with stills. The theory and application of maths is the same, but some of the ranges are a bit different.
The average picture ATS deals with is 8 bit. Even consumer cameras that shoot raw often have a 24 bits 'color depth’ which is actually an 8 bits per channel image (RGB) which means 256 ‘shades of grey’ in each channel regardless of what RAW can do. If the person creates a jpeg, it goes straight to 8 bit regardless of camera (until someone proves to me otherwise). Consumer video is certainly often 8 bit. I haven’t done an indepth survey of camera phones, but I’ve seen plenty of results from them which are certainly 8 bit!
I think it’s pretty obvious I’m aware there are 10/12/14 bits per channel stills cameras out there. You should have noticed I was referring to my assumptions, and my assumptions from the view of ATS are pretty accurate I still believe. I don’t believe that the consumer norm is working with DSLR images shooting raw format, or shooting a UFO with a Red One camera. I’m discussing investigating imagery, not your camera collection.
You also misunderstood how the immage sensor works - it can only measure luminence at each site, and it does so through RGB microfilters, do give a luminance reading in each of those chanels. These are then combined in a process called interpolation to produce a colour immage. There is no chemical process involved here as you suggest.
And, as you may have realised from my reply, a lot of the time I work with many different types of hardware. I assure you, some hardware does have chemical processes. I’m not talking about your camera collection.
You actually seemed to have missed the entire point of that sentence actually in an effort to demonstrate your knowledge a bit.
I saw you go on to talk about compression. Did yo consider that many of us shoot in RAW files?
Did you remind yourself that Pinke is a post artist and doesn’t care about your personal photography habits?
Would you like me to redo my tutorial to demonstrate the work flow of dealing with 10 – 14 bit per channel images? Perhaps let me know after you’ve politely read it.
Your post is way too long. Cut to the chase and give us the overview dude!
On one hand … you want me to cut down my post. On the other hand, you want detailed survey data on consumer cameras and shooting habits, as well as perhaps explanations on why we mostly tend to deal with 8 bits per channel images on ATS, as well as my writing catered for your individual camera collection …
I’m at a loss for what you actually expect here! If you do provide any useful information to the topic, I’d be happy to incorporate it and work with people who believe they know more than me.
Contrary to whatever belief you might have, I’d just like to work with people at ATS to share some information I have. If you happen to be able to add to my information, please do! But perhaps understand what it is there for first.
It's not a peer reviewed text book article, it's something vaguely helpful I wrote up in my spare time.
reply to post by Pinke
Hi,
Thanks for the very reasonable reply to my little poke - appologies for that it was very late and I was obviously very grumpy! I was thinnking about this and I would like to try and add something alittle more usefull to this thread.
I have skim read the rest of your post. Not because I was not interested, but because it is too long, and I struggle with reading long complicated posts (see my sig) but I have got the most of it down I think. You make some valid points regarding manipulating data during post processing, but I would like to look at how that data got there in the first place. I will stick to digital stills cameras, as I know little about scanners, and video - well, I know about it but not in enough detail to speak about here.
There are 2 main types of immage sensor on the market today in consumer cameras, and if you want to truly understand the immages you are looking at you really need to know whch one captured the immage. This is why we always ask for Exif data to be included with pictures, se we can look up this information. Why do we need to know?
The 2 types of sensor in use are the CCD and CMOS sensors. These work in radiclly different ways. Basically, they both comprise of millions of small photo sites which collect photons of light. These sites are then read to produce a luminesence map of the sceene. No colour information. (We will look at this in a mo). The difference between the two types is how the data is read. On a CCD the data is read in 1 big hit, all at once. On the CMOS it is read 1 line at a time from top to bottom. Why is this important? Because camera movement can have a huge effect on the CMOS immage. Because it is read 1 line at a time, (From top to bottom) if there is any movement of the camera, straight lines will appear diagonal. Try it - point your iphone (Or other camera!) at a doorway in camera mode and move it left and right. Observe the diagonal lines.
Here is a brilliant example of that effect on youtube www.youtube.com...
So - without knowlege of what sensor is being used, you may end up enhancing artifacts of the sensors architecture. Those diagonals may well have been straight lines once!
OK, so where does the colour immage coome from. Each of the photo sites on your sensor has either a red, blue or green microfilter in front of it. This way, when we take a luminance reading from that site, what we actually have is a luminance reading of either the red, blue or green channel. The camera basically take 3 sites at a time and combines them to produce 1 colour pixel (Picture element)
Ah! you may ask then why is My 16 megapixel camera not producing immages 1/3 of the size? Because the camera will compare every pixel to every neighbouring pixel, in order to work out the actuall colour of each photo site and assign it a colour value. And magically we have a full resolution colour immage.
So you can see, many pixels are interpolated - ie, the camera works out what must logically be there, rather than actually recording what is there. This must also be born in mind during post processing as you may be enhancing unreliable source data.
What else is involved? Well - how sensative is the sensor? In the old days of film we had fast and slow film, and this was a measure of how sensative to light it was. A standard daylight film would have been ISO 100. A very fast film for example would be the Agfa ISO 1600 black and white. Problem was, in order to make the film more sensative, the chemical christals on the film had to be larger, and this resulted in grain being visible on high speed films.
The same is true with digital cameras. In order to acheive high speeds the camera will group photo sites together increasing the ability to collect light, but reducing the resolution and introducing grain. The higher the effective ISO used, the more grain yuo wil see. Again - we need this information to avoid enhancing what is effectively just a grain pattern in the immage.
The last consideration is sensor noise, especialy at high megapixel counts.
Try this - take a photo in a black dark room, or with your lense cover attached so no light can reach the sensor. Take quite a long exposure - 1 seccond or so if you can. What do you see? Lots of noise in the immage, caused by the electronics of the sensor. After all, if you are jamming millions of photo sites onto a chip 24 x 36 mm small, (That is an APS-C sensor, many compact cameras have sensors much smaller than this) there will be the odd rogue electron which you just can't controll. You will see patterns, even bright white dots. These are hot pixels, or damaged areas on your sensor. Modern cameas can map these areas out, most don't.
All digital cameras will use a noise reduction algorithm to account for this. So now we have both sensor noise and also a computed solution to it. More advanced cameras us a Black Frame Subtraction technique to do this. If you take a long exposure of a dark sceene, it will take a seccond exposure with the shutter closed, Using this dark immage to map the noise, the camera then subtracts that noise from the long exposure immage. This can have a marked effect on the shadow detail. Again, we need to be aware of what we are enhancing.
I am also aware that having complained about the length of your thread I have just sat here and typed out an epic lol. Well, I just wanted to try and add in a little more constructive way to this very important debate.
I hope that between us we have been able to shed a little more light onto the subject of how immages are created, and how they behave during subsequent post processing.
edit on 28-8-2011 by Shamatt because: (no reason given)
Originally posted by knightsofcydonia
reply to post by Pinke
You said you haven't read Hoaglands books which I find to be a major hole in your logic and theme of the thread... His findings, by increasing gain were unique and seperate from anything you have suggested here. The thread is dependent on the fact that Hoagland was wrong, but you can't prove it...So my question, why bring him into the thread at all? even if you think he is wrong, thats still your opinion..which is based on NOTHING because you haven't heard or listened to what he has to say. so before you go discrediting him, at least allow the opportunity to be receptive to what he has to say.
Said I hadn't read all of Hoagland's stuff, not that I haven't read any Hoagland at all ever.
The alterations I've made are still Hoagland style, regardless of what you think of Hoagland's work, and they are the sort of artefacts you would expect to find from a poor work flow. Plenty of Hoagland's supporters mess up this work flow on a daily basis.
The thread isn't dependant at all on Hoagland being wrong (though I think Hoagland is wrong). I haven't read Hoagland's books in full, because I think the method of image analysis I've seen from the persons work is lacking.
Regarding proving a person like Hoagland wrong ... Part of the reason I prefer to make a thread like this in the first place is ... have you ever tried to disprove an overly complex theory? Even the most basic of false images or CGI requires thousands of words to express what's wrong to a level acceptable by a believer. Deconstructing Hoagland's work is much the same. It's much easier to make something than to deconstruct it.
Look at how many words it takes just to explain a simple work flow and image sharpening technique which is acceptable. I wouldn't really want to go into much more on Hoagland on this particular thread, though if you have something in particular you would suggest I look at you can U2U me I suppose.
Regarding 'gain' being seperate from my topic ... Gain in a digital sense is just another word for highlights, it's still dealing with tonal ranges in the same way that 'emulsions', although a film term, is really just pedestal or blacks. Artists generally use these terms based on whatever background they have.
As stated in a previous post, most analog terms have a mathematical digital equivolent.
[atsimg]http://files.abovetopsecret.com/images/member/6bc63d021fa4.jpg[/atsimg]
Like previous posts, these posts will help you if you're ...
1. New to video, and unsure how to look at at it
2. You work with video sometimes, and want to brush up or look at viewing video in a different way
3. You're just generally interested, or want to know what to look for in hoaxes
Primarily it will be about noisy images in a post environment. This means we're not overly interested in how the noise got there, just interpreting it and managing it once it is. Image theory applies to both stills and video photography.
This post will not be helpful if you're expecting indepth and perfect maths, text book level information, or the like. (Too much detail ruins the point)
Already know enough about noise to be happy, or believe giving people some information for themselves will be a waste of time.
Mostly it's just some quick advice on applying practical knowledge to photography of the unknown.
Noise is a significant factor in an image. Often the images we receive aren’t taken in the most ideal conditions. Often they are under exposed, captured in odd circumstances, or just taken with really poor camera quality. The side effect of this is often electronic (or other) noise, which gets in the way of seeing the real detail in an image. Noise is both a pain in the booty, and a boon to anyone researching odd videos. It obscures detail in a legitmate clip, but also reveals a hoax in many cases.
Noise reduction should be completed before any other subsequent alterations to an image in most cases. Any enhancement of a noisy image will also enhance the unwanted noise. In the majority of cases, if the noise cannot be reduced to an acceptable level then further work will likely be impossible, and at very least unreliable.
If anything, this is one of the most ignored rules of image manipulation on ATS by professionals and amateurs alike.
To put this in perspective, noise in a piece of photography (video or still) can be enough to have an image rendered inadmissible as court evidence. Here on ATS, we often see persons inadvertently pulling a ‘Hoagie’ by working with excess noise within an image, or attempting to remove noise at an incorrect place in their work flow. Often we end up with an unsatisfyingly soft final image which gives us very little in the way of better detail.
There is, of course, the usual question of how much is too much. An ‘enhanced’ photo has been changed, and is therefore not a ‘primary’ source … The arguments for this seem to vary between ignorant or deliberate hand waving, and lack of knowledge of the process occurring. Understanding noise is also crucial at times to spotting forgeries, as noise often varies wildly based on camera type and lighting conditions and is over looked by the hoaxer just as much as the hoaxed.
Regardless of our process we must always remember that our goal is to highlight or reveal information already present, not to destroy or create new details.
The term noise is a little bit vague. It can be a lot of different things depending on the situation. In this particular instance, we will refer to noise as the part of the signal, video or still, which is not useful in the image we’re looking at. Ideally our ‘signal to noise’ ratio should be somewhere between good and acceptable for reduction. If our noise is larger than our signal, ie the parts of detail we want to see are completely obscured by noise then removing the noise will do us very little good, beyond averaging out the image as we’re about to discuss.
Here is a good example of an image that, whilst we may call it noisy, the ‘noisy’ parts really have become part of the image, and attempting to remove it would be catastrophic for most purposes:
[atsimg]http://files.abovetopsecret.com/images/member/486688db141e.jpg[/atsimg]
This is because there is no detail to reveal in the vast majority of this image. We lack both the spatial and the temporal resolution to bring new details.
The usual noise generated by a camera is often modelled as ‘random Gaussian noise’. In statistics the Gaussian curve results when there is a large number of single sources which create a single result. This means a lot of individual variation amongst pixels, with some being brighter and some being darker. If you own a camera and would like to see the noise generated by your camera, take a snap of some evenly lit grey card and then take the image inside your computer.
Noise can also be additive and multiplicative etc … I’m aware that ATS will have a maths expert somewhere to point this out, but for most situations approaching noise this way works.
As stated though, we won’t just be looking at camera noise, but also some other types of noise a little later on.
Like previous posts, these posts will help you if you're ...
1. New to video, and unsure how to look at at it
2. You work with video sometimes, and want to brush up or look at viewing video in a different way
3. You're just generally interested, or want to know what to look for in hoaxes
Primarily it will be about noisy images in a post environment. This means we're not overly interested in how the noise got there, just interpreting it and managing it once it is. Image theory applies to both stills and video photography.
This post will not be helpful if you're expecting indepth and perfect maths, text book level information, or the like. (Too much detail ruins the point)
Already know enough about noise to be happy, or believe giving people some information for themselves will be a waste of time.
Mostly it's just some quick advice on applying practical knowledge to photography of the unknown.
Bring the Noise
Noise is a significant factor in an image. Often the images we receive aren’t taken in the most ideal conditions. Often they are under exposed, captured in odd circumstances, or just taken with really poor camera quality. The side effect of this is often electronic (or other) noise, which gets in the way of seeing the real detail in an image. Noise is both a pain in the booty, and a boon to anyone researching odd videos. It obscures detail in a legitmate clip, but also reveals a hoax in many cases.
Noise reduction should be completed before any other subsequent alterations to an image in most cases. Any enhancement of a noisy image will also enhance the unwanted noise. In the majority of cases, if the noise cannot be reduced to an acceptable level then further work will likely be impossible, and at very least unreliable.
If anything, this is one of the most ignored rules of image manipulation on ATS by professionals and amateurs alike.
To put this in perspective, noise in a piece of photography (video or still) can be enough to have an image rendered inadmissible as court evidence. Here on ATS, we often see persons inadvertently pulling a ‘Hoagie’ by working with excess noise within an image, or attempting to remove noise at an incorrect place in their work flow. Often we end up with an unsatisfyingly soft final image which gives us very little in the way of better detail.
There is, of course, the usual question of how much is too much. An ‘enhanced’ photo has been changed, and is therefore not a ‘primary’ source … The arguments for this seem to vary between ignorant or deliberate hand waving, and lack of knowledge of the process occurring. Understanding noise is also crucial at times to spotting forgeries, as noise often varies wildly based on camera type and lighting conditions and is over looked by the hoaxer just as much as the hoaxed.
Regardless of our process we must always remember that our goal is to highlight or reveal information already present, not to destroy or create new details.
Identifying Noise
The term noise is a little bit vague. It can be a lot of different things depending on the situation. In this particular instance, we will refer to noise as the part of the signal, video or still, which is not useful in the image we’re looking at. Ideally our ‘signal to noise’ ratio should be somewhere between good and acceptable for reduction. If our noise is larger than our signal, ie the parts of detail we want to see are completely obscured by noise then removing the noise will do us very little good, beyond averaging out the image as we’re about to discuss.
Here is a good example of an image that, whilst we may call it noisy, the ‘noisy’ parts really have become part of the image, and attempting to remove it would be catastrophic for most purposes:
[atsimg]http://files.abovetopsecret.com/images/member/486688db141e.jpg[/atsimg]
This is because there is no detail to reveal in the vast majority of this image. We lack both the spatial and the temporal resolution to bring new details.
The usual noise generated by a camera is often modelled as ‘random Gaussian noise’. In statistics the Gaussian curve results when there is a large number of single sources which create a single result. This means a lot of individual variation amongst pixels, with some being brighter and some being darker. If you own a camera and would like to see the noise generated by your camera, take a snap of some evenly lit grey card and then take the image inside your computer.
Noise can also be additive and multiplicative etc … I’m aware that ATS will have a maths expert somewhere to point this out, but for most situations approaching noise this way works.
As stated though, we won’t just be looking at camera noise, but also some other types of noise a little later on.
edit on 16-9-2011 by Pinke because: Typo!
Looking at Noise
‘Looking’ at noise probably sounds a bit silly; sort of like ‘looking’ at my invisible pants … but what you really want to see is your noise.
To do this you will need your own noisy video image, or image sequence. If you don’t have either of these, you can download Pinke’s fake video. This will also mean you have an appropriate image to work with. If using your own image, make sure it is a locked off sequence of images, or video.
www....(nolink)/file/lhegk9gdlfnl5bw/GrainCheckATS.mp4
This work can actually be achieved in Photoshop as well as any compositing software you have; though you may need to turn your video into an image sequence depending on Photoshop version. If you’re just looking at the photo, you won’t be able to see the noise moving. However, we have added some noise to find on the plate and take a look at.
Take your footage and place it on a single layer/node. Now you need to have two different unique frames of your footage. So either off set your footage on a time line, or grab a different frame from the sequence. Now simply subtractone frame from the other. Initially you may just have a blank screen, but we know some previously described properties of noise we can apply to this situation.
We know noise can either bright or darken a pixel at varying intervals. We know that both frames have different pixels brightened and darkened at different times. Therefore, if you scrub an eye dropper over your image you should find lots of tiny values. Use your favourite tool to bring the tonal levels up … Brightness, levels, curves etc all work …
Remember to apply your adjustment to the result of the subtraction, not prior to the subtraction or you will end up with something else.
What you may end up with will look something like this:
[atsimg]http://files.abovetopsecret.com/images/member/04bc380a4e14.jpg[/atsimg]
You’ve also performed a difference operation via your subtraction which probably brings memories back from grade school.
This can be a good exercise simply to understand what noise is. Also, when an image is moving it can be quite difficult to actually view noise with human eyes. We’re immensely tolerant of it; from an early age most of us having been watching it on a cinema screen.
Note that any tonal adjustment to your plate will bring this noise up dramatically, and sometimes that’s not what we want.
Against the Grain
Just looking at electronic noise or film grain within an image for this part.
One of the most over looked aspects of spotting a forgery, CGI or composite, is noise and grain matching. It can be very difficult to view in a tiny youtube video, and many times this is one of the reasons why 1080p footage rarely surfaces in my opinion. The other reason I think noise matching is over looked is based on how difficult it can be to explain to a lay person. Many times I see persons stating that both cameras would be needed to make an evaluation, that it’s yet another arm chair ‘expert’, and other sarcasms. Eventually the door opens to the persons which will say that anything can be faked with CGI and we will never know … often we can know, it just takes a little but more reading than the back end of a cereal box to understand.
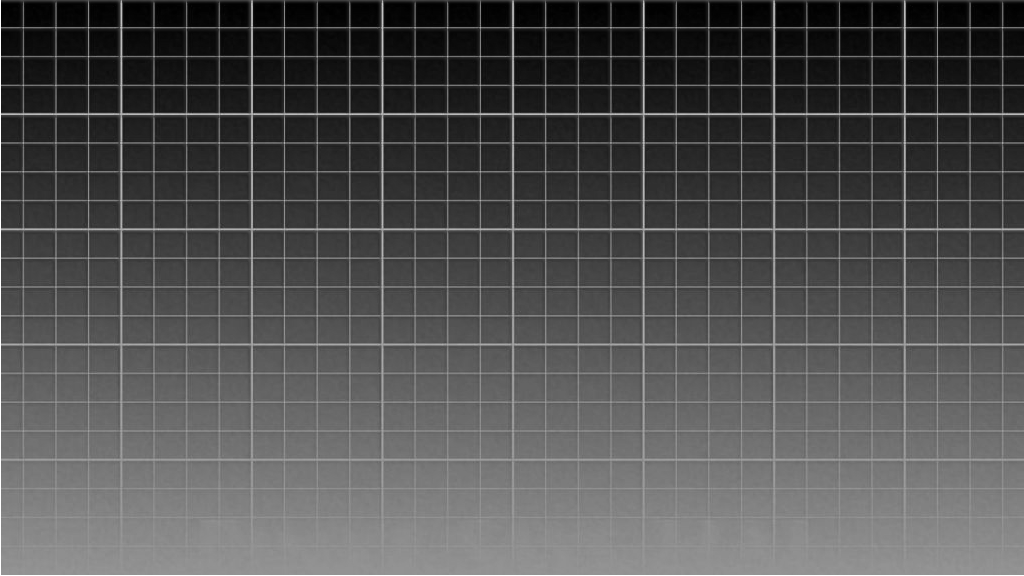
Different cameras will produce different amounts of noise. Different lighting conditions will produce different amounts of noise in the same camera. There will also be different amounts of noise in the darker areas of an image vs the lighter areas. If two different cameras are used there will also be different amounts of noise in each of the channels (red, green, blue) depending on the hardware of the camera itself. It’s quite easy in most editing systems to switch between channels to view this, and can sometimes be quite useful see/work on noisy areas of an image. Many cameras have the most noise in the blue channel, since this is a color most human eyes aren't overly sensitive to.
www....(nolink)/i/?i143bxxdh05dtcy Red Channel
www....(nolink)/i/?4abaqgyo2mky5tj Green Channel
www....(nolink)/i/?on4ga8mwd4s33rg Blue Channel
The above images are individual channels of a camera on the same frame shooting a grid. These channels are combined to make the whole image. Notice the differences in noise between channels. Often poor attempts at noise or grain matching will add a uniform amount of noise across all channels of an image. Some hoaxers will add grain over an entire image to try to mask laziness or lack of knowledge, which makes especially grainy footage more suspect.
Some things (but not all things) to watch for:
- Much like was discussed with sharpening, any operator/filter placed on a noisy image will also affect that noise. A common effect in amateur UFO fakes is to use blurring as an artificial defocus to help integrate an image. A proper defocused image will have the same amount of noise despite being out of focus, where as a fake defocus will have its noise destroyed in the blurring process. This is especially noticeable in a moving image. The same applies to scaling and similar operations.
www....(nolink)/imgbnc.php/4d61de22102d4845842f3a2cb63456f93cc54e8c6350531341658d14d58dec516g.jpg An actual defocus on a blue channel
www....(nolink)/i/?809p3eb8y85eywl Artificial blurring of a blue channel
www....(nolink)/file/b4orkuf2y7hgqqj/defocusexample.mp4 Basic video example
As can be seen in the examples above, operators destroy grain and noise quite easily. Even a UFO will have noise regardless of how magical it is since it comes from the camera. Between the difficulty in matching noise to a camera perfectly, and producing an accurate focus pull ... the majority of hoax videos fall far short, and the ones in the right ball park are possible to interpret with the correct knowledge.
- Cameras record light. Cameras have noise. Everything in an image should have noise from the camera! It shouldn’t look too noisy, or too clean! Too clean is likely CGI, too noisy is likely stock footage … especially if the hoaxer has attempted to alter the stock footage and thus altered the noise in a poor work flow
- Repeating noise patterns or frozen noise can occur when a person uses a photograph and tries to introduce noise to the image (or forgets to!)
- Most of the noise matching tools in a comp system don’t take into account existing noise in an image or abnormal lighting/processing. This will result in an image that is too noisy, or has noise in the wrong places.
It’s fairly rare to have a hoaxer perfectly noise match an image.
Even professional VFX artists can be lazy plenty of the time (Watchmen I looking at you). Also, the majority of artists simply match noise and grain visually but don’t care too much for perfecting in most instances. People simply don’t look at it with that much scrutiny.
Images taken from different sources often don't match, but they might ‘do’ for a movie or similar. With some experience, and a bit of knowledge this can be applied to many false images. Perhaps one day a person will even come up with a solution which demonstrates this quickly and easily to the arm chair expert nay sayers and the people that believe the original camera is required for testing.
edit on 16-9-2011 by Pinke because: Link Fix #1
edit on 16-9-2011 by Pinke because: Links. AGAIN! >.<
Turning it Down
Sometimes though, it isn't about noticing fakie noise, it's about revealing detail from obstructive noise.
As seen previously, strong blurs and averaging do 'remove' noise, but also make our image soft. One of the most basic ways but amazingly effective methods of eliminating noise is via image averaging or temporal averaging.
It’s a technique that has been used on many MPFs (motion picture … screw ups), and has been used to remove unconvincing cornflake snow, unconvincing actors, and clean up green and blue screens. It can be surprisingly simple to accomplish, but is also incredibly simple.
Temporal averaging comes with certain limitations …
- It requires a well tracked or locked off shot or sequence
- It may eliminate desirable details if details are temporal (only exist for a set number of frames)
- It cannot be done with a single image
- It works best when trying to resolve static, constant objects
- Does nothing to remove fixed pattern based artefacts which occur across all frames
What it can be useful for is controlled situations with poor light such as night time photography, removal of weather debris such as rain or snow, the processing of lab slides, and inter planetary photography. It can also be good for creating comparison plates/shots … ie images which clearly depict a background in perhaps a UFO scene.
Averaging an image sequence in most systems is fairly easy. Some systems have this as a mathematical node or filter/operator. To do this manually … as previously, I’ll discuss this in photoshop terms, but it works in all other circumstances.
We can work with a fairly ludicrous scenario that never happened to demonstrate how effective this can be. We’re going to pretend that we got ourselves an awesome time machine, and we’ve gone back to work out things about JFK. For some reason our time machine makes rain and everything look like a mardi gras parade because it’s stupid.
You can download the footage to follow along here:
www....(nolink)/file/8udzrzg1oi7xp0x/ColorfulNoiseATS.mp4
Note there are 200 frames, and the second set of 100 frames has a different type of ‘noise’ to eliminate.
But for lazy persons, or persons who already know where this is going … this is what we’re looking at:
[atsimg]http://files.abovetopsecret.com/images/member/9eab3757add5.jpg[/atsimg]
Despite the fact this is a video, this work can still be performed in photoshop if required. As previously, we’re going to work in a primarily layer based method for this since that’s what most ATS’rs will be using.
I want to read the license plate. Due to the ‘noise’ in this plate, sharpening techniques will be completely useless, and any attempt to tackle the tonal range will result in more mess.
The temptation is, as usual, to reach for a filter or effect that might give us a nice result. Here is an example of trying to use a kernel based smoothing effect. This softens the image and, in this particular instance, gives us absolutely nothing useful. This method is called spatial averaging.
[atsimg]http://files.abovetopsecret.com/images/member/192b2d820dd3.jpg[/atsimg]
Now it’s not that spatial averaging is useless, it’s just not good for this particular purpose. Maybe we discuss it a bit more in future, but in very basic terms it’s a kernel which creates a new image from an average of previous pixel values. Unfortunately, if we start with large amounts of bad values we don't want and average them we just end up with the bad values over coming our nice pixels and a softened image. It’s especially harsh to use on low resolution imagery since there aren’t that many pixels to average out in the first place.
If you’re lucky, your comping or editing system will come with temporal smoothing or blurring. Still, it is useful to try something like this out if you don’t know what it’s doing behind the scenes.
1. Take your footage and place it on a new layer.
2. Duplicate your footage layer. Call it average layer 1 for now.
3. Lower the opacity of average layer 1 to perhaps 10 – 30% (will come back to this)
4. Duplicate average layer 1 and off-set/advance its sequence by a single frame. (If you are working in photoshop with an image sequence you will need another frame from elsewhere)
5. Repeat step 4 till you have a fully opaque looking frame
You should end up with something like this:
[atsimg]http://files.abovetopsecret.com/images/member/609f2d110b1f.jpg[/atsimg]
And we're done!
What Happened?
Most image editing systems handle opacity in a predictable way. If you average/place five frames over one another the result will not be completely opaque in the same way that holding two pieces of paper that are 50% opaque to the sun would not block out all the light. (Some editors may do this differently)
This set up can be a little time consuming to do manually, and many persons set up nodes or operations to do this for them. It is a highly useful technique to actually understand though.
Essentially what we’ve done is used the unpredictable noisy pixels against themselves. Essentially each frame we’ve added from a different point in our video has increased our signal to noise ratio in favour of our signal. This is an incredibly useful technique despite the fact it is quite old.
Other Stuff
Why are there so many different ways to reduce noise?
Averaging, when it works, appears almost magical. There are, however, many different types of noise, and different types of situations.
There are many different types algorithms which can rely on having other knowledge of how they work such as medians etc ... Sometimes we may want to eliminate noise in a particular area of an image and will use other methods to isolate that area prior to working with it (more common in the art field) and sometimes we may want to remove halos or flares from our star field photography.
It’s a deep rabbit hole full of words like Fourier and Weiner (really). Might do something more in depth later on this stuff.
Isn’t image averaging creating a new image?
In this particular instance, not really; it’s creating an accurate composite that would otherwise take many hours to
piece together to something easy to view.
It’s similar to removing rain, or patterns to retrieve a finger print. A person does have to be aware of what is being destroyed … i.e averaging together an image of a running person will remove the running person!
I suppose this is one of the parts of ATS which is often the most difficult to reconcile. Persons often level the 'altered' image accusation at anything which has been enhanced if it suits an agenda. In the same vien many persons will pull the opposite tact (as discussed in our first post) defending alterations to an image to protect their conclusion.
It really goes back to comparing the original image with the result, and keeping a history of the alterations done to image to have them reviewed. Many image alterations which produce fantastic results like to claim special software, special mathematics, or just specialness in general (how do you know how a 5th dimensional creature would react to my sony cyber shot?!) to avoid actually revealing their process.This is usually because revealing their process will also reveal their deception. (It's not always delibrate deception)
The other issue is being able to identify and distinguish alterations from enhancements. A big mistep from many ATS'ers is assuming that anything done digitally is 'editing' and anything done physically is the 'original image'. Depending how philosophical a person wants to be there is no original image. The camera saw it, you didn't, tough luck, but it produced a nice copy for us to peer at in the end.
A realistic perspective though, especially from high end photography, is that some work has to be done to make an image digestable. High dynamic range images need processed for your monitor since 90% of people don't know or care to look at a HDR image properly. Tonal ranges need to be clipped, colors corrected, and sometimes errors removed; it's the same choices you make when holding a camera in your hands, but often with less options (tonal range for example).
It's not always sinister. Usually it's just an analog process that in the last 20 years turned into a digital process, which we often mistakenly assume is 'editing'.
It's no more editing than a mechanic giving you a vehicle in a state you can use rather than in 12, 000 different pieces. (I got no idea how many pieces a car has)
Can you make this shorter?
Unfortunately, no. Even saying something very basic requires a large amount of words, and this isn't even really that indepth. Sorry.
Anyways, all done! Hopefully is helpful. May do some more if I think of anything, and the response isn't overly negative.
Disclaimer: The above post may contain a depth equivalent to a rotund child sitting in a wading pool, and a number of conversational generalizations. Pinke is not an expert in anything. Pinke cannot bake cakes, create lemonade, or make interesting looking sculptures. Pinke is not an equal opportunities employer. Pinke may or may not be on a horse.
I find your posts both funny and informative, those two factors combined doesn't come around that often. Stars and flag for your contribution. Really
appreciate it!
reply to post by Droogie
Thanks!
Though I'm kind of realising perhaps I should have made a new thread. I imagine most persons think we're still back and forthing on small technical details when this thread pops back up and don't look.
Haha oh well.
Thanks!
Though I'm kind of realising perhaps I should have made a new thread. I imagine most persons think we're still back and forthing on small technical details when this thread pops back up and don't look.
Haha oh well.
reply to post by Pinke
I only saw this thread this week, but it's better late than never. It's a good idea and very well done.
The method I usually use to try to enhance images is a little different, and this is the result I get when I use that grid image:
Now I just have to try to mix it with the method presented on this thread.
I'm sure most people would find the technical dicussion of this boring. I am interested, though.
I wrote a c program that can improve the resolution of line drawings made with Illustrator or Inkscape. The improvement is small but real, and those programs shouldn't even need such enhancement.
But what makes it interesting to me in the context of the UFO question is not photos of UFOs per se as much as the Ramey memo. The best digtial image of it on the Web is a 720-dpi scan (good) but posted as jpeg (not good, as you pointed out). It was probably done before png was available.
Anyway, I might try some sottware, but first I want to try to improve the blind disconvolution of this small c program. As you implied, if I can get results from that then I can show the source code as proof that any results obtained are real and unbiased, and making the executable available would offer further proof by allowing people to process blurry scans of documents or photos with the program--if I can get some good results. The tests so far use psf of 1. So it needs work still, and I know it's technically challenging. But already I can read some of the words. And maybe the Photoshop programmers have already got this figured out for their next release.
edit on 16-10-2011 by xpoq47 because: (no reason given)
Originally posted by xpoq47
The tests so far use psf of 1. So it needs work still, and I know it's technically challenging. But already I can read some of the words. And maybe the Photoshop programmers have already got this figured out for their next release.
edit on 16-10-2011 by xpoq47 because: (no reason given)
You might want to take a glance at something like Matlab or Octave languages if you're keen.
If you like maths, and have a background in scripting and programming you shouldn't find it too difficult. If you've managed to do some basic things from scratch you should catch on quite quickly, and Matlab has some extensive functions (though a lot are add ons). Octave is very similar, but free.
Creating an individual program isn't a terrible idea, but to be honest I don't think many persons will take the time to understand it. (Same goes for Matlab and Octave unfortunately) However, you can do some very awesome (if time consuming) things this way, since you're not constrained by the road Photoshop has built for you.
And thank you ArMaP!
new topics
-
Who guards the guards
US Political Madness: 2 hours ago -
Has Tesla manipulated data logs to cover up auto pilot crash?
Automotive Discussion: 3 hours ago -
whistleblower Captain Bill Uhouse on the Kingman UFO recovery
Aliens and UFOs: 8 hours ago -
1980s Arcade
General Chit Chat: 11 hours ago -
Deadpool and Wolverine
Movies: 11 hours ago
top topics
-
Lawsuit Seeks to ‘Ban the Jab’ in Florida
Diseases and Pandemics: 16 hours ago, 20 flags -
whistleblower Captain Bill Uhouse on the Kingman UFO recovery
Aliens and UFOs: 8 hours ago, 9 flags -
CIA botched its handling of sexual assault allegations, House intel report says
Breaking Alternative News: 13 hours ago, 8 flags -
Deadpool and Wolverine
Movies: 11 hours ago, 4 flags -
1980s Arcade
General Chit Chat: 11 hours ago, 4 flags -
Teenager makes chess history becoming the youngest challenger for the world championship crown
Other Current Events: 12 hours ago, 3 flags -
Who guards the guards
US Political Madness: 2 hours ago, 1 flags -
Has Tesla manipulated data logs to cover up auto pilot crash?
Automotive Discussion: 3 hours ago, 0 flags
active topics
-
"We're All Hamas" Heard at Columbia University Protests
Social Issues and Civil Unrest • 205 • : TheWoker -
whistleblower Captain Bill Uhouse on the Kingman UFO recovery
Aliens and UFOs • 8 • : CarlLaFong -
Mood Music Part VI
Music • 3085 • : TheWoker -
The Democrats Take Control the House - Look what happened while you were sleeping
US Political Madness • 106 • : Annee -
They Killed Dr. Who for Good
Rant • 65 • : grey580 -
House Overwhelmingly Passes Funding for Ukraine, Israel and Taiwan
US Political Madness • 60 • : Justoneman -
Candidate TRUMP Now Has Crazy Judge JUAN MERCHAN After Him - The Stormy Daniels Hush-Money Case.
Political Conspiracies • 628 • : FlyersFan -
I Guess Cloud Seeding Works
Fragile Earth • 38 • : seekshelter -
Another person lights themselves on fire and dies on College campus, happened in Red Deer, Canada
Mainstream News • 28 • : seekshelter -
23,000 Dead People Registered Within a Two Week Period In One State
US Political Madness • 41 • : Xtrozero