It looks like you're using an Ad Blocker.
Please white-list or disable AboveTopSecret.com in your ad-blocking tool.
Thank you.
Some features of ATS will be disabled while you continue to use an ad-blocker.

Tomato Trellis DIY Project for Home Gardens
page: 18
share:
Here’s an easy DIY for newcomers to gardening and perhaps new to the world of woodworking as well.
Some folks call these cages, but trellises seem to be a more accurate description.
It wouldn’t take much to add more wood for pole beans and the like.
Some aspects of this may seem a little crude, but we’re dealing with inexpensive pine that will not be painted or otherwise finished.
Sanding and the like is not required unless you need to knock some sharp corners off.
You’d think that leaving the trellis out in the weather it wouldn’t last long, but the original set I made lasted for over ten years and was still usable when we moved from Central California four years ago.
What does help is the trellis folds for storage and can winter out of the weather in a shed or simply leaned up against a wall where it’s protected from rain.
Like many gardeners, I tend to worry about and check the garden fairly often.
In years past I used to use commercially available tomato cages and later on I made my own by rolling up some wire fencing of a fairly sturdy wire gage.
If you go this way make sure you get fencing with 6" x 6" openings so you can reach in and pick the tomatoes.
I went to making and using wooden cages after checking the California garden on a 100 degrees + day and found that you couldn’t handle or touch the wire cages with your bare hands.
Picking up and rolling over a tomato branch that had been lying on the wire cage showed evidence of serious burning.
There was a black mark and a depression burned out of the tomato branch.
After that, I swore off using metal supports for the garden and use wood when I can.
So . . . on to our little project.
Here’s what you need in the way of lumber to make two 8' long trellises.
That will suffice for most gardens as far as tomatoes go, but I’m a bit of a nut about home-grown tomatoes and tend to grow tomato hedges.
Once upon a time I had sixteen tomato plants and perhaps nine different varieties.
Sweetie remarked that I was crazy, but there was more than enough for us - family of four at the time - and I passed out the excess at work and the neighborhood about once a week.
List of materials:
Construction grade is just fine, straight is nice, but sometimes difficult to find and we’re not working with a high degree of accuracy here.
Six - 1" x 2" x 8' pine
Four - 2" x 2" x 8' pine.
Four - 5/16" x 3" NC (National Coarse) hardware store grade 2 or 3 bolts. (The least expensive ones.)
Four - 5/16" nuts.
A box of #6 x 2" drywall screws. These aren’t expensive at all and if you have an electric drill/screwdriver assembly is quick and easy. You’ll have quite a few left over and they will be handy for other projects. I tend to buy boxes of 100 when I can and it’s quite handy to have a good supply of bolts, nuts, screws and the like in the shop.
A bottle of wood glue. Nothing special required here, Elmers carpenters glue - pale yellow in color - works fine.
Total costs at Home Depot were less than $20.
This doesn’t count the cost of glue, bolts, nuts or drywall screws.

Tools required:
Measuring tape.
Saw.
Pencil. A carpenters pencil is nice, but the free pencils from the golf course work great and the price (free) is right.
An adjustable square is nice, but not necessary, the old Mark 3 eyeball works just fine.
#2 Phillips head screwdriver or best of all a battery powered portable drill/screwdriver.
Some of the portable drill/screwdrivers aren’t too expensive and once you’ve had one, you’ll wonder how you ever got along without it.
A note about safety here.
If you’ve never used a circular saw like professional carpenters use, don’t use one.
They can kick back, jump out of the cut and otherwise get away from you and cause some terrible injuries.
Table saws and radial arm saws pose similar dangers to the novice and the same precautions apply.
I have a circular saw, but realizing that some will be very new to woodworking I used a hand saw to make the few cuts required and it didn’t take much time at all.
In fact, the whole project including shopping for the wood, getting the tools out etc. took three hours total.
Two hours for the actual building process.
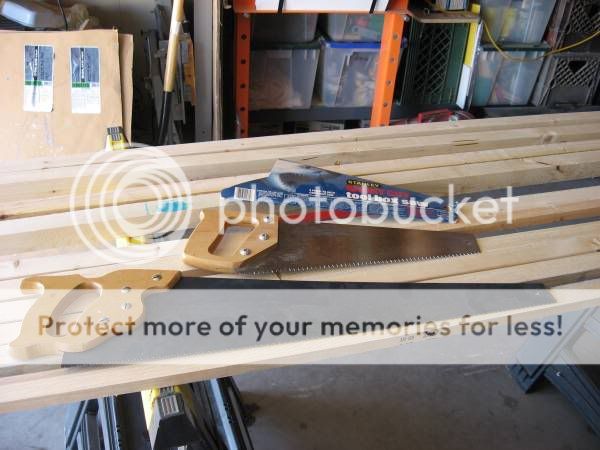
If you have to buy a saw, this particular one is highly recommended.
It's a Stanley Toolbox saw, named so because it fits in many toolboxes.
Stanley calls it the Shark and it's an apt name.
I’ve owned it for quite a while, used it a lot and it’s still very sharp.
It cuts on the backstroke as well as it does on the forestroke and starting the cut right on the line is quick and easy.
A Teflon coated common crosscut saw is shown for comparison purposes.
The square is shown set for 5" which is where the pivot bolt goes.
A measuring tape will do it, but the adjustable square once set makes for accurate, quick and repeatable measuring.
I do a lot of precision machining and the like.
An adjustable square set up for the initial cuts is almost a given.
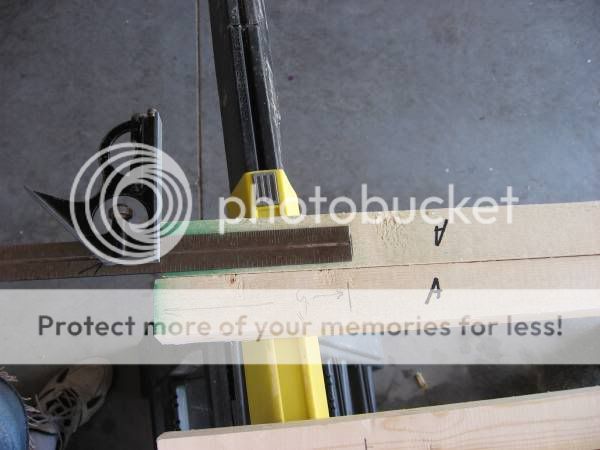
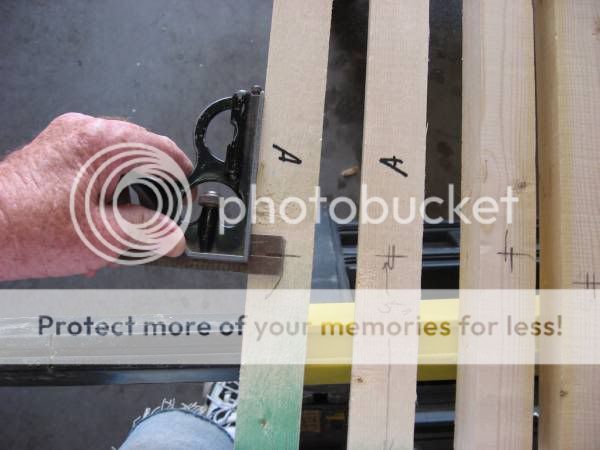
This pic shows the adjustable square set to make finding center on the 1 ½" wide 1 x 2 easy.
Note there are two marks, one measured from either side.
Drilling on center between the two marks will give you a well centered hole.
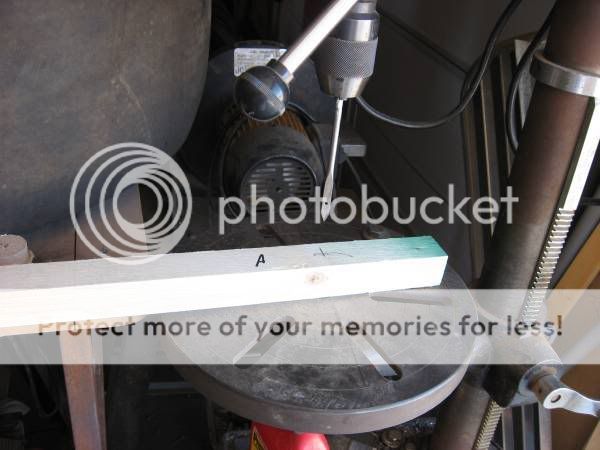
A portable drill works for drilling the pivot holes.
A standard twist drill works ok, but a spade drill designed specifically for drilling in wood does a little better job.
If you drill with a twist drill be aware the drill tends to suck itself into the wood and if you’re not drilling a through-hole it will go deeper than you want.
No reason you can’t drill the hole with a brace and bit, the bit being the typical carpenters drill bit most of us have seen before.
Nice part about using a drill press is that getting a hole square to the world is easy.
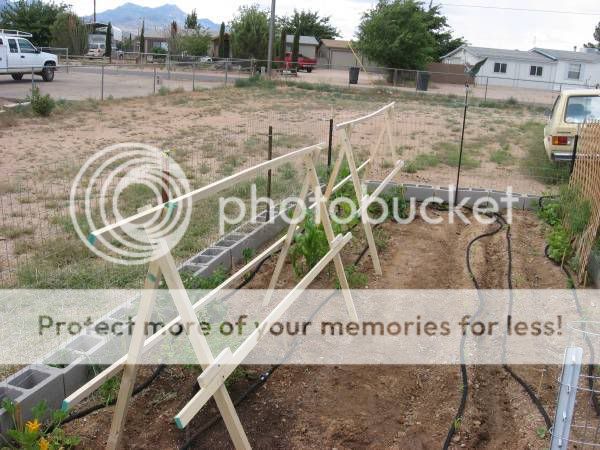
Here’s a pic of the garden with the trellises set where I think they’ll need to be.
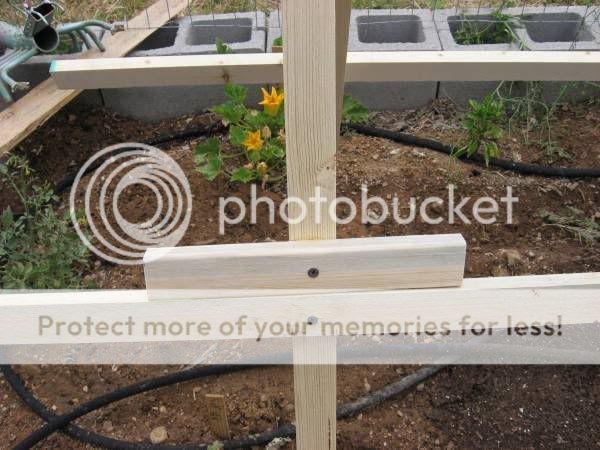
Another view that shows a fix for a bit of a screw-up.
I used to make these with a total of five horizontal 1 x 2's and they tended to stay square.
The added piece with screw and glue helps the trellis to keep from collapsing parallelogram style.
There are several ways to brace the trellis so it stays square and upright.
Since these are designed to be an economical project, this was the easy way out for me.
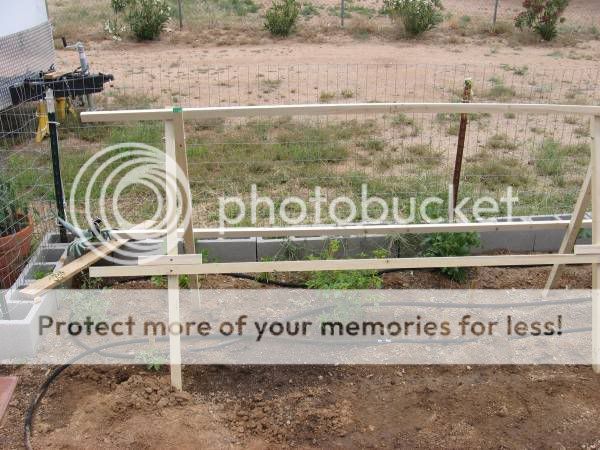
Another view of the trellis in place with the glued on brace.
You only need one on each side of both folding pieces.
These trellises, as you can see, are a quick and easy project.
Not a lot of finish work required and just so you don’t think I take the quick and easy way out on projects, here’s a pic of a custom made cabinet I made for Sweeties teapot collection.
It hangs from the wall and there are no nails or screws used in its construction.
Took a while, but it turned out ok.

Course, I may have shot myself in the foot with this project . . . now she wants another one....
[edit on 22-5-2008 by Desert Dawg]
Some folks call these cages, but trellises seem to be a more accurate description.
It wouldn’t take much to add more wood for pole beans and the like.
Some aspects of this may seem a little crude, but we’re dealing with inexpensive pine that will not be painted or otherwise finished.
Sanding and the like is not required unless you need to knock some sharp corners off.
You’d think that leaving the trellis out in the weather it wouldn’t last long, but the original set I made lasted for over ten years and was still usable when we moved from Central California four years ago.
What does help is the trellis folds for storage and can winter out of the weather in a shed or simply leaned up against a wall where it’s protected from rain.
Like many gardeners, I tend to worry about and check the garden fairly often.
In years past I used to use commercially available tomato cages and later on I made my own by rolling up some wire fencing of a fairly sturdy wire gage.
If you go this way make sure you get fencing with 6" x 6" openings so you can reach in and pick the tomatoes.
I went to making and using wooden cages after checking the California garden on a 100 degrees + day and found that you couldn’t handle or touch the wire cages with your bare hands.
Picking up and rolling over a tomato branch that had been lying on the wire cage showed evidence of serious burning.
There was a black mark and a depression burned out of the tomato branch.
After that, I swore off using metal supports for the garden and use wood when I can.
So . . . on to our little project.
Here’s what you need in the way of lumber to make two 8' long trellises.
That will suffice for most gardens as far as tomatoes go, but I’m a bit of a nut about home-grown tomatoes and tend to grow tomato hedges.
Once upon a time I had sixteen tomato plants and perhaps nine different varieties.
Sweetie remarked that I was crazy, but there was more than enough for us - family of four at the time - and I passed out the excess at work and the neighborhood about once a week.
List of materials:
Construction grade is just fine, straight is nice, but sometimes difficult to find and we’re not working with a high degree of accuracy here.
Six - 1" x 2" x 8' pine
Four - 2" x 2" x 8' pine.
Four - 5/16" x 3" NC (National Coarse) hardware store grade 2 or 3 bolts. (The least expensive ones.)
Four - 5/16" nuts.
A box of #6 x 2" drywall screws. These aren’t expensive at all and if you have an electric drill/screwdriver assembly is quick and easy. You’ll have quite a few left over and they will be handy for other projects. I tend to buy boxes of 100 when I can and it’s quite handy to have a good supply of bolts, nuts, screws and the like in the shop.
A bottle of wood glue. Nothing special required here, Elmers carpenters glue - pale yellow in color - works fine.
Total costs at Home Depot were less than $20.
This doesn’t count the cost of glue, bolts, nuts or drywall screws.
Tools required:
Measuring tape.
Saw.
Pencil. A carpenters pencil is nice, but the free pencils from the golf course work great and the price (free) is right.
An adjustable square is nice, but not necessary, the old Mark 3 eyeball works just fine.
#2 Phillips head screwdriver or best of all a battery powered portable drill/screwdriver.
Some of the portable drill/screwdrivers aren’t too expensive and once you’ve had one, you’ll wonder how you ever got along without it.
A note about safety here.
If you’ve never used a circular saw like professional carpenters use, don’t use one.
They can kick back, jump out of the cut and otherwise get away from you and cause some terrible injuries.
Table saws and radial arm saws pose similar dangers to the novice and the same precautions apply.
I have a circular saw, but realizing that some will be very new to woodworking I used a hand saw to make the few cuts required and it didn’t take much time at all.
In fact, the whole project including shopping for the wood, getting the tools out etc. took three hours total.
Two hours for the actual building process.
If you have to buy a saw, this particular one is highly recommended.
It's a Stanley Toolbox saw, named so because it fits in many toolboxes.
Stanley calls it the Shark and it's an apt name.
I’ve owned it for quite a while, used it a lot and it’s still very sharp.
It cuts on the backstroke as well as it does on the forestroke and starting the cut right on the line is quick and easy.
A Teflon coated common crosscut saw is shown for comparison purposes.
The square is shown set for 5" which is where the pivot bolt goes.
A measuring tape will do it, but the adjustable square once set makes for accurate, quick and repeatable measuring.
I do a lot of precision machining and the like.
An adjustable square set up for the initial cuts is almost a given.
This pic shows the adjustable square set to make finding center on the 1 ½" wide 1 x 2 easy.
Note there are two marks, one measured from either side.
Drilling on center between the two marks will give you a well centered hole.
A portable drill works for drilling the pivot holes.
A standard twist drill works ok, but a spade drill designed specifically for drilling in wood does a little better job.
If you drill with a twist drill be aware the drill tends to suck itself into the wood and if you’re not drilling a through-hole it will go deeper than you want.
No reason you can’t drill the hole with a brace and bit, the bit being the typical carpenters drill bit most of us have seen before.
Nice part about using a drill press is that getting a hole square to the world is easy.
Here’s a pic of the garden with the trellises set where I think they’ll need to be.
Another view that shows a fix for a bit of a screw-up.
I used to make these with a total of five horizontal 1 x 2's and they tended to stay square.
The added piece with screw and glue helps the trellis to keep from collapsing parallelogram style.
There are several ways to brace the trellis so it stays square and upright.
Since these are designed to be an economical project, this was the easy way out for me.
Another view of the trellis in place with the glued on brace.
You only need one on each side of both folding pieces.
These trellises, as you can see, are a quick and easy project.
Not a lot of finish work required and just so you don’t think I take the quick and easy way out on projects, here’s a pic of a custom made cabinet I made for Sweeties teapot collection.
It hangs from the wall and there are no nails or screws used in its construction.
Took a while, but it turned out ok.
Course, I may have shot myself in the foot with this project . . . now she wants another one....
[edit on 22-5-2008 by Desert Dawg]
Nice looking trellis. I usually bind some sticks together with twine and call it good. Point is, middle of the summer- fresh off the vine
tomatoes-sliced thick warmed from the sun and spread with mayonaise or celery salt are tasty things!
Starred and flagged. My tomatoes are growing all over the darn place and if I don't get them some support soon they might just creep away
Nice.
I am big into woodworking, dovetails are definitely our friend.
My hops plant has a homemade lean to trellis. Viney plants love to climb.
My tomatoes need some good structure, I may just build me one of your supports.
I am big into woodworking, dovetails are definitely our friend.
My hops plant has a homemade lean to trellis. Viney plants love to climb.
My tomatoes need some good structure, I may just build me one of your supports.
Starred & flagged, DesertDawg.
You should have your own program on HGTV.
I think I could do this with the instructions you provided. I do need an alternative to the metal cages, for the reasons you mentioned.
Thanks.
You should have your own program on HGTV.
I think I could do this with the instructions you provided. I do need an alternative to the metal cages, for the reasons you mentioned.
Thanks.
Thanks all.
Kattrax, the novice is who I was aiming at.
As well as commenting on not using a circular saw.
The little saw shown is fast.
I can saw a 2 x 4 in two quicker with the Shark saw than I can with a circular saw.
Once the wood is set up to cut, grab the Shark and cut.
The circular saw - called a Skill-Saw by many (brand name) - has to pulled out of a drawer, plugged in with an extension and if you're only doing a few cuts it' not worth the trouble to get the circular saw out.
One thing I forgot to mention is the 2 x 2's were cut 48" long.
As well as the top piece simply lays in the V, it doesn't need to be screwed or nailed down.
Looking back, if I did it again I'd set it up for five cross-pieces.
The ones I made before had the side pieces set up at the 1/3 and 2/3 level of the 48" 2 x 2s.
Even so, not a big deal to add a couple more cross-pieces if needed.
We'll see how the tomatoes go before deciding on some more cross-pieces.
At a $1.29 each the price isn't too bad....
(post by FitBoy removed for a serious terms and conditions violation)
Wow! Great thread and instructable. Thanks for sharing with us.
a reply to: Desert Dawg
Good work there.
Dead simple too. I like the irrigation system as well, sure beats a watering can.
I'm toying with the idea of making a vertical garden along the garage wall, using pallets, this might just make a great addition since my kids go through tomatoes like sweets.
Good work there.
Dead simple too. I like the irrigation system as well, sure beats a watering can.
I'm toying with the idea of making a vertical garden along the garage wall, using pallets, this might just make a great addition since my kids go through tomatoes like sweets.
new topics
-
Electrical tricks for saving money
Education and Media: 2 hours ago -
VP's Secret Service agent brawls with other agents at Andrews
Mainstream News: 4 hours ago -
Sunak spinning the sickness figures
Other Current Events: 4 hours ago -
Nearly 70% Of Americans Want Talks To End War In Ukraine
Political Issues: 4 hours ago -
Late Night with the Devil - a really good unusual modern horror film.
Movies: 6 hours ago -
Cats Used as Live Bait to Train Ferocious Pitbulls in Illegal NYC Dogfighting
Social Issues and Civil Unrest: 8 hours ago -
The Good News According to Jesus - Episode 1
Religion, Faith, And Theology: 10 hours ago
top topics
-
Cats Used as Live Bait to Train Ferocious Pitbulls in Illegal NYC Dogfighting
Social Issues and Civil Unrest: 8 hours ago, 8 flags -
Florida man's trip overseas ends in shock over $143,000 T-Mobile phone bill
Social Issues and Civil Unrest: 15 hours ago, 8 flags -
VP's Secret Service agent brawls with other agents at Andrews
Mainstream News: 4 hours ago, 8 flags -
Former Labour minister Frank Field dies aged 81
People: 17 hours ago, 4 flags -
HORRIBLE !! Russian Soldier Drinking Own Urine To Survive In Battle
World War Three: 12 hours ago, 3 flags -
Nearly 70% Of Americans Want Talks To End War In Ukraine
Political Issues: 4 hours ago, 3 flags -
Sunak spinning the sickness figures
Other Current Events: 4 hours ago, 3 flags -
Bobiverse
Fantasy & Science Fiction: 14 hours ago, 3 flags -
Electrical tricks for saving money
Education and Media: 2 hours ago, 3 flags -
Late Night with the Devil - a really good unusual modern horror film.
Movies: 6 hours ago, 2 flags
active topics
-
President BIDEN Vows to Make Americans Pay More Federal Taxes in 2025 - Political Suicide.
2024 Elections • 135 • : WeMustCare -
VP's Secret Service agent brawls with other agents at Andrews
Mainstream News • 30 • : ThatSmellsStrange -
Why to avoid TikTok
Education and Media • 19 • : Kaiju666 -
HORRIBLE !! Russian Soldier Drinking Own Urine To Survive In Battle
World War Three • 30 • : DaRAGE -
Spectrophilia - Women Who Have Had Affairs With Ghosts Say Spooks Are Better Lovers Than Real Men
Paranormal Studies • 32 • : burritocat -
Electrical tricks for saving money
Education and Media • 2 • : rickymouse -
-@TH3WH17ERABB17- -Q- ---TIME TO SHOW THE WORLD--- -Part- --44--
Dissecting Disinformation • 656 • : burritocat -
Cats Used as Live Bait to Train Ferocious Pitbulls in Illegal NYC Dogfighting
Social Issues and Civil Unrest • 18 • : Xtrozero -
VirginOfGrand says hello
Introductions • 6 • : TheMichiganSwampBuck -
How ageing is" immune deficiency"
Medical Issues & Conspiracies • 31 • : rickymouse
8