It looks like you're using an Ad Blocker.
Please white-list or disable AboveTopSecret.com in your ad-blocking tool.
Thank you.
Some features of ATS will be disabled while you continue to use an ad-blocker.

I'm learning Pyrography...
page: 1share:
Pyrography
So, I have decided to learn the basic skills of Pyrography or wood burning. I watched several instructional videos on it and read through a whole bunch of material. And as I did, I notated anything interesting along the way, so I thought I might as well share what I learned here as well.
The History
Pyrography is derived from the Greek words pur (meaning fire) and graphos (meaning writing).
Pyrography is speculated to have been practiced since the times when cavemen discovered fire. At first using the charcoal from their fires on the walls of their caves and than, as they progressed, using stones and metals. Cave walls being their first canvas, eventually progressing as their knowledge did to wood, leather and bone. The medium used was fire, the art was born, and now we carry on the tradition...just with a bit better technology.
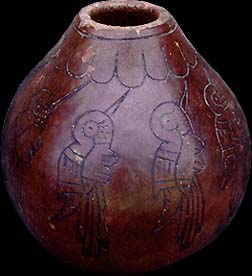
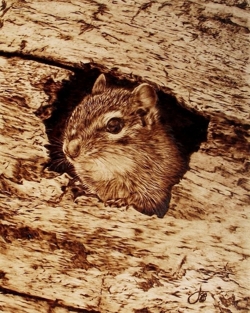
The earliest evidence of Pyrography was found in Peru, which may be one of the birth places of the art, and dates back to 700 AD (picture below). There is some mention of Pyrography being used in ancient Egyptian times, but I have not found any direct reference to how/what they used it on/for. Also, it was a traditional form of folk art in Romania, Argentina and Hungary.
In Europe, Asia, Australia and America pyrography was used to decorate artifacts such musical instruments and kitchenware. In Europe the use of pyrography is thought to have appeared in the medieval and renaissance periods. The Great Masters were thought to have used pyrography to decorate wainscots, although this has not been substantiated.
In Victorian times it became more popular, being accepted as an art form called pokerwork. This because they would have used a charcoal stove with holes all the way round into which pokers of various sizes and shapes were heated. A constant temperature had to be maintained and heat control was letting the poker cool down! The standard of some of the work done at this time was remarkably high considering such crude tools were used ...
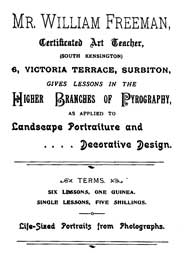
In the later Victorian era, a wood etching machine was developed and courses were offered on the art within the whole Victorian Era.
Eventually, we moved to soldering irons, and graduated to what we use now,wood burning tool kits. Offering an array of tips and heat settings, helping us to carve intricate, delicate lines and affording us more control over shading and creating beautiful designs/artwork.
The tools:
* Wood burning pen
* Carbon paper
* Tape
* Sandpaper
* Wet paper towel
* Design or artwork to wood burn
Wood Burning Pen
A cheap and easy hobby to learn, and really beautiful way to create unique, one of a kind gifts for any occasion. There are very cheap beginner kits that you can pick up at Wal-Mart which average around $30-50 dollars. This will give you the basic tools needed to get started.
Some articles mention you can also use a soldering iron. If you are not sure that this is the hobby for you, you may want to start out with one of those. Be aware though, the soldering iron has no way to control the heat application, so you will be relying on your own patience and hand pressure to get gradient/shadow variances. The other downfall I see is there is no way to be precise really. You may be limited in design options and lettering styles.
Note: With the soldering iron you will have to keep wiping the tip with a wet paper towel. Some people do this with the wood burning pen as well. It will build up carbon residue and in order to make the best lines you need to keep it clean.
With the wood burning pen, you get different tips/nibs and temperature control when you buy anything above beginner level kits. (Beginner level kits will give you at least 3-4 tips but you won't get the adjusted temperature feature usually.) You'll have smoother lines and more precision and control over your artwork. The ability to change the temperature (and the tips) will allow you to do different levels of shading and there will be less chance you'll make mistakes (although, you most likely will in the beginning stages anyways). The wood burning pen also comes with a stand to hold it while not in use or while your waiting for the temperature to reach the right level.
I have 2 soldering irons, one with a flat tip and one with a pointed tip, but I'm probably going to go purchase a cheap kit as well from my local store today. I'm not at the point where I want to invest $200-250 dollars in this hobby, but I do want to find out if it's something I wish to pursue.
Carbon Paper, Artwork, and Tape
Used to draw/sketch your design directly onto the piece of wood you're working with. Once you pick what you want to do, you simply size it to the correct dimensions, print it offline, tape it to the carbon paper then the wood, and trace. The tape is to prevent it from slipping while you are tracing the picture, as you will be moving the project piece around while you copy the picture/drawing you are using. (it is suggested to use a stylus or a regular pencil to do your trace)
Some people are comfortable freehand drawing and that is awesome. As my drawing skills are limited to stick men, I'll be using the carbon paper trace method. I already have one design traced and ready to go. I plan to start it tomorrow. But, I also picked a complex pic, so, it will take me while to complete. I have another project that I'm doing as well. So, depending on how good or bad they turn out, I'll update with pics upon completion.
continued...

Sandpaper & Wood Selection
Any type of wood can be used in Pyrography. Soft or hard is fine. You can also use prefab from a local craft store. Once you have the piece selected, you need to sand it down pretty well. The more you sand it, the better the pen will travel on its surface.
Soft wood will burn at lower temperatures, and hard wood will take longer to burn through. Soft wood is recommended for beginners. Some less expensive examples of soft wood are: Basswood, Ash, maple, and Birch. But it really is a personal choice and depends on what you want your finished piece to look like.
Note: Never use a varnished or stained piece of wood in your wood burning work. You can stain afterwards, but a pre-stained piece will be harder to burn, gums up your pen nib and does not allow for smooth, precision lines.
It is important to try and go with the grain of whatever piece you are using, the pen tends to try and follow the grain on its own. When you are tracing or drawing your picture, make sure you try to take that into consideration.
Sanding Prep:
You can use a planer, polishing compound such as Aluminum Oxide, or sandpaper. I used a planer for my pieces. Here is a 3 step sanding process that one person uses for the sandpaper method:
He also includes his experiences with different types of wood at the above link.
• Sand the board down to at least 220 grit. You may have to start with a rougher paper (60, 80, 100, or 150 grit or all of the then in progression) to get the board in shape for the final sanding
• After it’s sanded to 220 grit, wet out the wood. Only do this on solid wood, never wet out plywood as it might buckle. To wet out, take a very wet sponge and wipe it over the sanded surface of the wood. The goal is to get the wood wet, but not dripping, it should feel damp to the fingers. Place the wood someplace to dry for a few hours.
• After it’s dry, sand again with 220 grit sandpaper. It should feel very smooth at this point.
The board is now ready for use. The purpose for the wet sanding is to bring up the grain, or nap, so that during the second sanding it gets removed resulting in an ultra-smooth board to burn on. Smoother surfaces enable the tips to glide across them easier and allow for finer detail in your artwork. Also, if you plan to seal the work, it will help prevent the nap from raising when you do and thereby avoid it getting ‘fuzzy’ in the process of applying the sealant....
Beginner Tips
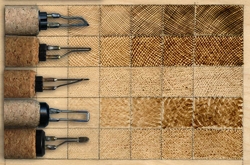
Practice using each tip on a piece of scrap wood (the same kind you are going to use preferably) before you try burning the main piece. Figure out what does what with regards to shading and lines, how much pressure you need, etc.. This is just getting you used to the pen as well as the wood you are trying to burn.
Use a light touch and do your outlines first. You can darken them up later if needed. If you make a minor mistake, sandpaper is your friend. It doesn't always work but can be quite helpful in minimizing/erasing errors.
Carbon builds up on the nib/tip quite often, so keep a wet paper towel handy to clean them off from time to time.
Adding color is done with watercolor paints or crayons. Coloring in the area with the crayon and then using a slightly wet watercolor brush to blend and get the washed out color look. If you are blending 2 strong colors together, you need to make sure your brush is cleaned very well in between color changes so they do not bleed into the next color you will be using.
The most valuable tip I think is having patience. It sounds like the more you rush, the more mistakes you will make and that they are for the most part, irreversible depending on how deep the burn is.
So, that's it, my introduction to Pyrography. Of course there is a ton more information out there, a ton more tips and techniques, how to make your own pen, do's and don'ts, etc...but I think this covers some of the more important basics.
Oh, I almost forgot, be safe! Well ventilated rooms and ensuring your workspace is free from clutter (potential fire hazards) is a must. Don't ever try to touch the tip of the wood burning pen with your hands, pliers are recommended for changing them out, and don't ever test the heat/temperature of your pen on your hand, always have a scrap piece of wood to do so on.
Thanks for taking the time to read through all this stuff. As I said, if my projects work out, I'll be posting a few in here from time to time. If I decide that this just isn't my cup of tea, I'll update as well. If someone else has a few pieces they have done and want to post, I would be interested (and it would be inspiring) to see them. Or if there are any more "beginner tips" that are important to mention please feel free to share.
As always, thanks for reading!
blend57
edit on 23-7-2017 by blend57 because: Always an edit! : /
Those wood burning pens look a lot like solder irons, giving me the idea one could use a solder iron that can change tips.
Great thread! Lovely work. Well done!
A very interesting hobby limited only by your imagination.
One other fact I can mention is this.
Soldering irons are only designed to solder. To burn wood, you need to 'drive' the point across the wood. This puts a strain on the iron that it was never designed to handle.
I do not suggest using an expensive temperature controlled soldering iron, it will eventually break because of the lateral forces you are forcing on the barrel.
Some people will tell you it does not matter, well, it does. It will all depend on how the iron is manufactured.
P
a reply to: blend57
Ha, cool! I bought a super cheap pyro iron a few weeks ago and have gradually found more time to use it the past few days. One of the soldering iron types with screw-in tips.
Tried it on wood a little at first, on end grain ash which burnt irregularly and i have a bunch of birch to try (a favoured wood so i read) but have not prepared any yet.
I done a lot of bone and antler in the last few days though and i'm loving it. Slow but seriously engaging.
Post some work!
I'm also a stick figure artist! I've found this art form a lot of fun for someone like me. I don't attempt to do anything realistic, I do abstract and
creative shapes and lines. It's been a great outlet for the non artistic dude I am. Great post!!
originally posted by: skalla
a reply to: blend57
Ha, cool! I bought a super cheap pyro iron a few weeks ago and have gradually found more time to use it the past few days. One of the soldering iron types with screw-in tips.
Tried it on wood a little at first, on end grain ash which burnt irregularly and i have a bunch of birch to try (a favoured wood so i read) but have not prepared any yet.
I done a lot of bone and antler in the last few days though and i'm loving it. Slow but seriously engaging.
Post some work!
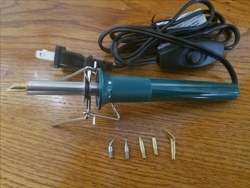
I just got back from purchasing a $12.00 one from Wal-mart. It was the only one they stock here in my area. I thought it would be a lot more as they were quoting $30-50 in the articles. This is what I got for twelve bucks:
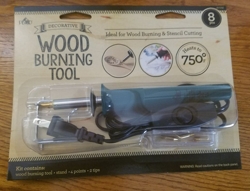
And I don't have any projects in progress yet. I literally just read/watched about it yesterday and decided to give it a go. Hopefully later today or by tomorrow I will be actually working on something..lol.
This is one of my wood projects I want to do though. My dad is a wood worker and this is left overs he gave me from a current project of his:
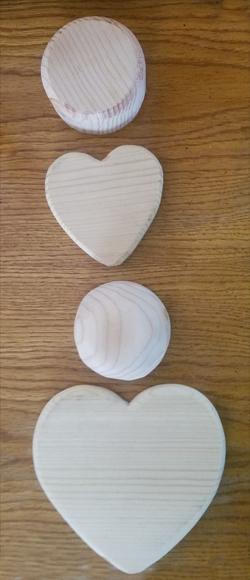
Not saying I will make it look any better, but at least it is a fun little project to start on. The other one is more complex and will take some time...if it turns out, I will post it.
Thanks to everyone for all the tips and comments. The more I know before I dive into this the better.
Thanks,
blend57
a reply to: blend57
Very similar to mine, the only tips i have tried are the fine pointy one and the angled calligraphy style one. Takes a long time to get hot enough to burn bone but i've been at it on and off most of today inbetween some very relaxed parenting!
Look forwards to seeing some stuff
Very similar to mine, the only tips i have tried are the fine pointy one and the angled calligraphy style one. Takes a long time to get hot enough to burn bone but i've been at it on and off most of today inbetween some very relaxed parenting!
Look forwards to seeing some stuff
Oh, I remember wood burning kits sold when I was a kid. They were fun! I am looking forward to seeing your work!
originally posted by: Night Star
Oh, I remember wood burning kits sold when I was a kid. They were fun! I am looking forward to seeing your work!
Ok..so...I doodled with it a bit. Got bored of making lines and such, so I did the ATS logo. I used all the tips on this and will just plane the piece of wood down and reuse it later. Learned a few things about the tips and what they do, sanding, etc..just really trying to get used to the pen and the process. So, my first really crappy wood burning piece:
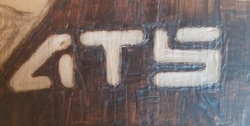
But it does (so far) seem like a really fun hobby and I'll probably try to do the other projects I showed above in a few days, once I get a better understanding of what I'm doing.
Thanks,
blend57
Ps..I apologize to the ATS staff for making such a poor replica of their logo..lol. Maybe the next one won't be so bad.
a reply to: blend57
It's a fun hobby. Most of my work is done on gourds. As with all crafts, practice is the answer. I began with one of the inexpensive models but discovered that the more costly ones, with temperature controls and multiple tips made the going sooooo much easier.
Looking forward to seeing some of your work!
skalla
That was my first wood burning ever. I probably won't keep it as the lines are uneven and there are impressions in the wood where I pressed too hard. That piece of wood is thick enough I can just skim the top off and start again.
Night Star
I think I will play around a little more with that pic (I only showed the bit that I actually completed, there is more), then scrap it and try one of those hearts. My nephew is getting married in a couple months and I thought it would be a nice addition to his gift..maybe put their names and wedding date on it. If I ever get that good..
diggindirt
I'm already figuring out that temperature control is the way to go. As soon as I know I want to pursue this hobby, I'll probably invest in one of the better quality pens. And yes, I'm gonna need a ton of practice...lol.
Thanks again to everyone for being so kind and all the comments/tips. Hopefully, eventually, I will be able to create something as beautiful as the pictures I've seen on the web. Until then..lots of stick men wood burning art maybe..
Thanks again,
blend57
a reply to: blend57
Don't you love that burning wood smell?? I remember making a trout coat hanger in shop class, using a big wood burning tool to make the eyes, gills, etc. and I gave it to my dad for Father's day in like 1995. Wow, amazing the memories that are still tucked away in this noggin haha - awesome work man! It seems like you've got is knack for this already Bravo!!!
Don't you love that burning wood smell?? I remember making a trout coat hanger in shop class, using a big wood burning tool to make the eyes, gills, etc. and I gave it to my dad for Father's day in like 1995. Wow, amazing the memories that are still tucked away in this noggin haha - awesome work man! It seems like you've got is knack for this already Bravo!!!
edit on 23-7-2017 by FamCore because: (no reason given)
I thought I would add another tool.
You can buy small flaming torches that you clip onto a can of butane gas. Many can also have a soldering tip on the end.
You can however use just the flame, a very fine flame. The temp is always the same and thus does not cool down from using it too fast.
Another tool for the toolbox and not overly expensive.
P
a reply to: blend57
I make my own guitars.
Done a neck for one. A painted body and finished neck for another. An unfinished body I stained. And have one more in parts (missing a few parts).
Since the unfinished body I always wanted to burn one!! The idea came from a furniture finishing book and looks really nice under a clear finish on a maple top!! Burn it, sand it down, clean the surface, then finish. Deep browns and some blacks against a yellow top.,. Sweet!
I didn't know there was a name for the technique!
I was into this before anybody I knew about refinishing!! Glad that there are more out there that appreciate this "distressed" look!
Blend,
My interest was to exaggerate the wood grain.
What you are doing is art!
Please keep us up to date with your experiments!
-TEOT
My interest was to exaggerate the wood grain.
What you are doing is art!
Please keep us up to date with your experiments!
-TEOT
new topics
-
Has Tesla manipulated data logs to cover up auto pilot crash?
Automotive Discussion: 54 minutes ago -
whistleblower Captain Bill Uhouse on the Kingman UFO recovery
Aliens and UFOs: 5 hours ago -
1980s Arcade
General Chit Chat: 8 hours ago -
Deadpool and Wolverine
Movies: 8 hours ago -
Teenager makes chess history becoming the youngest challenger for the world championship crown
Other Current Events: 9 hours ago -
CIA botched its handling of sexual assault allegations, House intel report says
Breaking Alternative News: 10 hours ago
top topics
-
Lawsuit Seeks to ‘Ban the Jab’ in Florida
Diseases and Pandemics: 13 hours ago, 20 flags -
Starburst galaxy M82 - Webb Vs Hubble
Space Exploration: 15 hours ago, 13 flags -
The Superstition of Full Moons Filling Hospitals Turns Out To Be True!
Medical Issues & Conspiracies: 17 hours ago, 8 flags -
CIA botched its handling of sexual assault allegations, House intel report says
Breaking Alternative News: 10 hours ago, 8 flags -
15 Unhealthiest Sodas On The Market
Health & Wellness: 15 hours ago, 6 flags -
whistleblower Captain Bill Uhouse on the Kingman UFO recovery
Aliens and UFOs: 5 hours ago, 6 flags -
1980s Arcade
General Chit Chat: 8 hours ago, 4 flags -
Deadpool and Wolverine
Movies: 8 hours ago, 3 flags -
Teenager makes chess history becoming the youngest challenger for the world championship crown
Other Current Events: 9 hours ago, 3 flags -
Has Tesla manipulated data logs to cover up auto pilot crash?
Automotive Discussion: 54 minutes ago, 0 flags
active topics
-
Lawsuit Seeks to ‘Ban the Jab’ in Florida
Diseases and Pandemics • 23 • : burritocat -
Has Tesla manipulated data logs to cover up auto pilot crash?
Automotive Discussion • 1 • : andy06shake -
15 Unhealthiest Sodas On The Market
Health & Wellness • 36 • : tanstaafl -
My wife just had a very powerful prophetic dream - massive war in Israel...
The Gray Area • 12 • : SchrodingersRat -
-@TH3WH17ERABB17- -Q- ---TIME TO SHOW THE WORLD--- -Part- --44--
Dissecting Disinformation • 606 • : burritocat -
"We're All Hamas" Heard at Columbia University Protests
Social Issues and Civil Unrest • 199 • : FlyersFan -
It takes One to Be; Two to Tango; Three to Create.
Philosophy and Metaphysics • 7 • : Terpene -
Take it to the Media when you protest.. Don't let them ignore you!
Education and Media • 4 • : SchrodingersRat -
They Killed Dr. Who for Good
Rant • 62 • : FlyersFan -
Definitive 9.11 Pentagon EVIDENCE.
9/11 Conspiracies • 421 • : Lazy88