It looks like you're using an Ad Blocker.
Please white-list or disable AboveTopSecret.com in your ad-blocking tool.
Thank you.
Some features of ATS will be disabled while you continue to use an ad-blocker.

Daggers for rituals and pipes fer smokin'.
page: 114
share:
Hey here's some recent stuff.
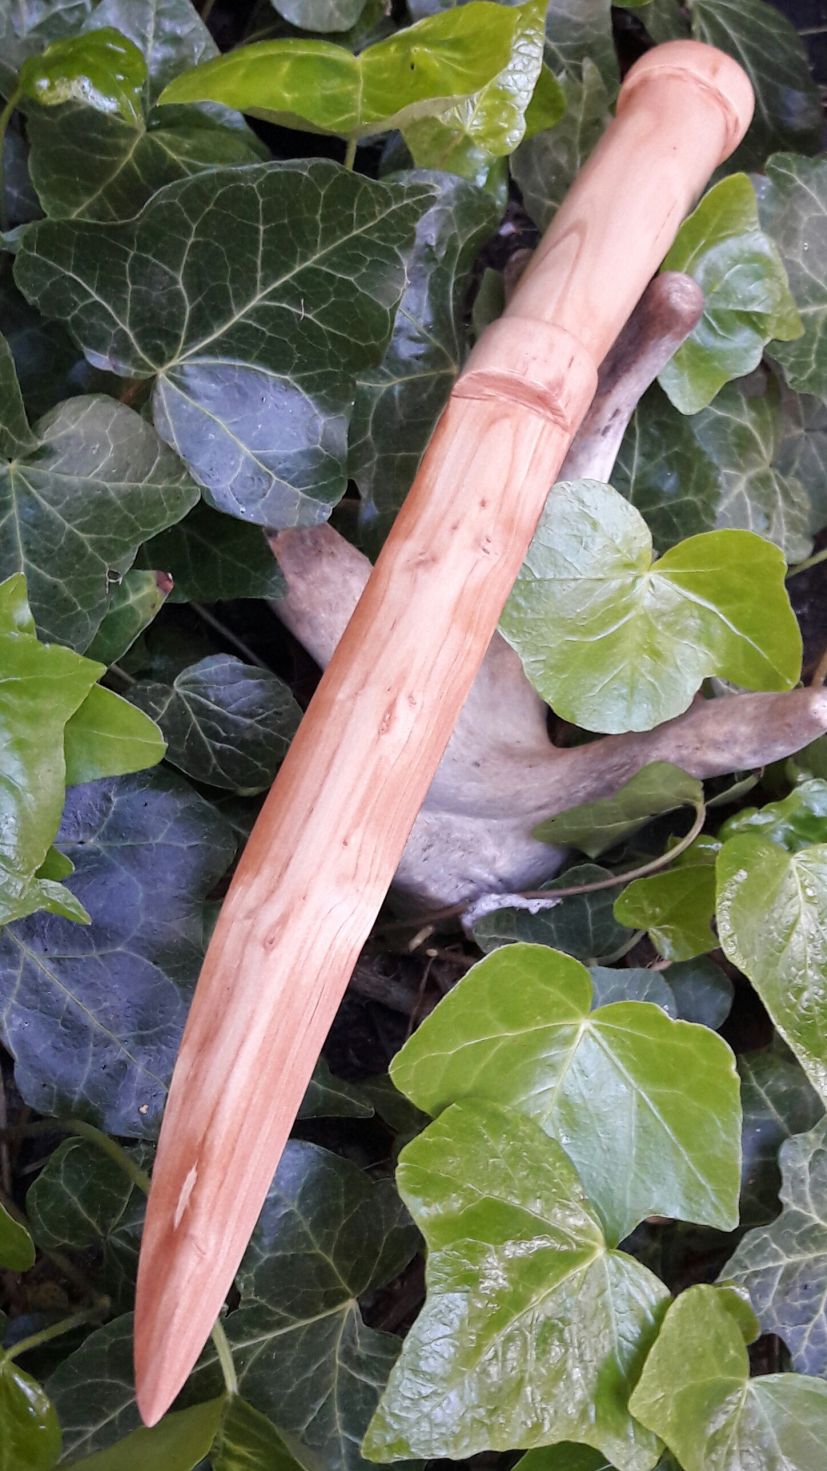
Been waiting on some bone that's big enough for blades recently so made a few athames/daggers from wood. They don't have to be used for communing with dark spirits and bringing about the end of civilisation and ting, they could just go on a shelf and look nice
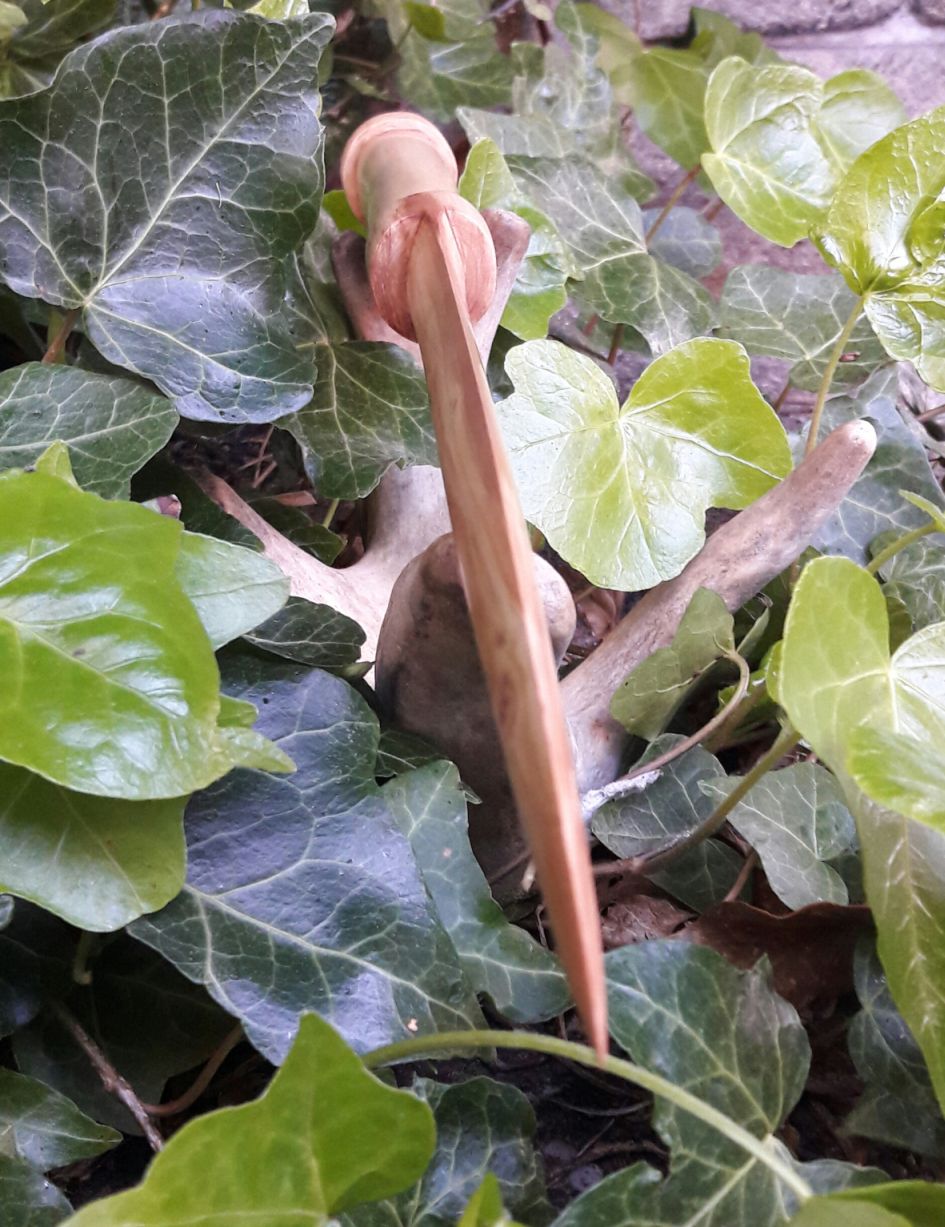
First one is nice and plain, carved from apple wood
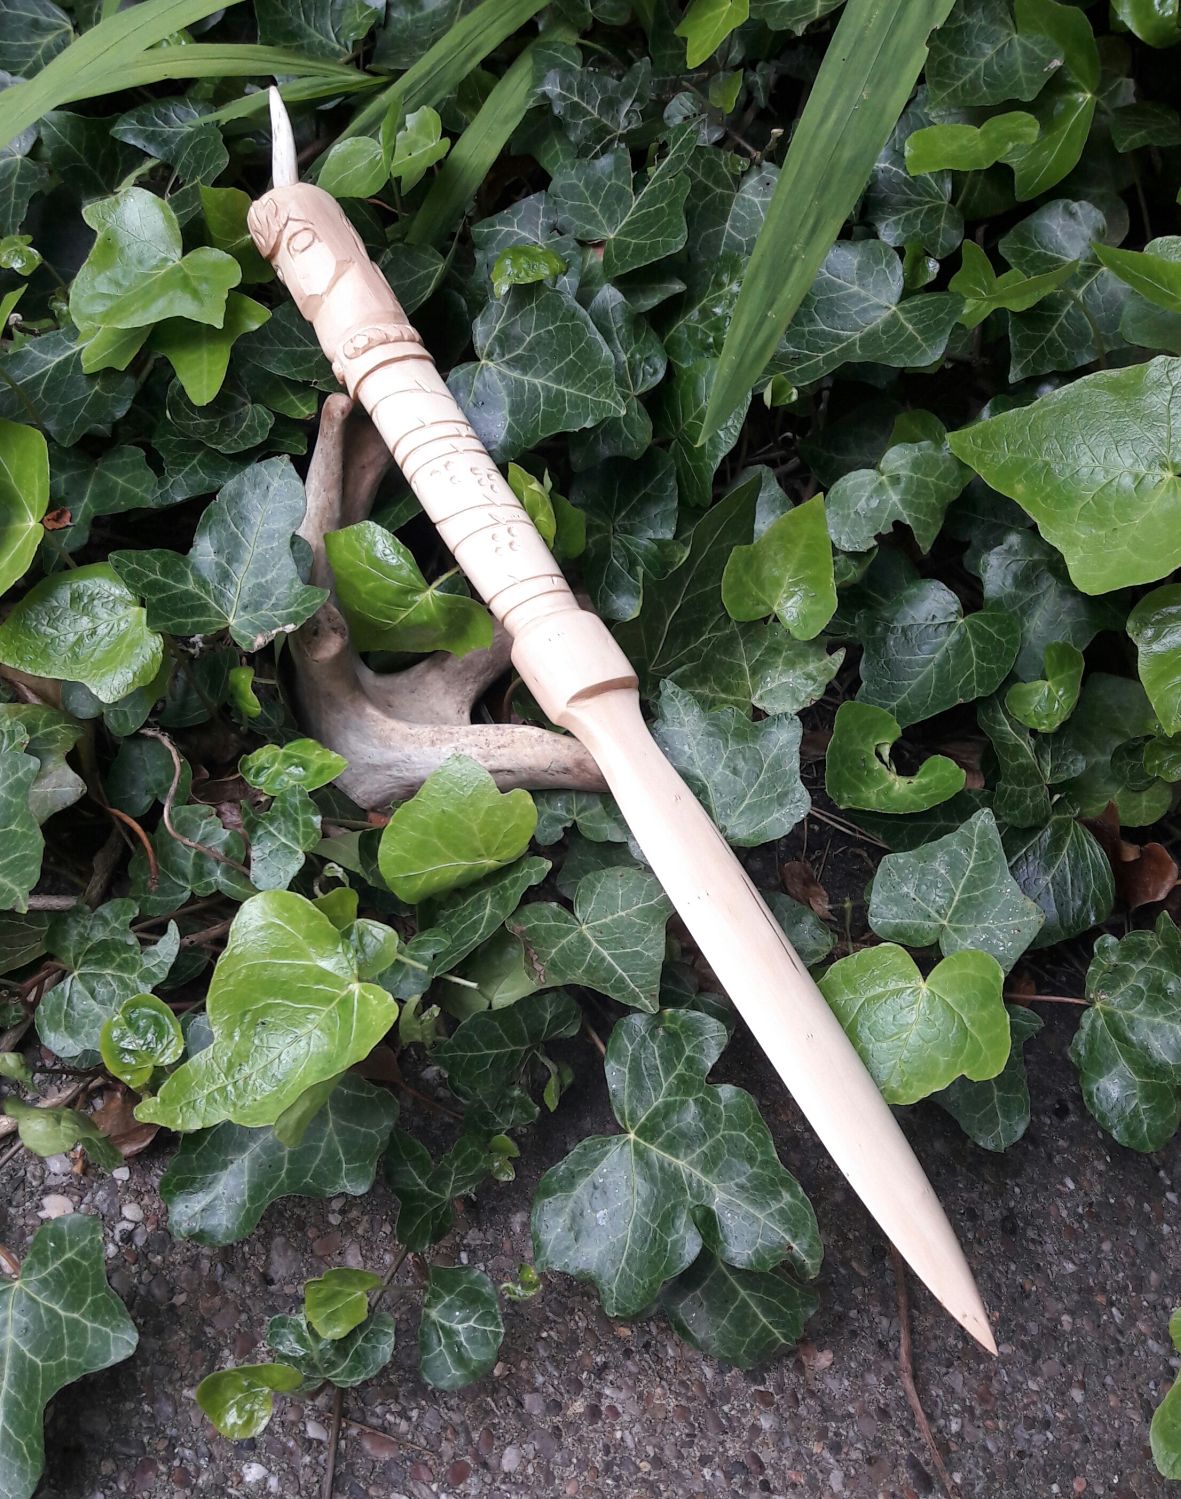
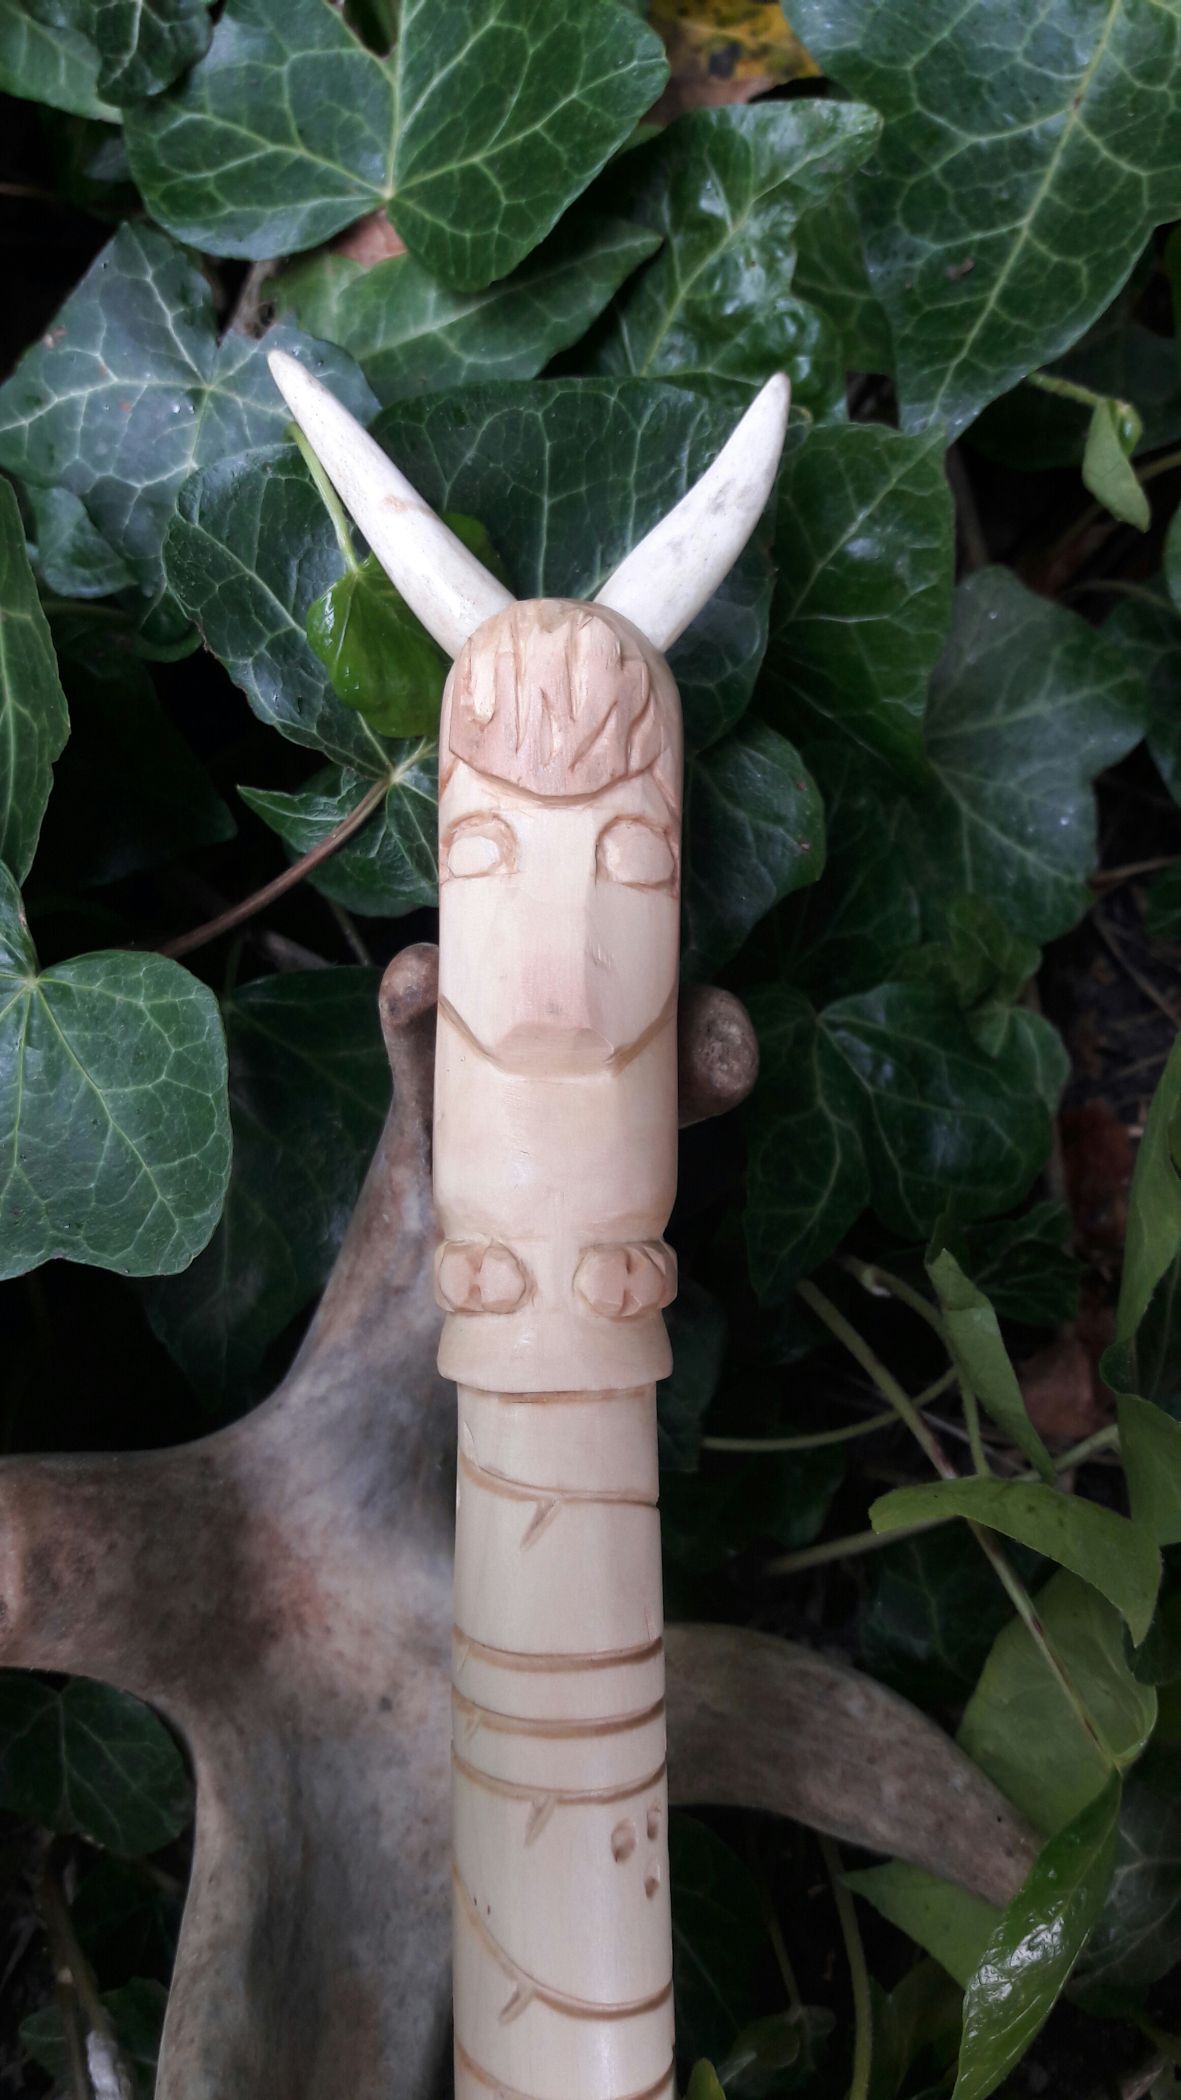
And the other one i got all ambitious with. It's meant to represent The Horned God, so the pommel has a man's head carved on one side and a deer wearing a torc on the other, i set some small antler tines between their heads so that they are both horned. It's hand carved from Hawthorn and i carved a growing hawthorn branch with berries up the handle. Took a lot of concentration and thought not to make a horrible mess of it.

I've been trying my hand at antler pipes too, got them looking and working nice but i need to work on cutting the bowls and aligning stuff up really neatly. Lots of fun testing them out though, i'll be making more!
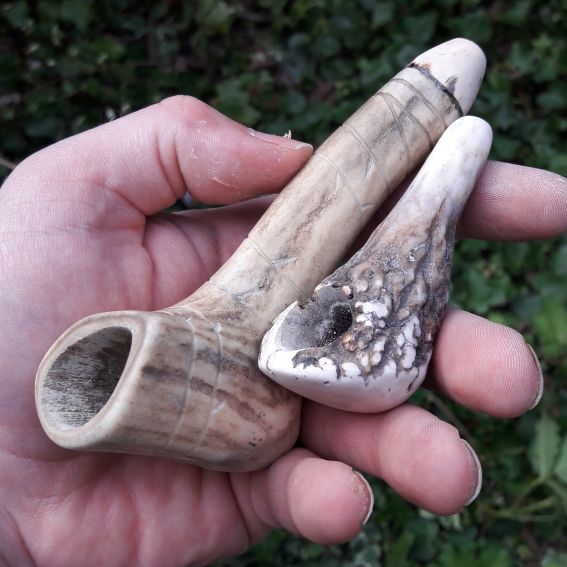
Someone pointed out that the larger one was somewhat phallic, and then the more i looked at it, the more penis-y it got. Obviously i remodelled it

Thanks for stopping by
Been waiting on some bone that's big enough for blades recently so made a few athames/daggers from wood. They don't have to be used for communing with dark spirits and bringing about the end of civilisation and ting, they could just go on a shelf and look nice
First one is nice and plain, carved from apple wood
And the other one i got all ambitious with. It's meant to represent The Horned God, so the pommel has a man's head carved on one side and a deer wearing a torc on the other, i set some small antler tines between their heads so that they are both horned. It's hand carved from Hawthorn and i carved a growing hawthorn branch with berries up the handle. Took a lot of concentration and thought not to make a horrible mess of it.
I've been trying my hand at antler pipes too, got them looking and working nice but i need to work on cutting the bowls and aligning stuff up really neatly. Lots of fun testing them out though, i'll be making more!
Someone pointed out that the larger one was somewhat phallic, and then the more i looked at it, the more penis-y it got. Obviously i remodelled it
Thanks for stopping by
edit on 27-4-2017 by skalla because: typo
To align the bores you need a small piece of wood with snug parallel holes (.125") set about an inch, or higher, apart, depending on your bowl height.
Once you drilled the long bore, you will be able to exactly locate where to begin the bowl pilot hole. By making a small hole which snugly (not too
snug because you will need to rotate a drill by hand) accommodates a small drill (.040") set exactly in the middle of these parallel bores and
perpendicular to them, you can start your bowl pilot hole using a pin vise carefully increasing depth until you hit the draw bore hole. You can
fashion a continuous plumbing pipe like set up this way, with no overlap, and given practice and familiarity with your jigs, zero centering error.
You always want to be careful to start your bowl pilot hole a little beyond the reach of the draw tube, just a few thousandths should do. You can always extend the draw bore to reach a bit farther but you cannot retract it. It helps to have assorted drills and reamers, so you can cover more styles, lengths, and clean up any run-out.
Using a tiny focusing flashlight, once you are confident that the small drill hit dead center, start using larger drills. I like to keep it a little smaller than the through hole. As such it acts like a natural screen, burns a little hotter, and gives a nice tweet sound when flamed when clean, or empty. Be careful to not dimple the bottom of your draw hole with the drills. You want a smooth curve which is easy to get spotless. I use a reamer sized to the draw bore, with a ball ground end, for clearing, and salvaging terpenes.
# 757
edit on 27-4-2017 by TheWhiteKnight because: I don't feel too great right now pm if my writing is hard to perceive.
edit
on 27-4-2017 by TheWhiteKnight because: (no reason given)
a reply to: TheWhiteKnight
Many thanks for taking the time to explain all of that, i will study that and give it a go! I haven't researched the craft at all yet really, i was looking at my off cuts and reckoned i'd see what i could make. The bowls are definately an area i need to work on. I guess you make a few pipes then?
Many thanks for taking the time to explain all of that, i will study that and give it a go! I haven't researched the craft at all yet really, i was looking at my off cuts and reckoned i'd see what i could make. The bowls are definately an area i need to work on. I guess you make a few pipes then?
a reply to: Woodcarver
Thank you! I love apple too, and the grain works nicely for this blade as it's got almost pattern weld look to it. Hawthorn is my personal fave, but the piece i made the dagger here from is far more uniform in colour than usual.
I'm an all hand powered hand tool chap, except for a drill to bore the odd hole. My core tools are a few saws, drawknife, sloyd, small chisels and various files. And too much sandpaper...
Part of me wants to get a dremel, but i'm making progress with hand carving faces and dont want to get it the way of that, plus i market my wares as traditionally made and i'm a silly purist
I hope the jig device makes sense as presented. I am assuming you have the ability to read between the lines, but I'll try to clarify a bit. I
remember when I began using this because I had blown several catlinite pieces by missing ever so slightly with the bowl bore, and once you get it
perfect, you have to have them all this way or it's just no good. You wind up with a sloppy off center and oversized hole at the bowl bottom which is
unsightly and annoying.
There are two pieces of wood needed...one has the parallel bores and in these you insert
1) the exact drill you used to bore the draw tube-assuming you held exact tolerances with the drill- and 2) above that drill you have another tight fitting tool, drill, whatever, just so they are stable.
The second piece gets a bore for the upper tool, and a tiny bore exactly centered on that bore, at right angles, or whatever angle you want to shape the form to. This small hole must be precisely drilled in the center of the bore. Then you insert the starter drill, the tiny one, through the hole you drilled, and when it is put together it looks like a rectangle, viewed from the side. You swivel the wood piece bearing the small drill until it points dead center at the point of the bottom drill (which drill is to be inserted into the pipe). You must cement the top drill, or tool, at both ends. The bore drill needs no cement. You cannot allow swiveling on the tool between/joined to the 2 pieces of wood, because those 2 wood pieces are aligned to cause the small drill to always point at the must be locked down.
It sounds like a lot of fuss but really it's pointless to try to machine set up irregular things like stone etc.... This jig will give perfect results but you should proceed slowly to prevent scarring the long draw bore bottom. Strictly finger drill that tiny hole, and take breaks to blow through it until you strike, so you aren't going too deep. It is still possible to make mistakes in location of length (try to aim for the very point left by the drill, or slightly beyond it).
You are going to be guessing at depth so keep a close watch. The centering should be perfect if you were patient with jig construction and pilot drilling consistently with the small drill.
It would be a shame to miss after all that work.
I'd post images but I seem to be unable to figure it out. The image box won't accept the copy cursor. Maybe I need to shut my machine down, restart? I have managed one image, and the procedure seems to not work anymore.
a reply to: skalla
# 758
edit on 27-4-2017 by TheWhiteKnight because: (no reason given)
new topics
-
The good, the Bad and the Ugly!
Diseases and Pandemics: 50 minutes ago -
Russian intelligence officer: explosions at defense factories in the USA and Wales may be sabotage
Weaponry: 3 hours ago -
African "Newcomers" Tell NYC They Don't Like the Free Food or Shelter They've Been Given
Social Issues and Civil Unrest: 4 hours ago -
Russia Flooding
Other Current Events: 5 hours ago -
MULTIPLE SKYMASTER MESSAGES GOING OUT
World War Three: 6 hours ago -
Two Serious Crimes Committed by President JOE BIDEN that are Easy to Impeach Him For.
US Political Madness: 7 hours ago -
911 emergency lines are DOWN across multiple states
Breaking Alternative News: 7 hours ago -
Former NYT Reporter Attacks Scientists For Misleading Him Over COVID Lab-Leak Theory
Education and Media: 9 hours ago -
Why did Phizer team with nanobot maker
Medical Issues & Conspiracies: 9 hours ago -
Pro Hamas protesters at Columbia claim hit with chemical spray
World War Three: 9 hours ago
top topics
-
Go Woke, Go Broke--Forbes Confirms Disney Has Lost Money On Star Wars
Movies: 14 hours ago, 13 flags -
Pro Hamas protesters at Columbia claim hit with chemical spray
World War Three: 9 hours ago, 11 flags -
Elites disapearing
Political Conspiracies: 12 hours ago, 9 flags -
Freddie Mercury
Paranormal Studies: 14 hours ago, 7 flags -
African "Newcomers" Tell NYC They Don't Like the Free Food or Shelter They've Been Given
Social Issues and Civil Unrest: 4 hours ago, 7 flags -
A Personal Cigar UFO/UAP Video footage I have held onto and will release it here and now.
Aliens and UFOs: 12 hours ago, 5 flags -
Two Serious Crimes Committed by President JOE BIDEN that are Easy to Impeach Him For.
US Political Madness: 7 hours ago, 5 flags -
Russian intelligence officer: explosions at defense factories in the USA and Wales may be sabotage
Weaponry: 3 hours ago, 4 flags -
911 emergency lines are DOWN across multiple states
Breaking Alternative News: 7 hours ago, 4 flags -
Former NYT Reporter Attacks Scientists For Misleading Him Over COVID Lab-Leak Theory
Education and Media: 9 hours ago, 4 flags
14