It looks like you're using an Ad Blocker.
Please white-list or disable AboveTopSecret.com in your ad-blocking tool.
Thank you.
Some features of ATS will be disabled while you continue to use an ad-blocker.

Astrophotography - Polar Alignment
page: 110
share:
So you've been out taking images of the sky with your camera and tripod. You may have discovered that, depending on what you have the camera's focal
length set to, there is a difference between how long you can open your shutter for and not get star trails.
As I've said in another thread, the amount of time you can expose your frame and not visibly see star trails depends upon the focal length divided into 500. The answer will be how many seconds you can open the shutter for a camera fixed and not moving.
For a 6.5mm focal length, you can expose the frame for up to 77 seconds. For 18mm, you have to shorten it down to 27 seconds. If your focal length is 50mm, you will only have 10 seconds. 500mm telephoto lens? You will only have 1 second before the star trail becomes noticeable in your shot.
Telescopes are even worse because you are starting to get into focal lengths measured in the thousands of millimeters.
Why is that?
Well, it's basically due to your FOV, or Field Of View becoming smaller and smaller as you zoom in. You can see this with an everyday day time images. Go up on a hill about a half mile away from a busy freeway and you can take a picture of the cars zipping along at 60 or 70 Mph. You'll capture lots of them just fine and very clearly. Now, change out that lens for a 500mm or higher one, and zoom in to try and image just one car....but don't move the camera with the car, keep it still. If you left the exposure time alone and the ISO alone, as you snap your image, the car passing through your field of view will be a blurry streak.
If, however, you move your camera to keep the single car in view and snap your picture then, you'll get a much better shot with no blurring.
This is the same thing that we are doing by putting our camera on a tracking mount, either by itself, or piggy backing it on to a telescope.
One of the best tracking mounts you can use is a German Equatorial Mount for this:
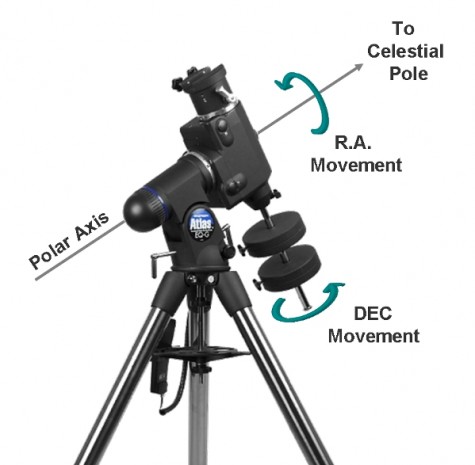
This is because it has a Right Ascension axis and a Declination axis:
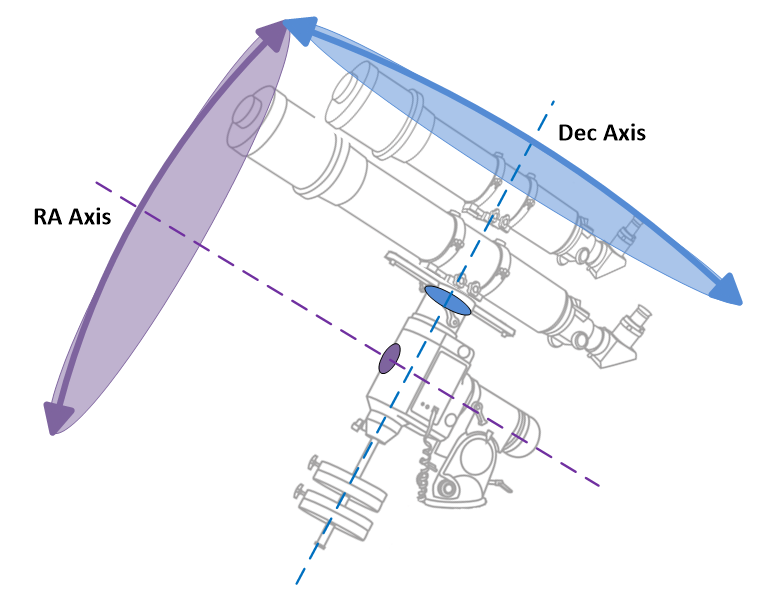
The RA axis allows you to align the mount with the spin axis of the Earth, so that (when facing north) you have the same right to left movement as the Earth's spin (things rising in the East and setting in the West).
The Declination axis allows you to turn and point your camera or telescope to an object you want.
Every object in the sky will have a set of RA and Dec coordinates. Most of the interesting objects you may wish to look at or image, you will not be able to just point your telescope at it, because it will be too dim for your eyes to see.
Once you have polar aligned your mount, you can dial in any objects RA and Dec coordinates and will be pointed at it.
So how do we do this?
Believe it or not, it's not really that hard. Just takes some practice and you'll be doing it without even thinking about it.
Important Note: You should have all the equipment you want mounted (IE telescope, camera, camera riding piggy back, etc) attached to the mount first before doing any of the following. If you don't and align the mount first, the act of mounting things to it can disturb your polar alignment and you may have to go back and do it all again.
Once you have your mount set up, make sure it's pointed towards North (or South if you live in the southern hemisphere). Most GE mounts have a polar alignment telescope built into them:
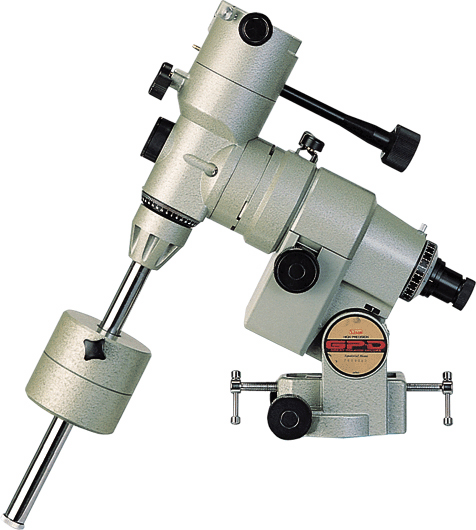
Before you can use it, you must make sure that your RA on the mount is set to zero and the same for the declination axis, or else you will not be able to see through the polar alignment telescope.
When you look through the polar alignment scope, you may see this:
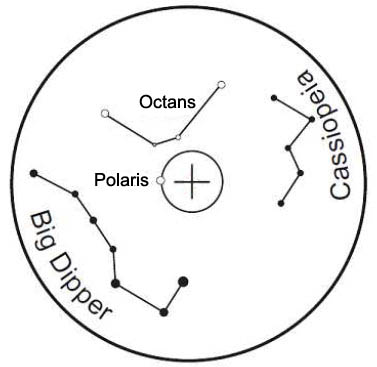
Different brands of GE mounts have different reticles than this, but this one is my favorite due to the ease of it's use, which is to simply line up the stars of the constellations with those on the reticle. For the northern hemisphere, you use either the Big Dipper or Cassiopeia. Octans is for those that live south of the equator and are doing a polar alignment to the south.
The mount will have adjustment knobs for moving the whole mount left or right, because let's face it: no one is going to place the mount on the ground facing directly north (or south) by eyeballing it.
There is also a knob or screw to adjust the mount's elevation angle. This is what tips the mount up and down, which moves the RA axis from looking straight out to the horizon (0 degrees) to straight over head (90 degrees). What this gets adjusted to will depend on your latitude of where your mount is set. You'll adjust this last while looking in the scope to get Polaris where it needs to be (or to help place the stars of Octans for those in the southern hemisphere).
The elevation angle changes with your latitude. Once you have set it up, you could move your mount to the east or west (longitude) and you will not have to adjust the elevation angle again (as long as you didn't bump it or move it). This is because the angle at which polar north or south is will not change unless you change your latitude.
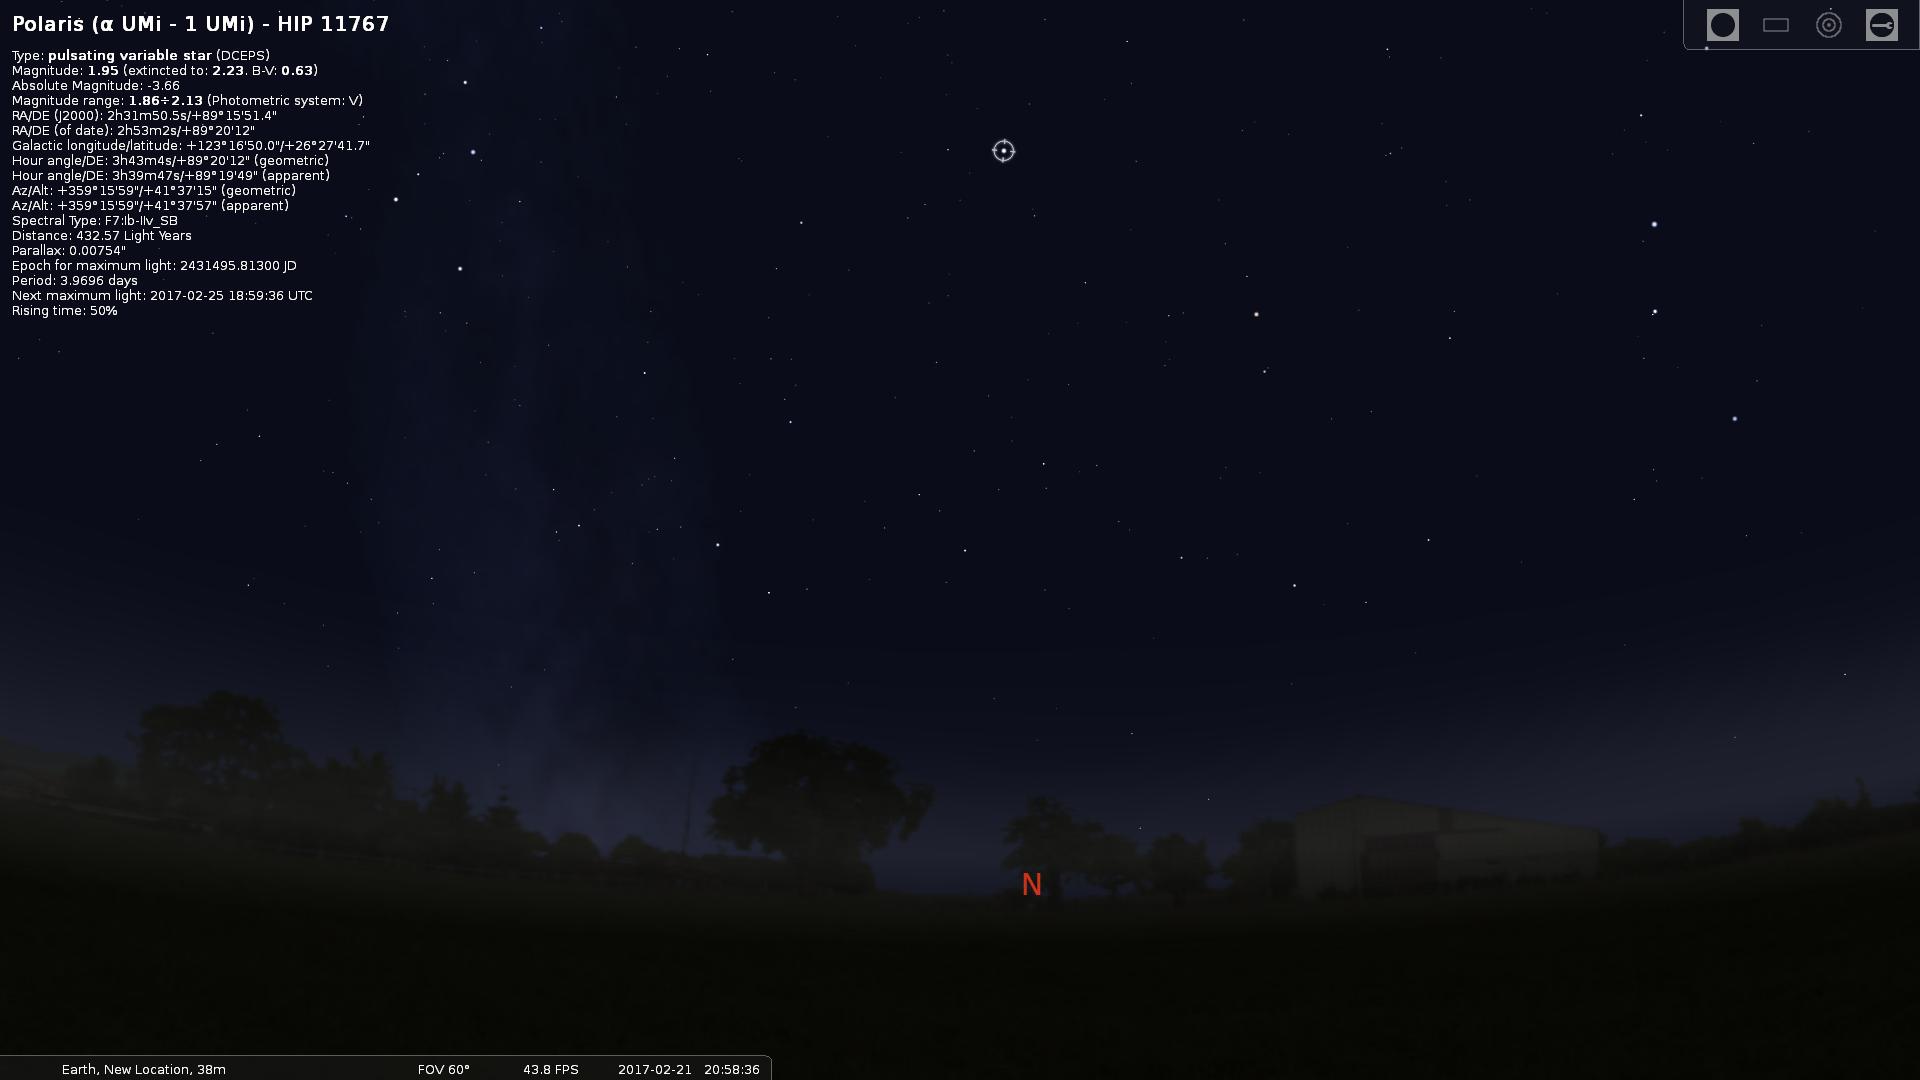
For example, here is how far up Polaris looks from the northern horizon where I live:

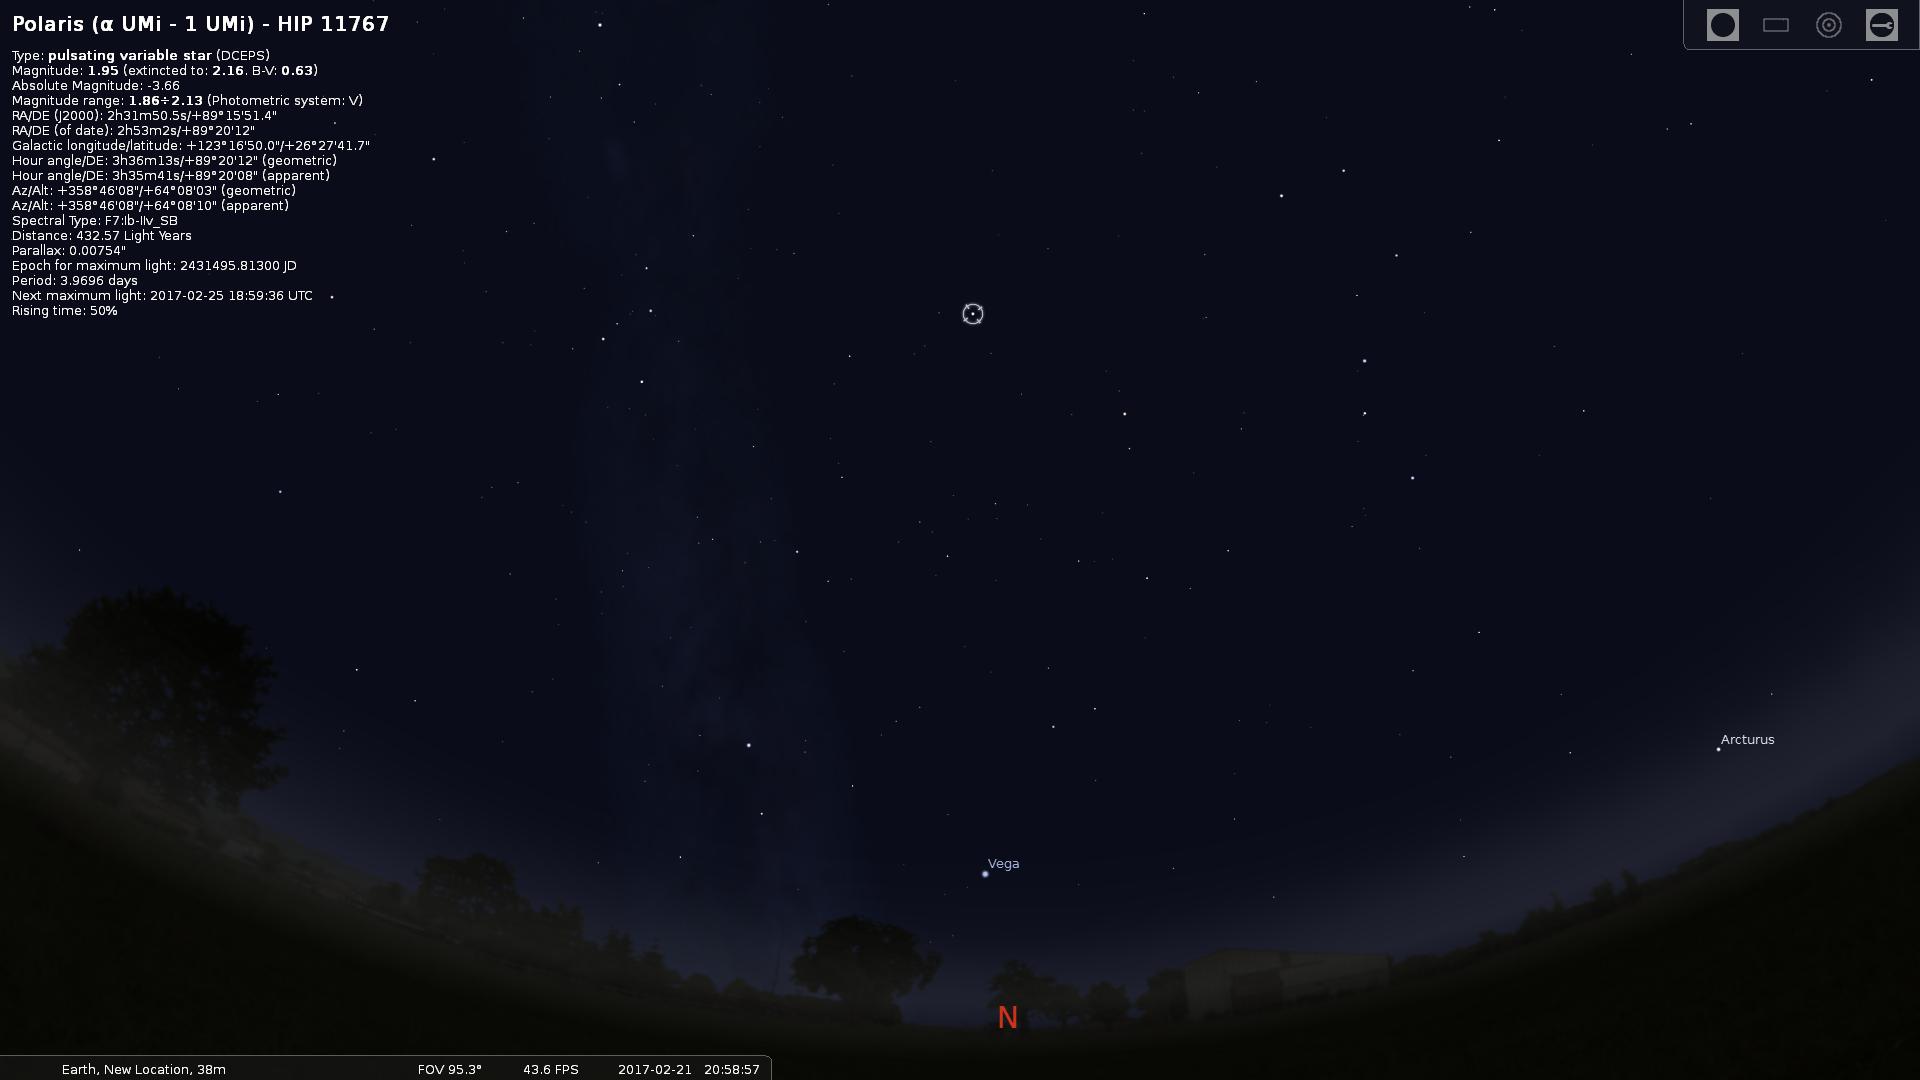
But, if we travel north and keep changing our latitude, you'll see that Polaris will rise higher in the sky:
Say like in New York:
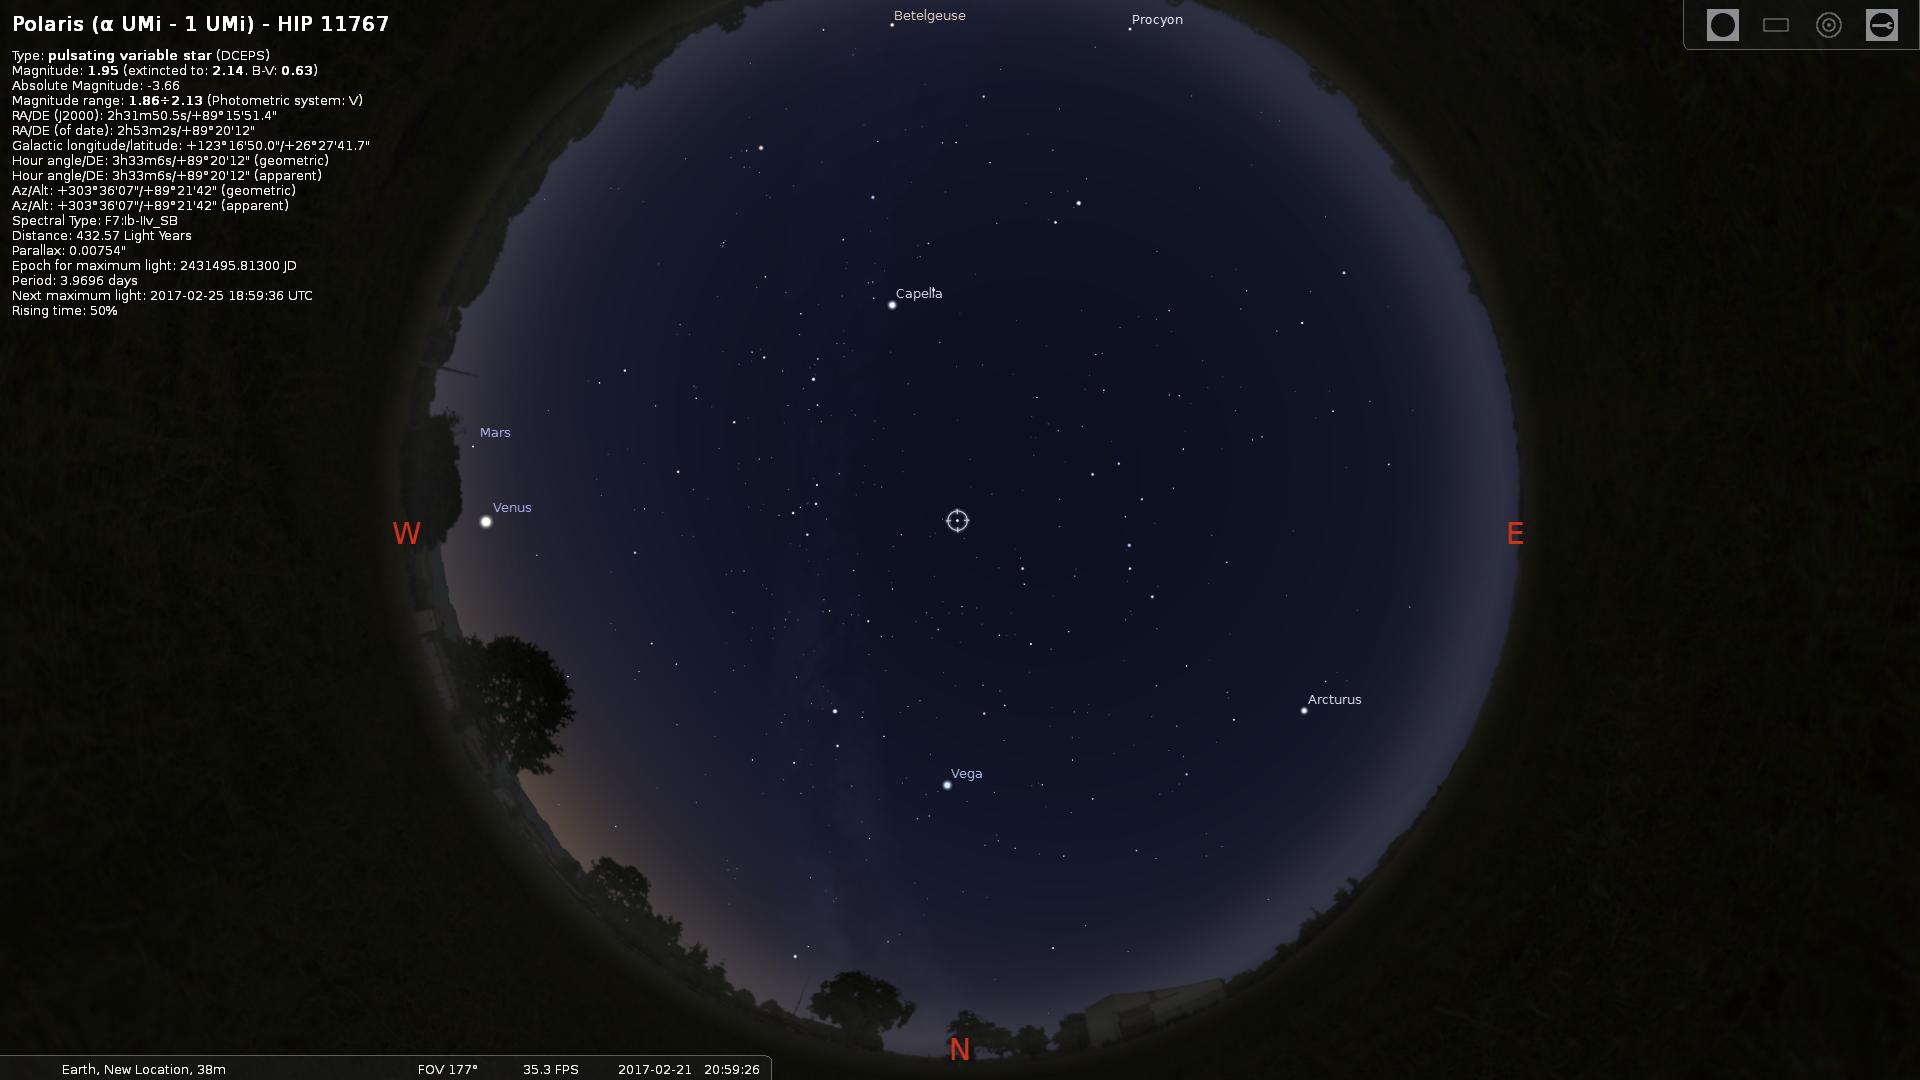
Or go further north up into Canada:
Get to the North Pole and your mount will have to polar align looking straight up:
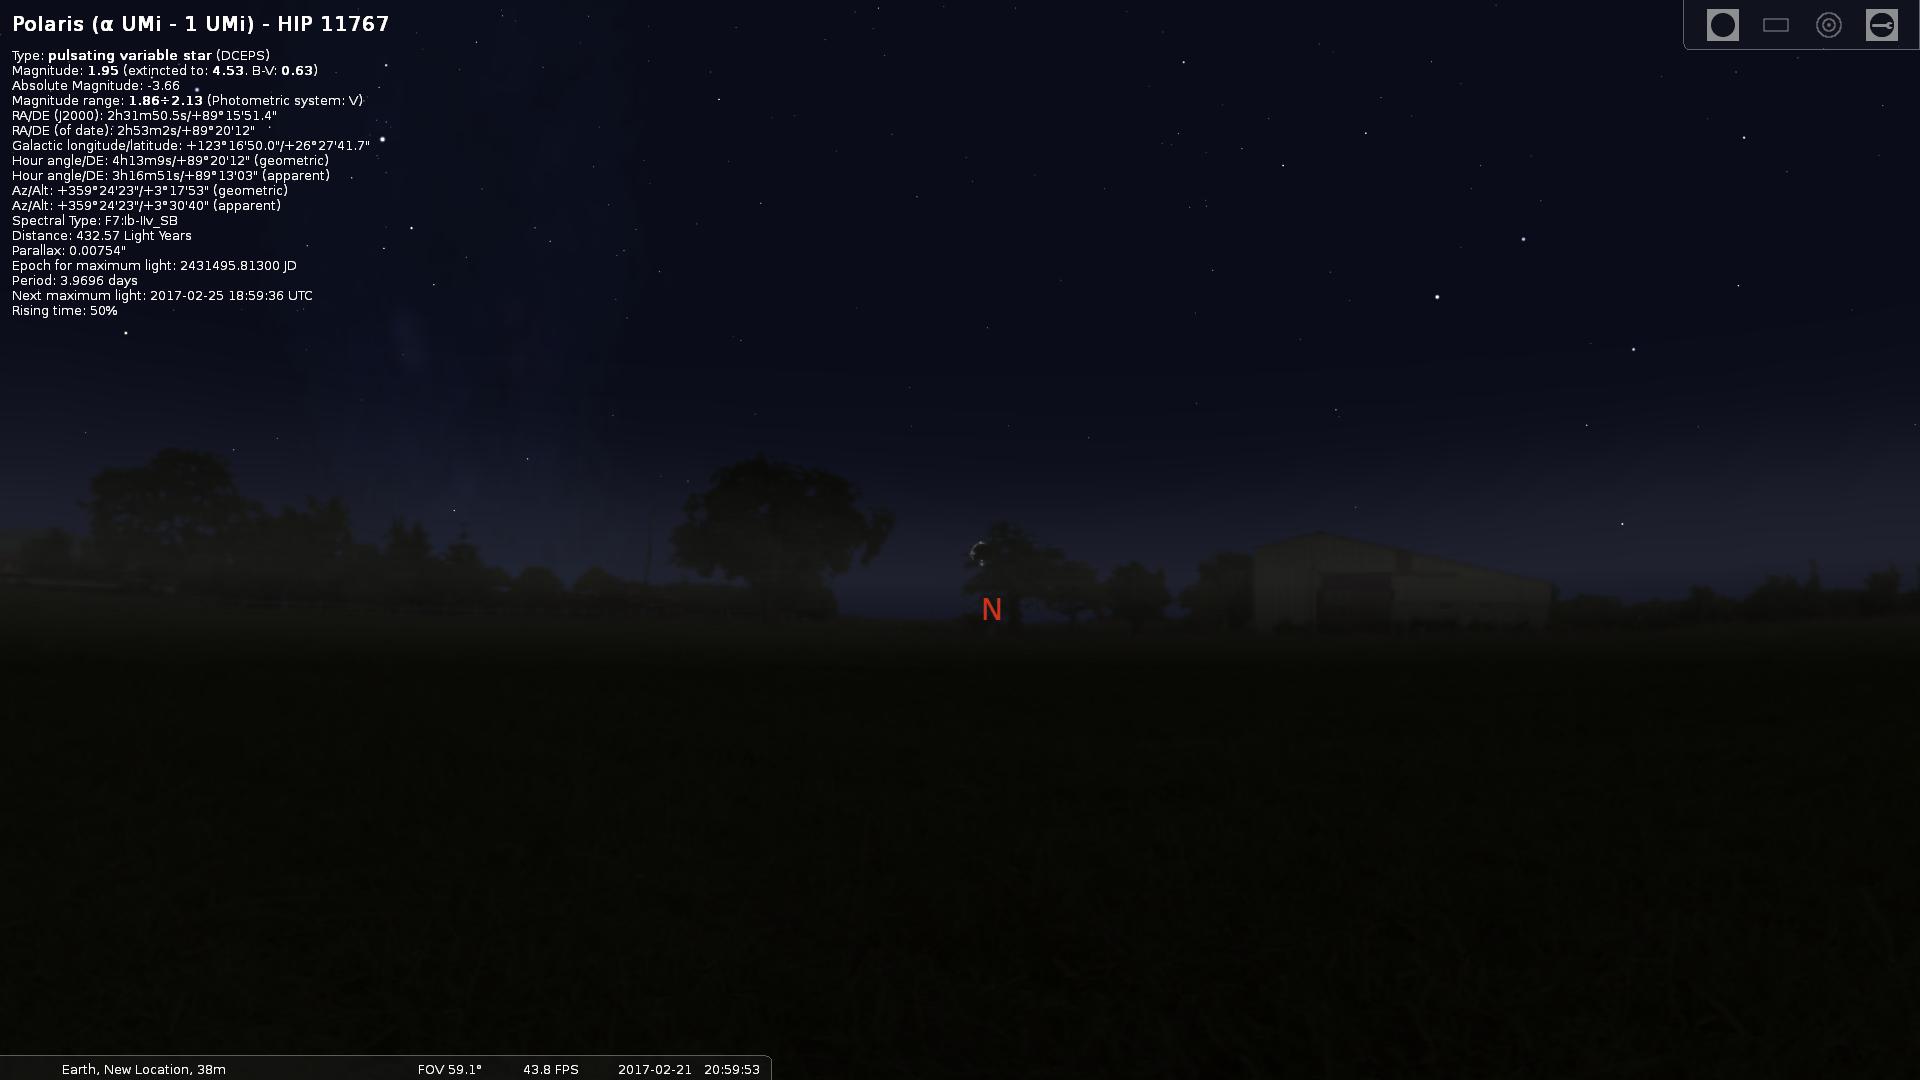
If we go south it will get closer to the northern horizon. Here is Polaris when we're almost on top of the Earth's equator:
Of course moving your mount makes it almost impossible to not disturb the settings you made to align it, so once you have, try not to kick or bump into the mount (I've done that many times stumbling around in the dark).
(cont.)
As I've said in another thread, the amount of time you can expose your frame and not visibly see star trails depends upon the focal length divided into 500. The answer will be how many seconds you can open the shutter for a camera fixed and not moving.
For a 6.5mm focal length, you can expose the frame for up to 77 seconds. For 18mm, you have to shorten it down to 27 seconds. If your focal length is 50mm, you will only have 10 seconds. 500mm telephoto lens? You will only have 1 second before the star trail becomes noticeable in your shot.
Telescopes are even worse because you are starting to get into focal lengths measured in the thousands of millimeters.
Why is that?
Well, it's basically due to your FOV, or Field Of View becoming smaller and smaller as you zoom in. You can see this with an everyday day time images. Go up on a hill about a half mile away from a busy freeway and you can take a picture of the cars zipping along at 60 or 70 Mph. You'll capture lots of them just fine and very clearly. Now, change out that lens for a 500mm or higher one, and zoom in to try and image just one car....but don't move the camera with the car, keep it still. If you left the exposure time alone and the ISO alone, as you snap your image, the car passing through your field of view will be a blurry streak.
If, however, you move your camera to keep the single car in view and snap your picture then, you'll get a much better shot with no blurring.
This is the same thing that we are doing by putting our camera on a tracking mount, either by itself, or piggy backing it on to a telescope.
One of the best tracking mounts you can use is a German Equatorial Mount for this:
This is because it has a Right Ascension axis and a Declination axis:
The RA axis allows you to align the mount with the spin axis of the Earth, so that (when facing north) you have the same right to left movement as the Earth's spin (things rising in the East and setting in the West).
The Declination axis allows you to turn and point your camera or telescope to an object you want.
Every object in the sky will have a set of RA and Dec coordinates. Most of the interesting objects you may wish to look at or image, you will not be able to just point your telescope at it, because it will be too dim for your eyes to see.
Once you have polar aligned your mount, you can dial in any objects RA and Dec coordinates and will be pointed at it.
So how do we do this?
Believe it or not, it's not really that hard. Just takes some practice and you'll be doing it without even thinking about it.
Important Note: You should have all the equipment you want mounted (IE telescope, camera, camera riding piggy back, etc) attached to the mount first before doing any of the following. If you don't and align the mount first, the act of mounting things to it can disturb your polar alignment and you may have to go back and do it all again.
Once you have your mount set up, make sure it's pointed towards North (or South if you live in the southern hemisphere). Most GE mounts have a polar alignment telescope built into them:
Before you can use it, you must make sure that your RA on the mount is set to zero and the same for the declination axis, or else you will not be able to see through the polar alignment telescope.
When you look through the polar alignment scope, you may see this:
Different brands of GE mounts have different reticles than this, but this one is my favorite due to the ease of it's use, which is to simply line up the stars of the constellations with those on the reticle. For the northern hemisphere, you use either the Big Dipper or Cassiopeia. Octans is for those that live south of the equator and are doing a polar alignment to the south.
The mount will have adjustment knobs for moving the whole mount left or right, because let's face it: no one is going to place the mount on the ground facing directly north (or south) by eyeballing it.
There is also a knob or screw to adjust the mount's elevation angle. This is what tips the mount up and down, which moves the RA axis from looking straight out to the horizon (0 degrees) to straight over head (90 degrees). What this gets adjusted to will depend on your latitude of where your mount is set. You'll adjust this last while looking in the scope to get Polaris where it needs to be (or to help place the stars of Octans for those in the southern hemisphere).
The elevation angle changes with your latitude. Once you have set it up, you could move your mount to the east or west (longitude) and you will not have to adjust the elevation angle again (as long as you didn't bump it or move it). This is because the angle at which polar north or south is will not change unless you change your latitude.
For example, here is how far up Polaris looks from the northern horizon where I live:
But, if we travel north and keep changing our latitude, you'll see that Polaris will rise higher in the sky:
Say like in New York:
Or go further north up into Canada:
Get to the North Pole and your mount will have to polar align looking straight up:
If we go south it will get closer to the northern horizon. Here is Polaris when we're almost on top of the Earth's equator:
Of course moving your mount makes it almost impossible to not disturb the settings you made to align it, so once you have, try not to kick or bump into the mount (I've done that many times stumbling around in the dark).
(cont.)
edit on 2/22/2017 by eriktheawful because: (no reason given)
Now that you've polar aligned the mount, you can now use the GE mount to point to anything you want in the sky using the Right Ascention and
Declination coordinate system. Which is good, because most of those beautiful nebula and galaxies you'd like to see or take a picture of can't be seen
by our eyes due to their light being so dim.
The other thing this does for us is to allow for tracking of the stars so that while we image an object, we can keep the camera on it during long exposures. In the old days, you'd have to sit there staring through and slowly turn the RA and Dec knobs while keeping your eye looking through a scope, tracking a star and keeping it centered. Worse: in the old days of film, some objects you'd have to expose frames for up to 45 minutes, or even more doing that!
In todays world we have two nice technologies that help with that: motors and CCD cameras!
The motors control the RA axis now for you. The CCD cameras do two things for us: They take images faster for us of course, so a long term exposure with it would be 5 minutes, not 45 minutes, and: you can set up a telescope using a CCD camera and software to actually track the stars for you!
You do not absolutely need to use a CCD tracking camera for getting really good "deep space" images. But if you plan to take images longer than a few minutes, while zoomed in greatly on M42 let's say, you'll need it because of errors in the stepping motor on the mount, and of course, you're polar alignment will not always be "perfect". The errors will cause trailing for very long exposures.
That's pretty much it. Any of you out there that have additional tips and instructions, or want to post showing your set up, please do.
new topics
-
President BIDEN Vows to Make Americans Pay More Federal Taxes in 2025 - Political Suicide.
2024 Elections: 1 hours ago -
Ode to Artemis
General Chit Chat: 2 hours ago -
Ditching physical money
History: 5 hours ago -
One Flame Throwing Robot Dog for Christmas Please!
Weaponry: 5 hours ago -
Don't take advantage of people just because it seems easy it will backfire
Rant: 6 hours ago -
VirginOfGrand says hello
Introductions: 6 hours ago -
Should Biden Replace Harris With AOC On the 2024 Democrat Ticket?
2024 Elections: 7 hours ago -
University student disciplined after saying veganism is wrong and gender fluidity is stupid
Education and Media: 10 hours ago -
Geddy Lee in Conversation with Alex Lifeson - My Effin’ Life
People: 11 hours ago -
God lived as a Devil Dog.
Short Stories: 11 hours ago
10