It looks like you're using an Ad Blocker.
Please white-list or disable AboveTopSecret.com in your ad-blocking tool.
Thank you.
Some features of ATS will be disabled while you continue to use an ad-blocker.

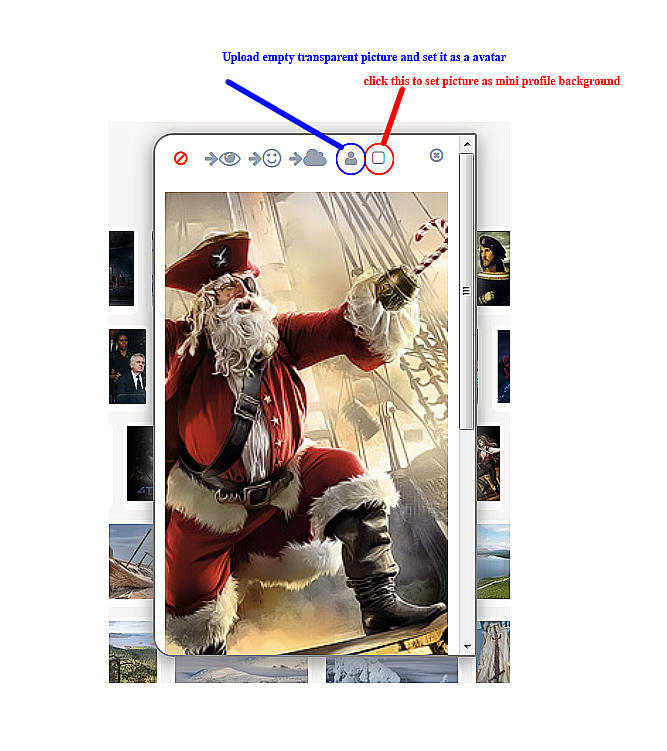
ATS Avatar Tutorial and Resource Thread: Photoshop
page: 1share:
Way back in 2008 a member by the name Im a Marty created a great tutorial on
how to create an ATS Avatar using a Photoshop program. Since then the photo's in his thread have been deleted over time and the forum has gone through
some major changes, and the avatar dimensions have subsequently gone through modification as well.
So, this thread is designed to help people who don't have the knowledge of Photoshop to produce an avatar that is designed of ATS. It will also serve as a place to gather resources, as I'll be providing a few pre-designed concepts for an ATS profile, where all you'll need to do to create your own custom one, with the images you want added is to simply copy that image into the file, and that's all you need to do!
For a tutorial on how to apply your already-made Avatar to your profile, please visit Zarniwoop's official thread titled "How to re-size your mini-profile background image for ATS 5/3"
Lets begin!
_____________________________________
The ATS Avatar Preset is already sized correctly and ready to add to your profile.
The Preset includes:
~ a random background image (just there as an example, you can delete it right away or paste over it)
~ a standard Text Layer with the ATS Font
~ a Customized Text Layer titled "ATS Layer Style 1" that is the recommended text to use on any avatar background. You also have the ability to customize it further or simply erase it and have the ATS Avatar Preset merely there for the proper dimensions for an ATS Avatar.
click here to download the ATS Avatar Preset for Photoshop
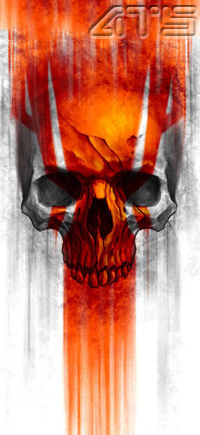
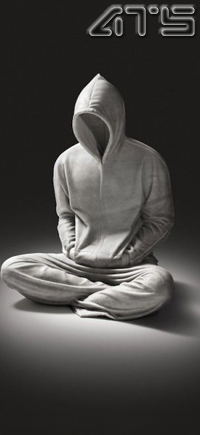
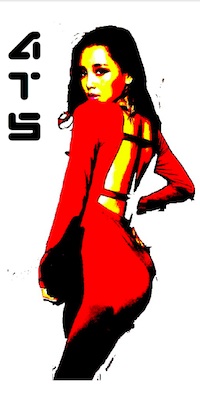
This is what the image size and text will look like if no customization is done to the ATS Layer Style 1 layer
The First Few Steps
If you don't have Photoshop already, it's available from their official website for a FREE 30 day trial Here
You can download the official ATS Logo font from here

The "A" in ATS is lower case. The "T" in ATS is lower case. The "S" in ATS is upper case.
To install a new font in Photoshop on a Windows computer go here
To install a new font in Photoshop on a Mac computer go here
Make sure Photoshop is closed when you add new fonts to the Font Folder. The new Font will not show up until Photoshop is reset (or if it was off to begin with, before adding the Font file to the Font folder)
_____________________________________
What To Do In Photoshop
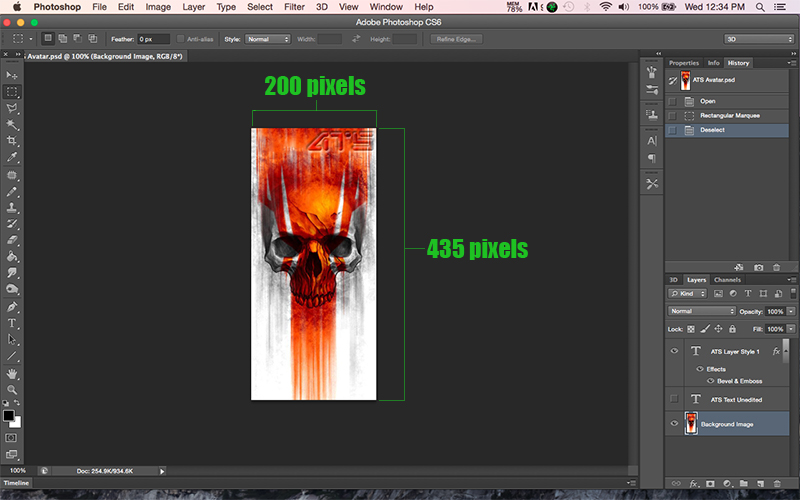
First thing's first. You need to open up the ATS Avatar Preset (which you can download right here). Open that in Photoshop (the dimensions are 200 x 435 pixels):
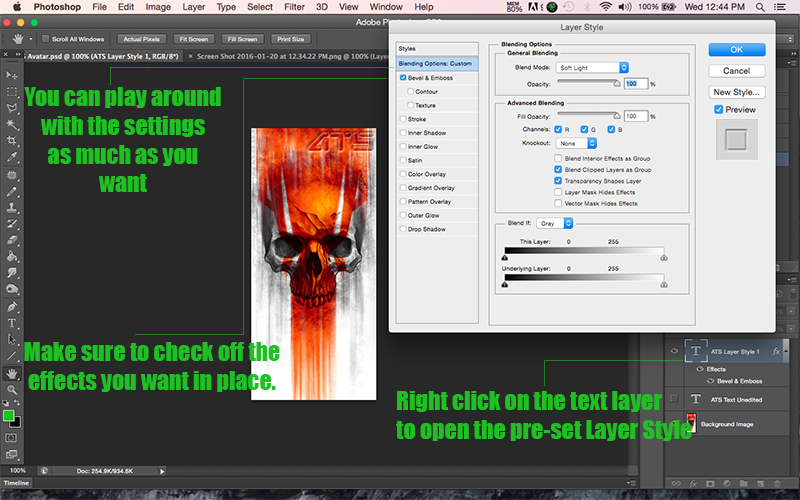
On the right hand side near the bottom corner you'll see all the various layers. There's a normal text layer, just with the ATS letters that you are free to work off of, or you can use my preset "ATS Layer Style" to have a nice clean look on almost any image.
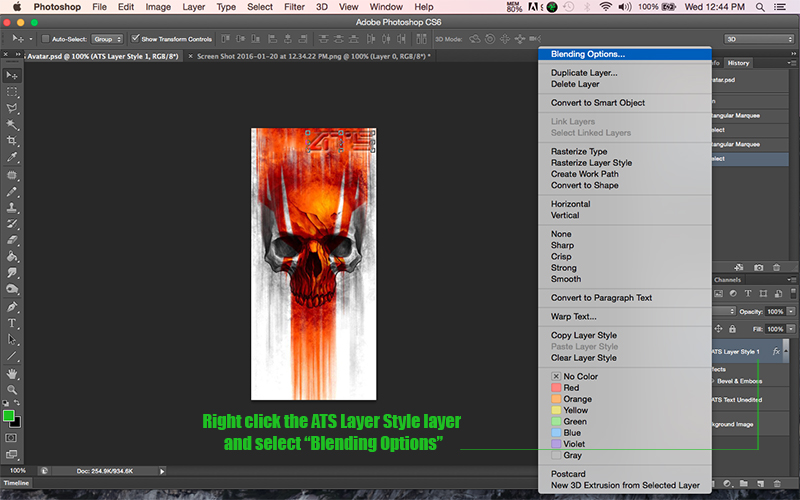
The ATS Layer Style layer is fully customizable, so if you want to tweak the design a bit, you can right click on that layer, go to "Blending Options" and a new window will come up. If not, skip ahead a few steps.
Once in the Layer Style blending options, you can click on any of the factors in the list and mess around with all the variables. Don't worry, they wont save unless you apply them, you can cancel at any time and it will go back to the previous preset that was made for you.
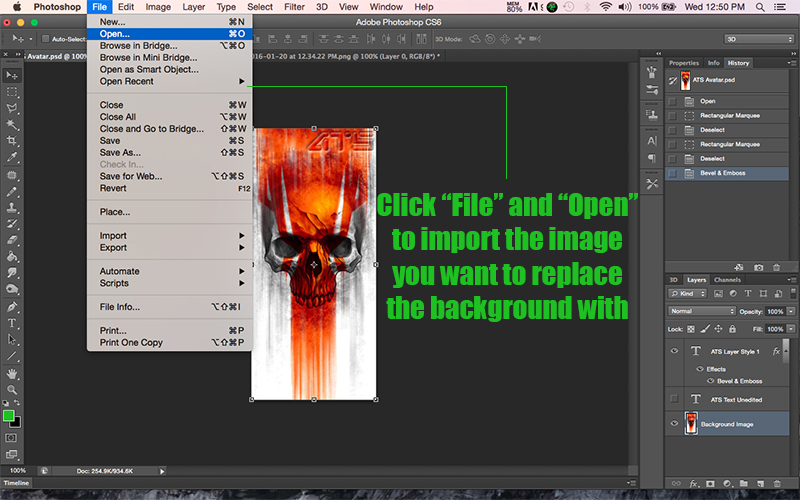
Once you're done with the text and have it how you like it (or decided to keep it the way it is) just import the background you want in your avatar into photoshop. (File > Open)
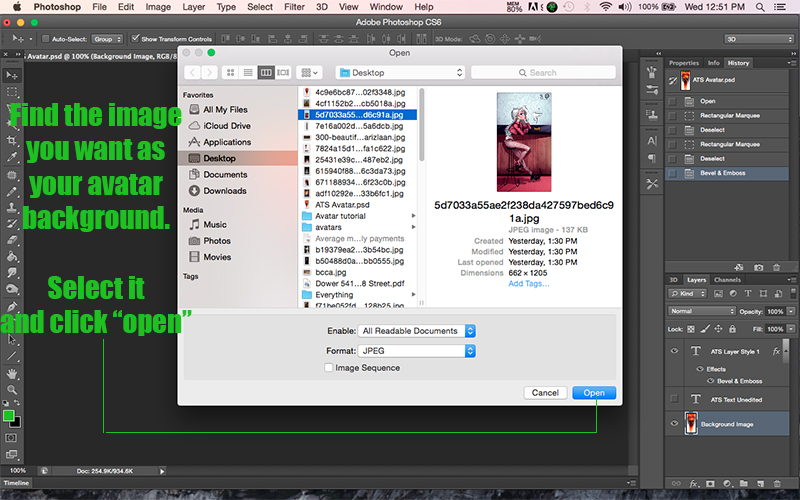
Select the file from wherever you have it on your computer and click "open"
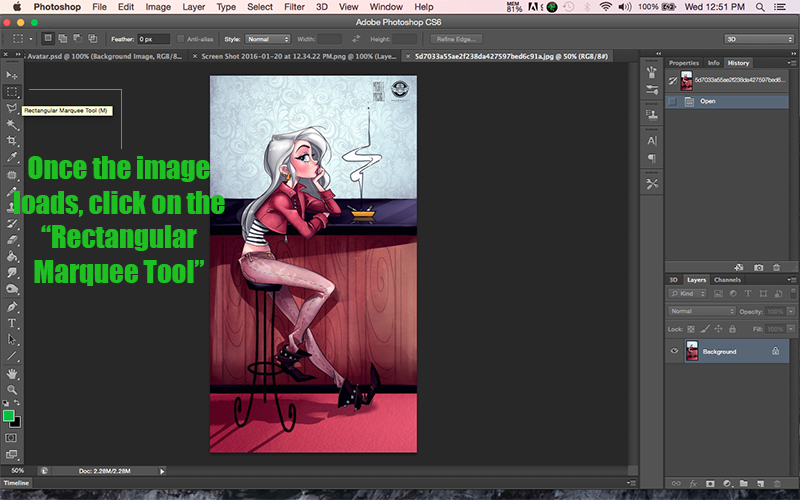
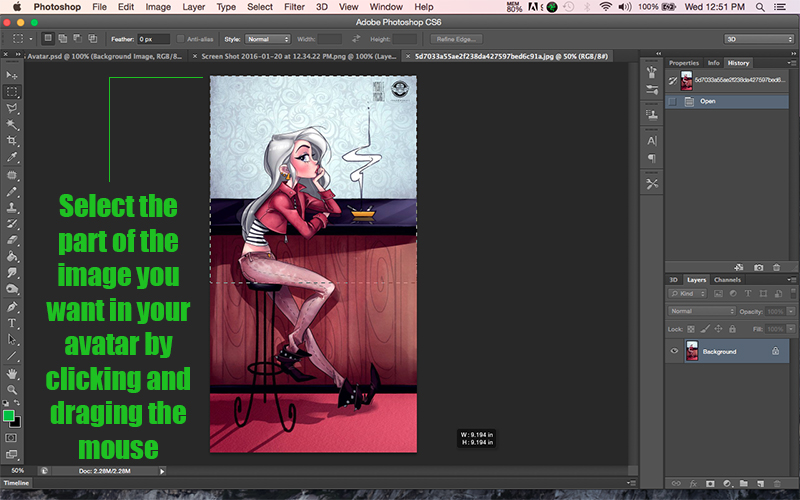
Next you'll want to select the entire image, or whichever part you want in the avatar. Click the Rectangular Marquee Tool to do this
Simply click anywhere on the image, or outside of the image in the gray area, hold, and drag to select how much of the image you want (if you want the full image, click "Select" in the top menu and then click "Select All"
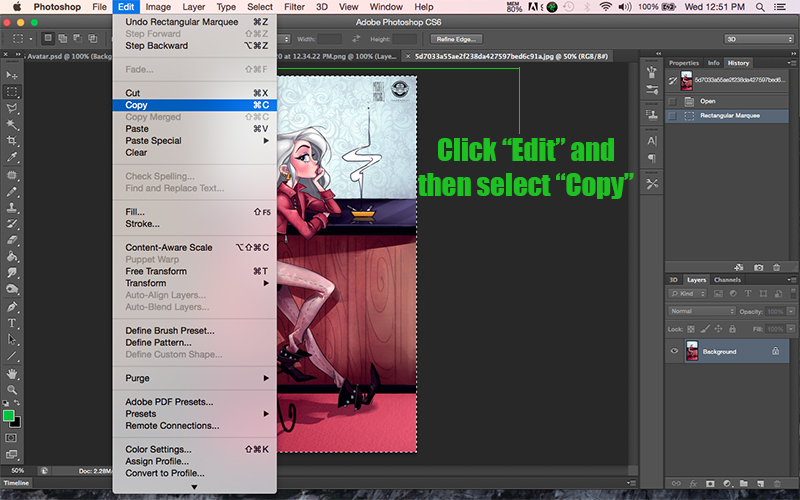
Once selected, click "Edit" and "copy"
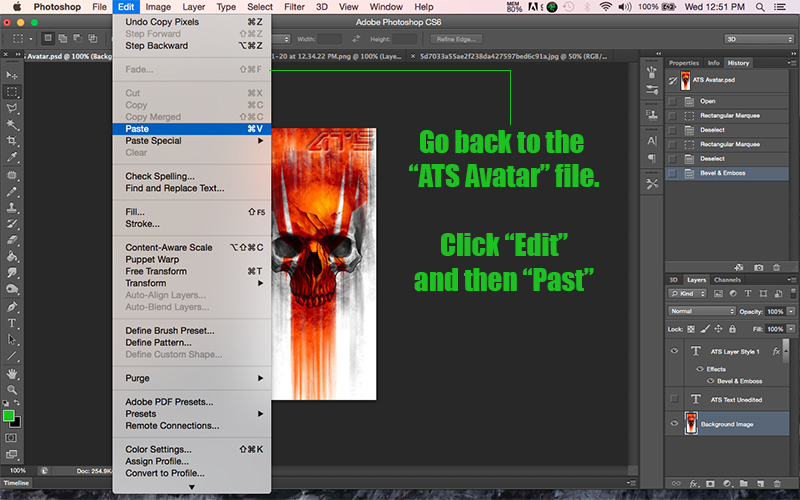
Go back to the ATS Avatar file, click "Edit" and "Paste"
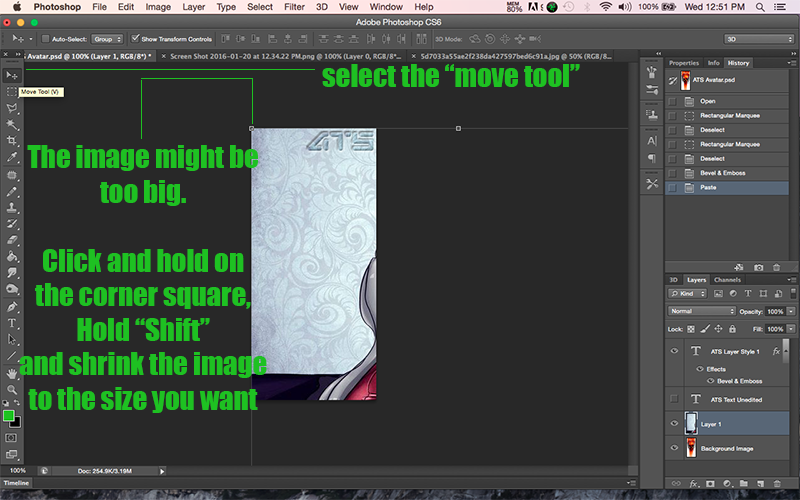
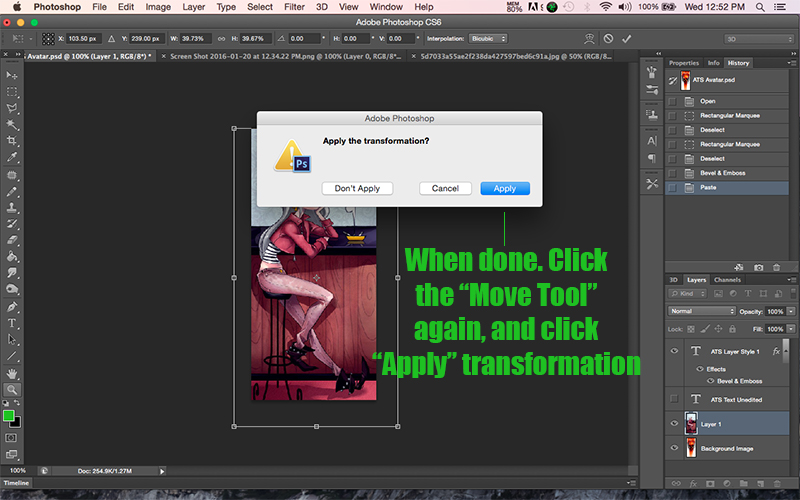
The image may be quite a lot larger than the ATS Avatar dimensions, so you'll want to resize the image by selecting the "move tool" and clicking the little corner box on the image, then hold shift, and drag the image to the appropriate size.
Apply the transformation
Now simply click on "Image" and then "Flatten Image"
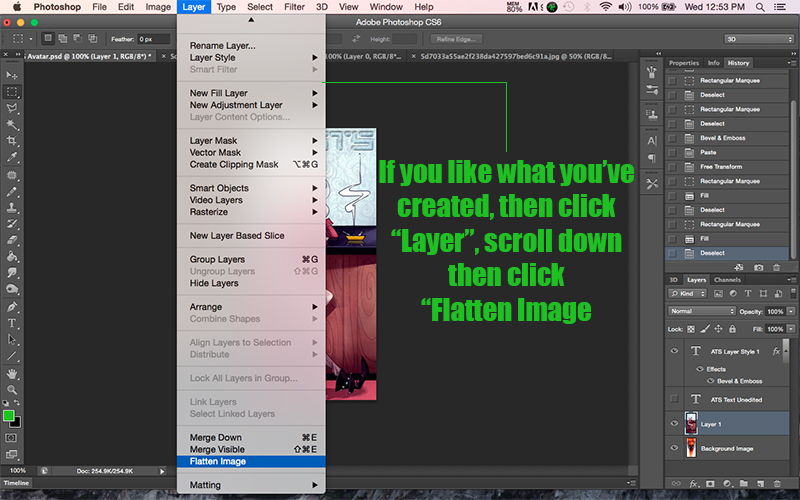
Discard any invisible layers

Then, click "File" and "save as" and select the "JPEG" format in the format drop-down menu.
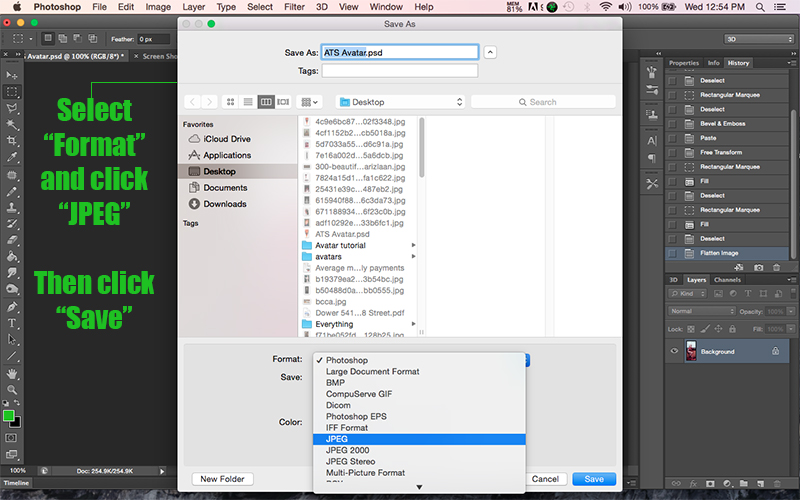
Then you're done!
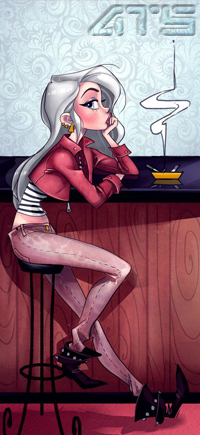
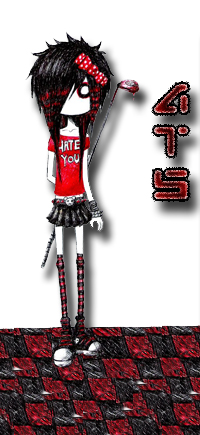
Here's your final product, and all you did was copy, past, and resize the image. It's that easy!
Now just follow the steps in the "How to re-size your mini-profile background image for ATS 5/3" thread and you can apply your new Avatar to your Profile.
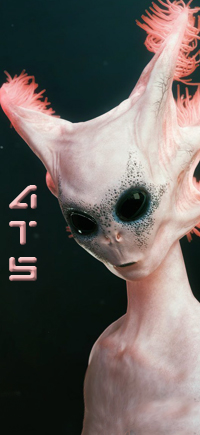
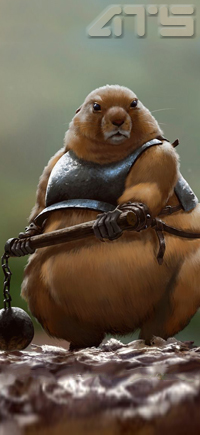
Here's some more examples of what you can do with this preset if you were to play with the "Blending Options" for the ATS Layer Style layer

Please post your new avatar and lets see what you've created
If you have any questions, just ask
So, this thread is designed to help people who don't have the knowledge of Photoshop to produce an avatar that is designed of ATS. It will also serve as a place to gather resources, as I'll be providing a few pre-designed concepts for an ATS profile, where all you'll need to do to create your own custom one, with the images you want added is to simply copy that image into the file, and that's all you need to do!
For a tutorial on how to apply your already-made Avatar to your profile, please visit Zarniwoop's official thread titled "How to re-size your mini-profile background image for ATS 5/3"
Lets begin!
_____________________________________
The ATS Avatar Preset is already sized correctly and ready to add to your profile.
The Preset includes:
~ a random background image (just there as an example, you can delete it right away or paste over it)
~ a standard Text Layer with the ATS Font
~ a Customized Text Layer titled "ATS Layer Style 1" that is the recommended text to use on any avatar background. You also have the ability to customize it further or simply erase it and have the ATS Avatar Preset merely there for the proper dimensions for an ATS Avatar.
click here to download the ATS Avatar Preset for Photoshop
This is what the image size and text will look like if no customization is done to the ATS Layer Style 1 layer
The First Few Steps
If you don't have Photoshop already, it's available from their official website for a FREE 30 day trial Here
You can download the official ATS Logo font from here
The "A" in ATS is lower case. The "T" in ATS is lower case. The "S" in ATS is upper case.
To install a new font in Photoshop on a Windows computer go here
To install a new font in Photoshop on a Mac computer go here
Make sure Photoshop is closed when you add new fonts to the Font Folder. The new Font will not show up until Photoshop is reset (or if it was off to begin with, before adding the Font file to the Font folder)
_____________________________________
What To Do In Photoshop
First thing's first. You need to open up the ATS Avatar Preset (which you can download right here). Open that in Photoshop (the dimensions are 200 x 435 pixels):
On the right hand side near the bottom corner you'll see all the various layers. There's a normal text layer, just with the ATS letters that you are free to work off of, or you can use my preset "ATS Layer Style" to have a nice clean look on almost any image.
The ATS Layer Style layer is fully customizable, so if you want to tweak the design a bit, you can right click on that layer, go to "Blending Options" and a new window will come up. If not, skip ahead a few steps.
Once in the Layer Style blending options, you can click on any of the factors in the list and mess around with all the variables. Don't worry, they wont save unless you apply them, you can cancel at any time and it will go back to the previous preset that was made for you.
Once you're done with the text and have it how you like it (or decided to keep it the way it is) just import the background you want in your avatar into photoshop. (File > Open)
Select the file from wherever you have it on your computer and click "open"
Next you'll want to select the entire image, or whichever part you want in the avatar. Click the Rectangular Marquee Tool to do this
Simply click anywhere on the image, or outside of the image in the gray area, hold, and drag to select how much of the image you want (if you want the full image, click "Select" in the top menu and then click "Select All"
Once selected, click "Edit" and "copy"
Go back to the ATS Avatar file, click "Edit" and "Paste"
The image may be quite a lot larger than the ATS Avatar dimensions, so you'll want to resize the image by selecting the "move tool" and clicking the little corner box on the image, then hold shift, and drag the image to the appropriate size.
Apply the transformation
Now simply click on "Image" and then "Flatten Image"
Discard any invisible layers
Then, click "File" and "save as" and select the "JPEG" format in the format drop-down menu.
Then you're done!
Here's your final product, and all you did was copy, past, and resize the image. It's that easy!
Now just follow the steps in the "How to re-size your mini-profile background image for ATS 5/3" thread and you can apply your new Avatar to your Profile.
Here's some more examples of what you can do with this preset if you were to play with the "Blending Options" for the ATS Layer Style layer
Please post your new avatar and lets see what you've created
If you have any questions, just ask
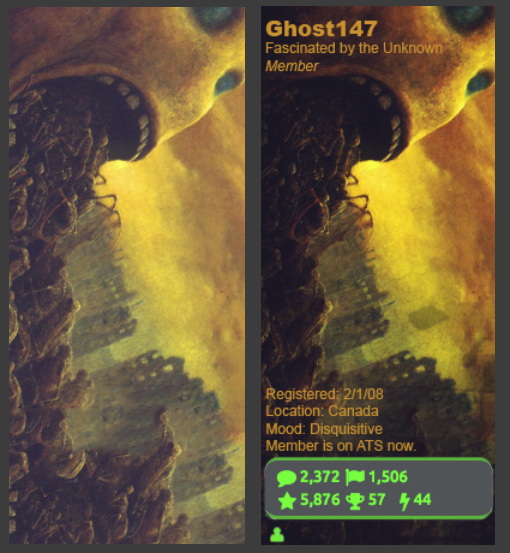
edit on 20/1/16 by Ghost147 because: added photo
Could you make one for Booji boy? Using the photo I already have. I've read that thread and could not figure it out.
ETA: Heres the full pic.

ETA: Heres the full pic.
edit on 1 20 2016 by Booji because: (no reason given)
originally posted by: Booji
Could you make one for Booji boy? Using the photo I already have. I've read that thread and could not figure it out.
ETA: Heres the full pic.
This thread is a resource thread, not a request thread. However, if you post it on the request thread here, I can see what I can do
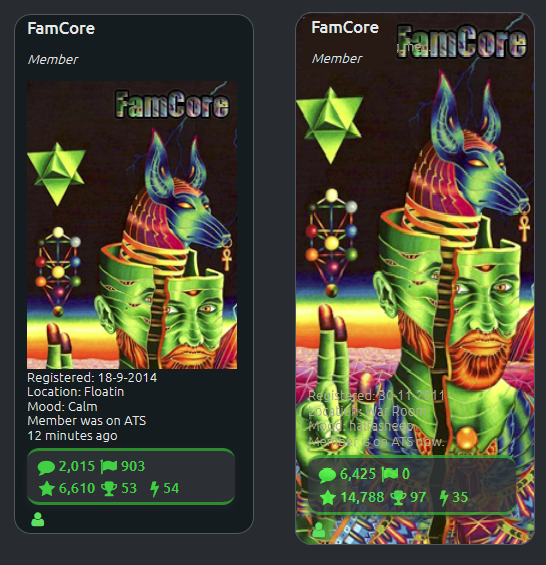
originally posted by: FamCore
a reply to: Ghost147
I see Booji Boy is already rocking his new graphics, thanks to Ghost - thanks for making this thread and thanks for creating mine as well. "Giving back to the community"
You're very welcome. I noticed the avatar isn't the full background though. It was designed to be. Did you prefer it smaller? or are you having troubles applying it?
Thanks very much Ghost for this much needed tutorial.
The images and PSD are VERY much appreciated.
One thing I was curious about is how you brightened up that washed out image in your other thread:
I am such a noob when it comes to Photoshop and would love to know how that is done...
EDIT: I just looked at Google and there are tons of tutorials on this already to play around with.
One example:
I am still curious how you did it though...
edit on 20-1-2016 by Murgatroid because: felt like it...
a reply to: FamCore
Nice avatar FC...
For the sake of anyone else wanting to do the same thing...
The left image is what FC has now, the right hand image is what he wants.
Both pics are using the same exact image, it's how they are setup in the profile that makes all the difference...
All you need to do is follow the instructions below:
See dollukka's fine post here for more on this...
Nice avatar FC...
For the sake of anyone else wanting to do the same thing...
The left image is what FC has now, the right hand image is what he wants.
Both pics are using the same exact image, it's how they are setup in the profile that makes all the difference...
All you need to do is follow the instructions below:
originally posted by: SgtHamsandwich
Dude, set the image as your back ground image and then put the below code in for your avatar image:
ttp://files.abovetopsecret.com/files/img/ev522a6803.gif (add an h in front of the ttp in the beginning)
See dollukka's fine post here for more on this...
edit on 20-1-2016 by Murgatroid because: felt like it...
originally posted by: Murgatroid
Thanks very much Ghost for this much needed tutorial.
The images and PSD are VERY much appreciated.
One thing I was curious about is how you brightened up that washed out image in your other thread:
I am such a noob when it comes to Photoshop and would love to know how that is done...
I am still curious how you did it though...
It's beyond simple. You can go into great precision using Image > Adjustments > Levels
But I prefer the much simpler Image > Adjustments > Brightness/Contrast
Just play with the sliders until you get something you like. I almost always use Brightness/Contrast on all images I tweak. It makes it stand out a lot more I find and takes literally 2 seconds
edit on 20/1/16 by Ghost147 because: (no reason given)
Awesome.
Thanks for this. I just may create an avatar after a decade.
Thanks for this. I just may create an avatar after a decade.
Doing a tutorial for GIMP would be a good idea, as it's free/opensource.
originally posted by: Eilasvaleleyn
Doing a tutorial for GIMP would be a good idea, as it's free/opensource.
I can look into doing that for you guys
a reply to: Ghost147
Hey, you're freaking awesome!
I got a little (fairly, pretty, VERY) drunk and bought Photoshop, I've used it less than Gimp.
Thanks for doing the one tutorial, and even more thanks for stepping up to do another!
I can look into doing that for you guys
Hey, you're freaking awesome!
I got a little (fairly, pretty, VERY) drunk and bought Photoshop, I've used it less than Gimp.
Thanks for doing the one tutorial, and even more thanks for stepping up to do another!
a reply to: Ghost147
Thanks. I'd do myself but it's been years since I used GIMP, and I'm lazeh anyway.
If anyone ever wants a tutorial on creating stuff from scratch and a render, I'll step up to the plate. I primarily work with anime characters, though.
What does flattening the image do, by the way? I have literally never, ever used that command. Not that way, at least.
edit on 21/1/2016 by
Eilasvaleleyn because: Reasons
originally posted by: Eilasvaleleyn
What does flattening the image do, by the way? I have literally never, ever used that command. Not that way, at least.
If you open up the ATS Avatar Preset file you'll notice it has a number of layers to it (the background image, and the two text layers), flattening the image converges all of the layers into one layer without altering the layers that may have a layer style to them.
You can also achieve the same event by 'merging layers', however, depending on the effect done to a particular layer, it can visually change that effect when you use the Merge function.
Without flattening the image, there would be another few pop ups while saving the file as a JPEG file, because of the various layers (some that aren't visible either)
To prevent any confusion, I just shows that nifty trick as an additive
a reply to: Ghost147
Ah, I always save as PNG. Almost never merge layers, since I need my things to be flexible. Higher quality. Biggest issue is filesize, which is honestly a non-issue unless you've got crazy strict limitations.
Actually, I just realised that my current image is 163KB, when I believe it's meant to be 150KB or less? Is that an issue, or does ATS auto-correct?
(I mean, I had an avatar that was 12 times larger than what it was supposed to be dimension-wise at one point, but it got auto-scaled.)
If not, and I need to change it, I should be able to reduce the size by 13 KB fairly easily.
edit on 21/1/2016 by Eilasvaleleyn because:
Reasons
new topics
-
Former Labour minister Frank Field dies aged 81
People: 1 hours ago -
SETI chief says US has no evidence for alien technology. 'And we never have'
Aliens and UFOs: 3 hours ago -
This is our Story
General Entertainment: 5 hours ago -
President BIDEN Vows to Make Americans Pay More Federal Taxes in 2025 - Political Suicide.
2024 Elections: 8 hours ago -
Ode to Artemis
General Chit Chat: 8 hours ago
top topics
-
University student disciplined after saying veganism is wrong and gender fluidity is stupid
Education and Media: 16 hours ago, 14 flags -
President BIDEN Vows to Make Americans Pay More Federal Taxes in 2025 - Political Suicide.
2024 Elections: 8 hours ago, 12 flags -
Should Biden Replace Harris With AOC On the 2024 Democrat Ticket?
2024 Elections: 14 hours ago, 6 flags -
One Flame Throwing Robot Dog for Christmas Please!
Weaponry: 12 hours ago, 6 flags -
Ditching physical money
History: 12 hours ago, 4 flags -
SETI chief says US has no evidence for alien technology. 'And we never have'
Aliens and UFOs: 3 hours ago, 4 flags -
Don't take advantage of people just because it seems easy it will backfire
Rant: 12 hours ago, 4 flags -
Ode to Artemis
General Chit Chat: 8 hours ago, 3 flags -
Former Labour minister Frank Field dies aged 81
People: 1 hours ago, 3 flags -
This is our Story
General Entertainment: 5 hours ago, 2 flags
active topics
-
So this is what Hamas considers 'freedom fighting' ...
War On Terrorism • 234 • : FlyersFan -
President BIDEN Vows to Make Americans Pay More Federal Taxes in 2025 - Political Suicide.
2024 Elections • 12 • : Xtrozero -
Breaking Baltimore, ship brings down bridge, mass casualties
Other Current Events • 473 • : bally001 -
whistleblower Captain Bill Uhouse on the Kingman UFO recovery
Aliens and UFOs • 19 • : pianopraze -
University student disciplined after saying veganism is wrong and gender fluidity is stupid
Education and Media • 39 • : BedevereTheWise -
Should Biden Replace Harris With AOC On the 2024 Democrat Ticket?
2024 Elections • 46 • : DAVID64 -
Thousands Of Young Ukrainian Men Trying To Flee The Country To Avoid Conscription And The War
Other Current Events • 126 • : Xtrozero -
One Flame Throwing Robot Dog for Christmas Please!
Weaponry • 9 • : crayzeed -
SETI chief says US has no evidence for alien technology. 'And we never have'
Aliens and UFOs • 18 • : Consvoli -
The Reality of the Laser
Military Projects • 34 • : Zaphod58